background image

12

13

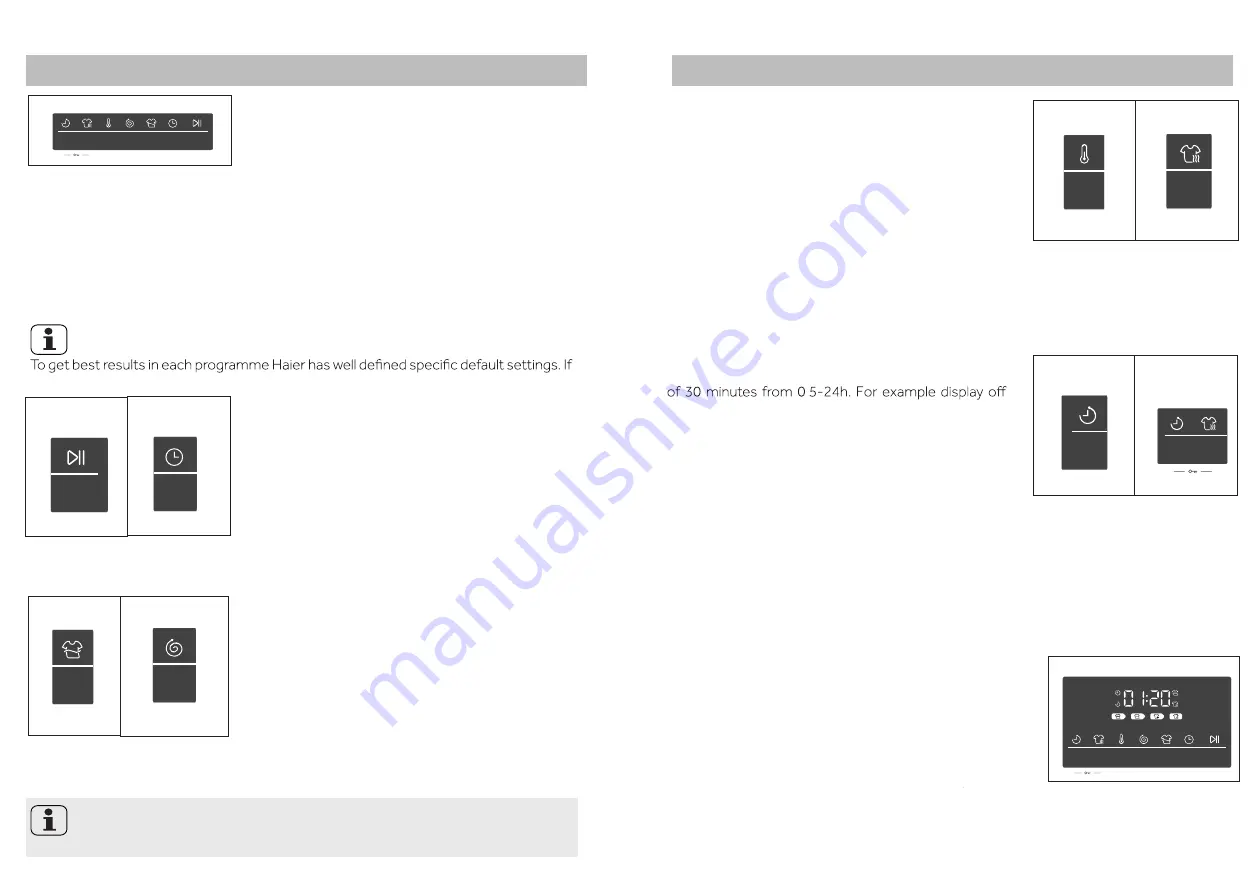
Control panel-function buttons

Display  symbols

Control panel-


Note: Liquid detergent

If using liquid detergent, it is not recommended to activate the end time delay.

1.4.2 Function “Time/Air Dry”


1-3

1-5

1.4 Function buttons

The function buttons (Fig. 1-2) enable  additional op-

tions  in  the  selected  programme  before  programme 

start. The related indicators are displayed.

If a button has multiple options, the desired option can 

be selected by touching the button sequentially. 
To delete the setting or to cancel the setting process, 

press the function button,  

Not all functions are available for all programmes. 

1-2


Note: Factory settings

there is no special requirement default settings are recommended. 

Touch this button  (Fig. 1-4)  in  order to activate /de-

activate  the  “Time/Air Dry”


function. 

By touching


button  sequentially,


drying time can be seen

In combination with programme 


function


sets the drying time. 

1-4

Time/Air

Dry

Dry

Spin

Speed

Extra

Rinse

Delay

Start/Pause

Wash

Temp

On / Off

1-6

Start/Pause

Time/Air

Dry

Extra

Rinse

Spin

Speed

1.4.1“Start/Pause“ button

Touch  this  button  (Fig.  1-3)  gently  to  start  or  inter-

rupt  the  currently  displayed  programme. 


 the displayed washing time is blinking. 


During a pause also the time display is blinking. 

1.4.3 Function button“Extra rinse“

Touch this button (Fig. 1-5)  to rinse the laundry more 

intense  with  fresh  water.  This  is  recommended  for 

people with sensitive skin.

By touching the button several times one to three ad-

ditional cycles can be selected. They appear in the dis-

play with P--0/ P--1 /P--2 /P--3 . 

1.4.4 Function “Spin Speed” 

Touch  this button (Fig. 1-6)  to change or deselect the 

Spin  Speed of  the  programme.


If 0 is chosen ,then


the 

laundry will not spin. 

1.4.8 Function “child lock”

This  option  blocks  all  panel  elements  against  activa-

tion. After programme start press button “Delay”


 and 

”Dry On/Off”


 (Fig. 1-10) for 3 seconds simultaneous-

ly; 


“cLok”    

is


displayed.  

For  

unlocking  press  again the 

two buttons. 

1.4.6 Function “Dry On/Off” 


Dry

On / Off

Delay

1-7

1-8

Wash

Temp

1-9

1-10

Dry

Delay

On / Off

1.4.5 Function “Wash Temp”

Touch  this  button  (Fig.  1-7)   to  change  the  washing 

temperature of the programme.

In conjunction with the “Delay”button,the child lock 

function can be switched on/off (see child lock).

Delay

1.4.7 Function “Delay” 

Touch  this  button  (Fig.  1-9)   to  start  the  programme 

with a delay. End time delay could be increased in steps 

6

:

30


 Touch “Start/Pause” button


to activate the time delay.

The time delay must be longer than the programme run 

time. Otherwise the programme will start immediately. 
For deactivating the time delay; rotate programme se-

lector.

In conjunction with the “Dry On/Off”button,the child lock 
function can be switched on/off (see child lock).

Knob is in the "Dry+Wash" area, Perform default settings;

Touch "Dry On/Off " button (Fig. 1-8),dry function will be 

switched 

off and only perform wash function.

1.5 Display

If  the  appliance  is  on  display  will   light   up  the  actual 

washing  time,  spin  speed,  tempe rature, etc will  appear 

(Fig. 1-11).

Time/Air

Dry

Dry

Spin

Speed

Extra

Rinse

Delay

Start/Pause

Wash

Temp

On / Off

Wash

Dry

1-11

“Time/Air Dry”, this 


the LED switches off.

means the cycle will finish in 6 hours and 30 minutes

During ope-

ration, 

.

By switching off the appliance, all options are disabled.

status on different sections. The information include

Summary of Contents for HWD8040BW1

Page 1: ...HWD8040BW1 User Manual Washer Dryer Time Air Dry Dry Spin Speed Extra Rinse Delay Start Pause Wash Temp 8kg 4kg Wash Dry Dry Wash On Off Wash Dry ...

Page 2: ...s No General information and tips Warning Important safety information Environmental information The presence of this symbol on the product accessories or materials that goes with this information indicates that at the end of its useful life the product or its electronic accessories e g cable inlet hose assembly should not be disposed with other household waste To prevent possible damage to the en...

Page 3: ... and drying of textiles where this is indicated on the care label The door will be locked from the start of the cycle until the cycle is completed for safety reasons It is possible to open the door during the cycle under certain conditions Never force the door to open Keep children away from the washer dryer while it is in operation Supervise children to ensure that they do not play with the washe...

Page 4: ...on in the oil This oxidation creates heat If the heat cannot escape the items can become hot enough to catch fire Piling stacking or storin Fabrics that contain vegetable oil cooking oil or have been contaminated by hair care products should not be washed or dried If unavoidable these fabrics should be washed in a hot water wash with extra detergent this will reduce but not eliminate the fire haza...

Page 5: ...bmerged in water and should be securely fixed and leak free If the drain hose is placed on the ground or if the pipe is at a height of less than 80 cm the washing machine will continuously drain while being filled self siphoning Warning Note Packaging disposal Keep all packaging material out of children s reach and dispose them in an environmentally friendly manner Use the drain hose bracket to ke...

Page 6: ...ay c Wash Temp d Spin Speed e Extra Rinse f Time Air Dry g Start Pause Time Air Dry Dry Spin Speed Extra Rinse Delay Start Pause Wash Temp 8kg 4kg Wash Dry Dry Wash On Off Wash Dry Time Air Dry Dry Spin Speed Extra Rinse Delay Start Pause Wash Temp 8kg 4kg Wash Dry Dry Wash On Off Wash Dry 1 1 Detergent drawer Open the drawer three compartments can be seen 1 Compartment Liquid detergent for progra...

Page 7: ... P 3 1 4 4 Function Spin Speed Touch this button Fig 1 6 to change or deselect the Spin Speed of the programme If 0 is chosen then the laundry will not spin 1 4 8 Function child lock This option blocks all panel elements against activa tion After programme start press button Delay and Dry On Off Fig 1 10 for 3 seconds simultaneous ly cLok is displayed For unlocking press again the two buttons 1 4 6...

Page 8: ...cal fibre fabrics Cotton fabrics Duvet Cotton Cotton Sports Wear 1400 1400 1400 800 1400 1400 1400 1400 1400 600 1400 600 1400 1 8 8 Programme Wash Temp Duration time h min 1 6 7 8 9 11 4 8 2 2 4 1 8 8 2 2 8 8 Extra Rinse Times 0 3 0 1 0 3 0 1 0 3 0 1 0 3 0 2 0 2 0 3 0 3 2 3 4 5 10 12 13 14 15 16 30 40 30 60 30 30 30 30 90 0 Cotton Eco Express 15 Allergy Mix Air Dry Time Dry Auto Sense Duvet Delic...

Page 9: ... To get the best washing results select the program that is most suitable to the laundry type loaded Select program by turning the program selector dial Select a programme Selecting detergent Washing and performance will vary de pending on detergent quality Use only machine wash approved detergent and if needed specific deter gents e g for synthetic and woolen fabric Preparing laundry Separate whi...

Page 10: ...ing Interrupt cancel wash programme To interrupt a running programme touch gently Start Pause button Touch it again to resume operation To cancel a running programme and all its individual settings touch Start Pause and then hold the for about 3 seconds General information and tips Choose programme settings carefully refering to icons on each laundry label and Care chart Removing laundry promptly ...

Page 11: ...re next usage check carefully power cord water inlet and drain hose Make sure everything is properly installed and no leakage Pump filter Clean the filter once a month and check the pump filter immediately if the appliance doesn t drain the water General information and tips Pump filter sealing has to be clean and undamaged If lid is Warning Scalding Risk Water in the pump filter can be very hot B...

Page 12: ...upply by solid substance like lime clean regularly the inlet valve filter Laundry weight detection in process please wait until program cycle time is displayed Drainage error water not emptied Check drain hose for blockage and ensure it is installed properly Clean pump filter Choose the best detergent Programme Kind of detergent Universal Colour Delicate Special Softener L P L P L P L P L P L P L ...

Page 13: ...lid position 3 Machine load is not balanced 1 Remove all transportation bolts 2 Ensure solid ground and a levelled position 3 Check load weight and balance Operation stops for a period of time 1 Appliance displays error code 2 Problem due to load pattern 1 Consider display codes 2 Reduce or adjust load 3 Cancel programme and restart Operation stops before completi ng wash cycle Water or electric f...

Page 14: ...x working current A Water pressure MPa Nominal load kg Wash Max spinning speed rpm Washing programmes Max power W Wash Dimensions HxDxW mm Net weight kg 220 240V 50Hz 10 0 03 P 1 8 1400 16 1850 850 550 595 76 26 Technical data Nominal load kg Dry 4 Max power W Dry 1900 ...

Reviews: