Haier HGRA202QABS User Manual Download Page 18

18

ALIGNMENTS AND ADJUSTMENT, Continued

Oven Pilot

The oven pilot is located along the left hand side of the oven burner. It is fastened under
the flame safety probe.   The flame of the oven pilot ignites main burner gas when the
oven is turned on.  If the pilot flame is not present, the flame safety device will not allow
pilot gas or main burner gas to flow.

Pilot flame size is set by the adjustment screw located along the side of the thermostat.
The outer tip of the flame should just barely reach the underside of the end of the flame
safety probe.  The pilot screw must be adjusted if the range is converted to LP gas.

Light the oven pilot as follows:

Fully press in and hold the oven control knob to allow pilot gas to flow to the pilot
burner.  It will take 30 to 60 seconds to bleed all the air out of the pilot supply line.

While pressing in the oven control knob, place a lit match or lighter under the pilot
burner to light it.

Once the pilot burner is lit, continue to hold in the oven control knob for at least 10
seconds.

If the pilot flame extinguishes when the oven control knob is released, repeat the
above procedure.

Adjust the size of the oven pilot flame if needed.

ALWAYS LIGHT THE OVEN PILOT WITH ALL CONTROL KNOBS IN THE “OFF”
POSITION.

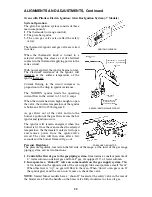
Ovens with Electric Glow Bar Ignition:

Ranges equipped with electric ignition have an electric glow bar oven ignition system.
This type of oven cannot adjust gas flow to hold a constant temperature.  It operates with
a typical “on-off” cycling temperature.  Refer to the page 19 for more information.

Ovens with glow bar ignition have a “shut-off” located at the safety valve in the rear of
the broiler area.  Turn the handle on the brass valve fully clockwise to close off gas.

NOTE:   In the event of a power failure, a glow bar ignition oven cannot be operated
without electricity supplied to the range.

Oven Ignition

On ovens with pilot ignition, lightly press in the oven control knob and turn it
counterclockwise to the desired temperature setting.  

If you press the knob in too far to

the pilot lighting position, the knob will not turn.

Gently let up on the knob, and the

thermostat shaft will release its safety key to let you rotate the control.

On ovens with glow bar ignition, press in the oven control knob and turn it
counterclockwise to the desired temperature setting.

ALIGNMENTS AND ADJUSTMENT, Continued

Hot Oven Restart

If you turn off the oven but then decide to turn it back on before it has cooled to room
temperature, the burner may not light properly.  This is due to the thermostat still sensing
a heated oven and not allowing the maximum gas flow rate into the burner.  Press in and
turn the oven control knob counter clockwise all the way to the “BROIL” position to
relight the burner.  After the burner has ignited, you may adjust the oven control to the
desired temperature.

If the oven burner does not ignite and maintain the flame, one of the following situations
may have occurred.
1.

The pilot burner has gone out.

  Relight the oven pilot.

2.

The pilot will not keep the flame safety probe heated.

Adjust the size of the pilot

flame.  Or, the thermocouple connection at the thermostat may need to be tightened.

3.

The flame safety probe may not be properly located.

Locate the probe directly

over the pilot burner.   On spark ignition ovens, the end of the flame safety probe
must very close to the side of the burner right in front of the flame ports.

4.

The burner is not in its proper position.

Make sure the rear of the burner is seated

on the injector elbow and the front is bolted onto the burner support.

5.

The spark ignitor is defective.

  Contact an authorized service technician.

6.

The glow bar ignitor is defective.

  Contact an authorized service technician.

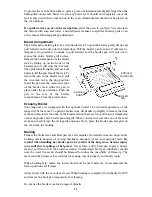
6. Oven Burner Air Shutter Adjustment

The oven burner flame should be a clean, blue flame with distinct inner cones
approximately _” long.  A soft, lazy flame with indistinct cones means too much gas or
not enough air.  A noisy lifting flame means too much air.  If adjustments are necessary
you must first loosen the lock screw located at the top of the air shutter, then rotate the air
shutter to correct setting, and retighten screw.

Oven burner flame can be checked as follows (without burner baffle in place):

To correct a yellow flame-Increase size of air shutter opening.

To correct a lifting, but distinct, blue flame-Decrease size of air shutter opening.

The air shutter should be set approximately 2/3 open for natural gas, and approximately
full open on LP (Propane) gas.
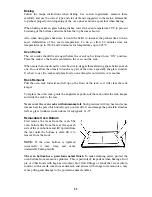
Pilot Burner

Flame Safety Probe

Pilot Flame

Summary of Contents for HGRA202QABS

Page 1: ...Quality Innovation Style Gas Range U User Manual ...

Page 2: ...e installation adjustment and use of your range HOW TO OBTAIN SERVICE AND OR PARTS When your range does not operate in accordance with the instructions in the manual you should contact the dealer in the immediate vicinity for service Or the purchaser may contact the service organization noted on the warranty IMPORTANT TO THE OWNER OF THE RANGE Retain this owner s manual for future reference TO THE...

Page 3: ...Ideas 8 Installation Instructions 9 10 Backguard Installation 11 Wall Clearances 12 Alignments and Adjustments 13 20 Operation of Range 21 23 Broiling 23 Optional Equipment 24 25 Cleaning the Range 26 27 Lift Off Doors 28 Trouble Shooting Guide 29 Wiring Diagrams 30 31 Note For warranty and service information please see back cover of this manual Do not store or use gasoline or other flammable vap...

Page 4: ... have a very sensitive respiratory system Fumes released during the self cleaning cycle overheated cooking oil fat margarine or overheated non stick cookware may be harmful or fatal to birds PROPER INSTALLATION Be sure your appliance is properly installed and grounded by a qualified technician in accordance with the National Fuel Gas Code ANSI Z223 1 latest edition and the National Electrical Code...

Page 5: ...is not visible Areas near surface burners may become hot enough to cause burns During and after use do not touch or let clothing or other flammable materials touch these areas until they have had sufficient time to cool Among these areas are the cooktop surfaces facing the cooktop the oven vent openings and surfaces near these openings oven door and windows NEVER use this appliance as a space heat...

Page 6: ... of pressure may cause the container to burst and result in injury Keep the oven vent duct unobstructed The oven vent is located along the bottom of the backguard Touching the surfaces in the vent area when the oven is being operated may cause severe burns Also do not place plastic or heat sensitive items on or near the oven vents These items could melt or ignite The range requires fresh air for p...

Page 7: ...ing the air back up into the hood This creates a cyclonic air wash that is designed for electric ranges only A cyclonic hood may cause the burners of a gas range to operate improperly Glazed cooking utensils Only certain types of glass glass ceramic ceramic earthenware or other glazed utensils are suitable for rangetop service without breaking due to the sudden change in temperature Check the manu...

Page 8: ...s when the meat is half cooked and then warm rolls or dessert after the main dishes are cooked Thaw frozen foods before cooking Thawed food requires less cooking energy than frozen food Make it a habit to turn the oven off before removing the cooked food NOTE The instructions appearing in this owner s guide are not meant to cover every possible condition and situation that may occur Common sense a...

Page 9: ...ces sold to consumers in the State of Massachusetts NOTICE Massachusetts law requires the following Appliances must be installed by a licensed plumber or gas fitter Appliances must be connected with three 3 foot 36 maximum length flexible gas connector and A T handle type manual gas valve in the gas supply line to the appliance ...

Page 10: ...icles ANSI A119 2 2 1982 in the U S A or CAN CGA Z240 4 2 in Canada The installation of appliances designed for recreational park trailers must conform with state or other codes or in the absence of such codes with the standard for recreational park trailers ANSI A119 5 Note Check all piping connections in the unit for leaks Never use an open flame to check for gas leaks Use a soap solution It is ...

Page 11: ...uipped with electrical features See No 1 D Insert machine screws through lower inside flange of end caps and end panels Secure with the hex nuts provided See No 2 E Insert machine screws through elongated holes See No 3 at bottom of backguard and side flanges of burner box Secure with the hex nuts provided F Attach lower edge of backguard to vent outlet with two sheet metal screws See No 4 ...

Page 12: ...e serial plate The serial plate is located below the cooktop ANY OPENINGS IN THE WALL BEHIND THE UNIT AND IN THE FLOOR UNDER THE UNIT MUST BE SEALED Note Due to potential hazards it is recommended that storage cabinets not be installed above the cooking surface IN THE EVENT OVERHEAD CABINETS ARE INSTALLED THE MAXIMUM DEPTH OF CABINETS INSTALLED ABOVE COOKING TOPS SHOULD BE 13 ...

Page 13: ...indicated on the serial plate When set for Natural Gas operation the pressure regulator will regulate the pressure to 4 inches water column When set for LP Gas operation the pressure regulator will regulate the gas to 10 inches water column pressure On sealed burner models the main top must be removed to adjust regulator burner orifices and thermostat from NAT to LP propane or vice versa See illus...

Page 14: ...lator is set for LP To Convert and or Adjust 1 Convertible Pressure Regulator The inlet pressure of the gas supply shall be in accordance with the nominal inlet pressure of the regulator used on the range or 1 2 psig maximum The range should be tested by pressurizing the regulator with an inlet pressure at least 1 inch water column above the manufacturer s specified manifold pressure shown on the ...

Page 15: ...tting off the burner As seen in the figures below the result is an oven temperature that remains steady throughout the entire cooking period Your gas range is set from the factory for natural gas or has the hardware necessary to covert to LP Propane gas 3 Top Pilots Gas The top burner pilots can be adjusted by a screw located on the pilot filter attached on the rear face of the manifold pipe Adjus...

Page 16: ... is also the HI position where the maximum gas flow rate is obtained and the burner should light automatically from the pilot flame By turning the top burner knob past the HI position the valve can be adjusted to many different heat settings which should be determined by the amount of food being cooked the amount of liquid or the size of the utensil Top Burners with Pilotless Electric Spark Igniti...

Page 17: ... This flame safety probe actuates the internal safety device to allow gas into the oven burner when the oven is turned on If there is a loss of gas ignition during operation the flame safety device will close off gas flow to the oven burner and pilot The oven burner orifice is located on a brass injector stud at the rear of the oven under the oven floor This orifice is dedicated to the gas for whi...

Page 18: ...the above procedure Adjust the size of the oven pilot flame if needed ALWAYS LIGHT THE OVEN PILOT WITH ALL CONTROL KNOBS IN THE OFF POSITION Ovens with Electric Glow Bar Ignition Ranges equipped with electric ignition have an electric glow bar oven ignition system This type of oven cannot adjust gas flow to hold a constant temperature It operates with a typical on off cycling temperature Refer to ...

Page 19: ...e of air shutter opening The air shutter should be set approximately 2 3 open for natural gas and approximately full open on LP Propane gas R o ALIGNMENTS AND ADJUSTMENT Continued Hot Oven Restart If you turn off the oven but then decide to turn it back on before it has cooled to room temperature the burner may not light properly This is due to the thermostat still sensing a heated oven and not al...

Page 20: ...e ignitor will remain energized when the burner is lit Once the oven reaches the selected temperature the thermostat contacts will open and remove power from the ignitor valve circuit The valve will then close after a few seconds and the burner flame will go out Pressure Regulator The pressure regulator located on the left side of the range at the inlet of the gas range piping system serves two fu...

Page 21: ...t upon the care of the user Top Burner Valves The top burner flame size should be adjusted so that is does not extend beyond the edge of the cooking utensil As a matter of safety it s urged that you comply with these instructions A high flame on a surface burner is both inefficient and unsafe The flame should always be adjusted so that it is no larger than the bottom of the pan Fluctuations in fla...

Page 22: ...o one utensil is not directly over another Rack Removal Pull the oven rack forward and lift up on the front of the rack so it will clear the rack keeper To replace the oven rack guide the angled rear portion of the rack under the rack keeper and slide the rack to the rear Never cover the oven racks with aluminum foil Such practices will trap heat and cause intense heat in spots which usually give ...

Page 23: ...rtment Close the broiler door Economy Broiler Your range may be equipped with this optional broiler The outward appearance of the range will be the same To open the broiler door lift handle up slightly to release the door catch and then lower the door In the broiler section there are two positions of stamped in oven rack guides and a broiler pan and grill When you want to broil take one of the ove...

Page 24: ... easy However some spills or food types are harder for the oven to clean without a little assistance For heavy spillovers such as from an overfilled fruit pie or casserole put a cookie sheet or aluminum foil on the oven bottom Be sure the foil does not cover the air openings so do not extend foil beyond oven bottom If you should get a heavy spillover on the oven bottom 1 Brush off heavy soil with ...

Page 25: ...R To set a dial type clock PUSH IN on the knob and turn it to the correct time NOTE Release and then without pushing in rotate so that the timer hand is OFF This should be done after setting the time To set timer don t push in on the knob simply rotate to the length of time you want A signal will sound when the time has elapsed To stop the signal rotate the knob to OFF DIGITAL CLOCK WITH TIMER WAR...

Page 26: ...ated steel These materials can be cleaned at the sink with detergent or soap filled scouring pads Do not be alarmed when the grate loses its shining finish The heat from the burners will cause the grates to lose their shining finish NOTE Top burner grates must be seated in the proper position with the retainer lug in the hole provided for it This will prevent the burner grate from rotating or tilt...

Page 27: ...use of many range fires Make certain that vents or air openings aren t covered by the foil If the vents located along the sides of the oven bottom are blocked poor cooking will result Never cover a rack completely A piece of foil slightly larger than the utensil can be placed on the rack beneath the utensil Remove and discard aluminum foil after each use This will help prevent greases and spilled ...

Page 28: ...r the hinges Then lower the door slowly and evenly over both hinges at the same time Open the door to the full open position and press the locking mechanism back into its original position DO NOT ATTEMPT TO CLOSE THE DOOR UNTIL THIS STEP IS COMPLETE THE HINGE OR DOOR COULD BE DAMAGED CLEANING THE RANGE Continued prevent this open the oven door for the first few seconds of initial oven heat up This...

Page 29: ...selector screw See step 4 incorrectly set in ALIGNMENTS AND ADJUSTMENTS section e Oven not set correctly e Set indicator in MANUAL MAN or OFF position f Oven calibration or burner f Have servicer adjust burner out of adjustment 6 Oven Temperature a Oven was not preheated a Preheat oven 10 minutes seems inaccurate b Incorrect rack position b Refer to Use of Oven Section Food takes too long c Incorr...

Page 30: ...30 Refer to this diagram for ranges equipped with all spark ignition ...

Page 31: ...31 Refer to this diagram for ranges equipped with top burner spark ignition and glow coil oven ignition ...

Page 32: ...enter For the name of the nearest service center please call 1 877 337 3639 THIS WARRANTY COVERS APPLIANCES WITHIN THE CONTINENTAL UNITED STATES PUERTO RICO AND CANADA IT DOES NOT COVER THE FOLLOWING Damages from improper installation Damages in shipping Defects other than manufacturing Damage from misuse abuse accident alteration lack of proper care and maintenance or incorrect current or voltage...

Reviews: