


17
ALIGNMENTS AND ADJUSTMENT, Continued
In the event of a power failure, the top burners can be lit by holding a lighted match near
the burner head and turning the appropriate top burner knob to the “LITE” position.
Top Burner Height
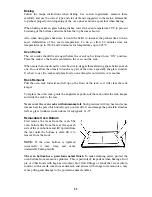
Make sure the top burners are properly positioned. The top of the burner head should be
level with the surface of the main top. To check, lay a straight edge such as a 12-inch
ruler across the burner bowl opening. The ruler should rest squarely on the top while in
contact with the burner head.
If the burner is too high (make sure the burner is cool), push it down. Supply enough
force with the palm of you hand to accomplish this adjustment. To raise, pull up on the
burner support at the center of the support.
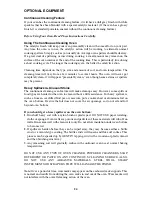
5. Oven Control (Thermostat)
The oven control has a flame safety device built into the body of the thermostat.
Presence of a gas ignition source (pilot) is verified by a flame safety probe. This flame
safety probe actuates the internal safety device to allow gas into the oven burner when the
oven is turned on. If there is a loss of gas ignition during operation, the flame safety
device will close off gas flow to the oven burner and pilot.
The oven burner orifice is located on a brass injector stud at the rear of the oven under the
oven floor. This orifice is dedicated to the gas for which the oven is to be used. The
orifice is not adjustable. It must be changed completely to convert from one gas to the
other. DO NOT DISCARD THE UNUSED ORIFICE. It should be saved in order to
convert the range back to its original fuel.
When converting the oven thermostat to LP (Propane) gas, the minimum bypass screw
must be screwed in all the way until it tightens. To convert back to natural gas, turn the
screw counterclockwise until the minimum burner flames appear as a row of 1/8”
diameter dots along the side of the burner.
ALIGNMENTS AND ADJUSTMENT, Continued
Oven Pilot
The oven pilot is located along the left hand side of the oven burner. It is fastened under
the flame safety probe. The flame of the oven pilot ignites main burner gas when the
oven is turned on. If the pilot flame is not present, the flame safety device will not allow
pilot gas or main burner gas to flow.
Pilot flame size is set by the adjustment screw located along the side of the thermostat.
The outer tip of the flame should just barely reach the underside of the end of the flame
safety probe. The pilot screw must be adjusted if the range is converted to LP gas.
Light the oven pilot as follows:
•
Fully press in and hold the oven control knob to allow pilot gas to flow to the pilot
burner. It will take 30 to 60 seconds to bleed all the air out of the pilot supply line.
•
While pressing in the oven control knob, place a lit match or lighter under the pilot
burner to light it.
•
Once the pilot burner is lit, continue to hold in the oven control knob for at least 10
seconds.
•
If the pilot flame extinguishes when the oven control knob is released, repeat the
above procedure.
•
Adjust the size of the oven pilot flame if needed.
ALWAYS LIGHT THE OVEN PILOT WITH ALL CONTROL KNOBS IN THE “OFF”
POSITION.
Ovens with Electric Glow Bar Ignition:
Ranges equipped with electric ignition have an electric glow bar oven ignition system.
This type of oven cannot adjust gas flow to hold a constant temperature. It operates with
a typical “on-off” cycling temperature. Refer to the page 19 for more information.
Ovens with glow bar ignition have a “shut-off” located at the safety valve in the rear of
the broiler area. Turn the handle on the brass valve fully clockwise to close off gas.
NOTE: In the event of a power failure, a glow bar ignition oven cannot be operated
without electricity supplied to the range.
Oven Ignition
On ovens with pilot ignition, lightly press in the oven control knob and turn it
counterclockwise to the desired temperature setting.
If you press the knob in too far to
the pilot lighting position, the knob will not turn.
Gently let up on the knob, and the
thermostat shaft will release its safety key to let you rotate the control.
On ovens with glow bar ignition, press in the oven control knob and turn it
counterclockwise to the desired temperature setting.
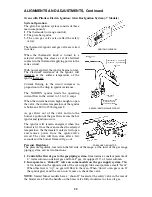
Minimum
Bypass Screw
Injector Stud
Mounting
Nut
Oven Burner
Orifice
Front Face of Thermostat
with Oven Knob Removed
End of Control Stem