background image

23

Cooking guidelines

Cookware


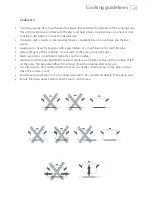
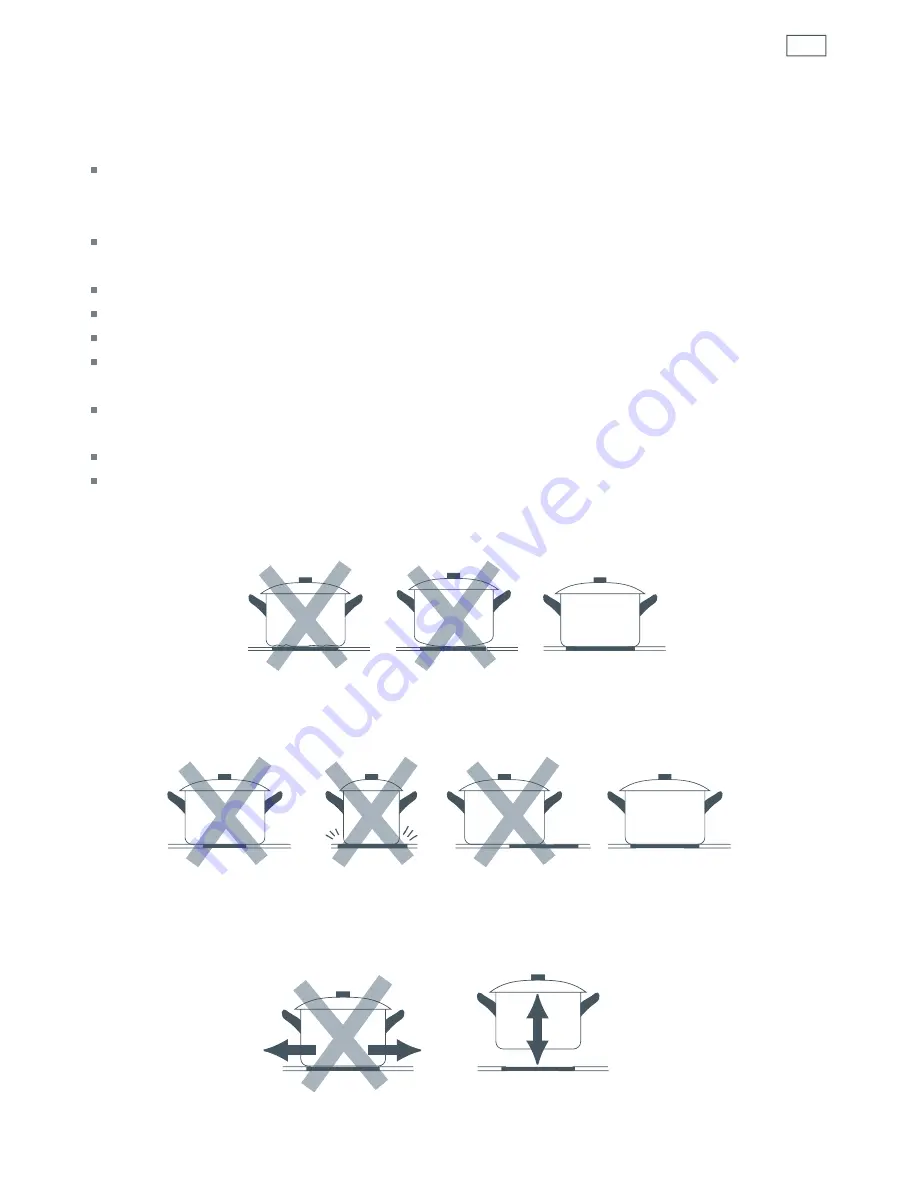
Use heavy-gauge, flat, smooth-based cookware that matches the diameter of the cooking zone. 
This will provide good contact with the glass and help reduce cooking times. Low heat or slow 
cooking is often due to incorrect cookware size.


Cookware with a stainless steel sandwich base or enamelled cast iron will give you the best 
results.


Saucepans or heavy frying pans with jagged edges or a rough base will scratch the glass.


Always lift pans off the cooktop - do not slide, or they may scratch the glass.


Never use plastic or aluminium foil dishes on the cooktop. 


Aluminium and copper-bottomed cookware can leave a metallic residue on the cooktop. If left 
on the glass, this becomes difficult to remove. Clean the cooktop after every use.


It is safe to place hot cookware from the oven, or another cooking zone, on the glass surface 
when the surface is cool.


Avoid placing anything on a hot cooking zone until it has cooled completely (

H

has gone out).


Ensure that pans never extend over the touch control area.

Summary of Contents for HCE604TB

Page 1: ...NZ AU Installation instructions and User guide Touch control ceramic glass cooktop HCE604TB model ...

Page 2: ......

Page 3: ...leshooting 28 Warranty and service 30 Important SAVETHESEINSTRUCTIONS The models shown in this user guide may not be available in all markets and are subject to change at any time For current details about model and specification availability in your country please visit our local website listed on the back cover or contact your local Haier dealer ...

Page 4: ...ectricity supply before carrying out any work or maintenance on it Connection to a good earth wiring system is essential and mandatory Alterations to the domestic wiring system must only be made by a qualified electrician Failure to follow this advice may result in electrical shock or death WARNING Cut Hazard Take care panel edges are sharp Failure to use caution could result in injury or cuts ...

Page 5: ...g the appliance as it could reduce your installation costs In order to avoid a hazard this appliance must be installed according to these instructions for installation This appliance is to be properly installed and earthed only by a suitably qualified person This appliance should be connected to a circuit which incorporates an isolating switch providing full disconnection from the power supply Fai...

Page 6: ...ard Do not cook on a broken or cracked cooktop If the cooktop surface should break or crack switch the appliance off immediately at the mains power supply wall switch and contact a qualified technician Switch the cooktop off at the wall before cleaning or maintenance Failure to follow this advice may result in electrical shock or death WARNING Cut Hazard The razor sharp blade of a cooktop scraper ...

Page 7: ...e should have a responsible and competent person to instruct them in its use The instructor should be satisfied that they can use the appliance without danger to themselves or their surroundings Do not repair or replace any part of the appliance unless specifically recommended in the manual All other servicing should be done by a qualified technician Do not use a steam cleaner to clean your cookto...

Page 8: ...ses only A B C CI D G F E Cooktop and cutout dimensions mm HCE604TB A overall width of cooktop 590 B overall depth of cooktop 510 C height of chassis below top of bench 45 CI height of chassis incl terminal block below top of bench 58 D width of chassis 552 E depth of chassis 480 F overall width of cutout 560 G overall depth of cutout 490 ...

Page 9: ...face 55 B minimum clearance from glass surface to rangehood 650 C minimum clearance from side edges of cutout to nearest combustible surface 85 D minimum clearance from benchtop to overhead cabinet not directly above the cooktop 450 E minimum clearance below top of benchtop to thermal protection barrier 65 Drawings for illustration purposes only ...

Page 10: ...ting switch will be easily accessible to the customer with the cooktop installed you consult local building authorities and by laws if in doubt regarding installation you use heat resistant and easy to clean finishes such as ceramic tiles for the wall surfaces surrounding the cooktop When you have installed the cooktop make sure that the power supply cable is not accessible through cupboard doors ...

Page 11: ...nto the cooktop as shown without tightening the screws 4 Place the cooktop into the cutout then tighten the screws to clamp the cooktop securely to the bench 5 Using a sharp cutter or trimmer knife trim the excess sealing material around the edge of the cooktop Take care not to damage the benchtop Note if your bench is thicker than 40 mm recess the underside to between 30 and 40 mm Fig 2 Preparing...

Page 12: ...ble sections can withstand the load specified on the rating plate To connect the cooktop to the mains power supply do not use adapters reducers or branching devices as they can cause overheating and fire The power supply cable must not touch any hot parts and must be positioned so that its temperature will not exceed 75o C at any point Power supply 6000W 220 240 380 415V 2N 26 10A Connection diagr...

Page 13: ...hem to a high setting and leave them on for at least one minute Are all elements glowing Are all touch controls and displays functioning To check that the hot surface indicators function correctly turn off all the cooking zones Is H displayed in all the cooking zone displays Have you shown the customer how to use the cooktop Make sure you explain to the customer about the hot surface indicators En...

Page 14: ...ial features We recommend you read the whole guide before using your new cooktop for both safety and cooking success For more information visit our local website listed on the back cover Before using your new cooktop Read this user guide taking special note of the Safety and warnings section Remove any protective film that may still be on your cooktop 2 3 4 1 Introduction Fig 5 Cooktop layout ...

Page 15: ...ntrols are always clean dry and there is no object eg a utensil or a cloth covering them Even a thin film of water may make the controls difficult to operate Cooking Points 1 Hi light cooking zone Ø 180 mm 1800 W 2 Hi light cooking zone Ø 140 mm 1200 W 3 Hi light cooking zone Ø 180 mm 1800 W 4 Hi light cooking zone Ø 140 mm 1200 W Controls 5 ON OFF key 6 Left front zone 1 key and increasing power ...

Page 16: ...l keys Cooking zone turned OFF Power range of lighted cooking zone Automatic heating in alternation with the preset power level Afterheat It is cancelled when the temperature drops below 60 C Locked touch control for children s safety Using your cooktop Turn ON and OFF touch control Control keys for activation and adjustment of cooking zone power level ...

Page 17: ...isplay reads alternatively hot and When the safety key for children is activated all displays of the cooking zones will read out locked With the safety key for children activated when a cooking zone is hot the display reads out alternately hot and To unlock the safety key for children see the relevant chapter Note If a cooking zone is not turned ON within 20 seconds after the touch control is pres...

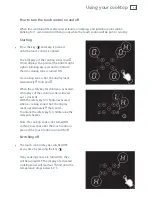
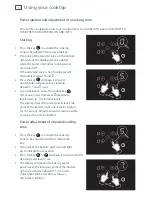
Page 18: ...e press the central key The choice starts from level maximum level down to minimum level The display shows the preset power level the point at the bottom right side remains lighted for 10 seconds Adjustment will remain possible as long as the point is lighted Power adjustment of a heated cooking zone 1 Press the key to activate the cooking zone to be adjusted and then release the key The point at ...

Page 19: ... then release the key The point on the bottom right side of the display will light up to indicate activation 2 Press the key to select the power level n then release the key The display will readout and the point on the bottom right side will be illuminated 3 Press the key to activate the fast heating up function then release the key The display reads out and the point on the bottom right side is ...

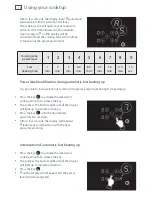
Page 20: ... It is possible to increase but not to reduce the preset power level during fast heating up 1 Press the key to activate the interested cooking zone then release the key The point at the bottom right side of the display will light up to indicate activation 2 Press the key until the desired new power level is reached After a few seconds the display will readout automatic in alternation with the new ...

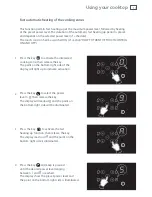
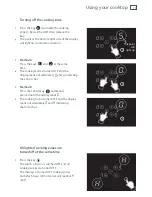
Page 21: ...and the display reads out alternately and indicating the zone is hot 2 Method B Press the central key and keep it pressed until the display reads The cooking hob is turned OFF and the display reads out alternately and indicating the hob is hot All lighted cooking zones are turned off at the same time 1 Press the key The touch control is switched OFF and all cooking zones are turned OFF The display...

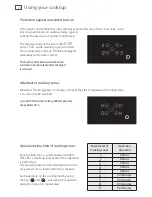
Page 22: ...ng zone is hot an will be displayed alternately with an error signal Thetouchcontrolwillremainlocked no controlcanbeactivated unlesstheobject isremoved Afterheat in cooking zones Whenever hot appears on displays it means that the temperature of cooking zone is too warm to be touched turnsOFFwhenthecookinghobtemperature dropsbelow60 C Operation time limit of cooking zones Each cooking zone is autom...

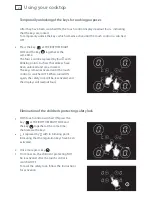
Page 23: ...will be automatically reset after the touch control is switched OFF Activation of the children s protecting safety lock 1 Press the key until the touch control is turned on All four displays of the cooking zones readout The points at bottom right side blink 2 Press the key at THE BOTTOM RIGHT SIDE and the key together at the same time then release these keys 3 Once more press the key at THE BOTTOM...

Page 24: ...locked and are activated The keys remain activated until the touch control is switched OFF When turned ON again the safety lock will be reactivated and the displays will readout four Elimination of the children s protecting safety lock 1 With touch control switched ON press the key at THE BOTTOM RIGHT SIDE and the key together at the same time then release the keys is replaced by with its blinking...

Page 25: ...s or a rough base will scratch the glass Always lift pans off the cooktop do not slide or they may scratch the glass Never use plastic or aluminium foil dishes on the cooktop Aluminium and copper bottomed cookware can leave a metallic residue on the cooktop If left on the glass this becomes difficult to remove Clean the cooktop after every use It is safe to place hot cookware from the oven or anot...

Page 26: ... 1 Stand the meat at room temperature for about 20 minutes before cooking 2 Heat up a heavy based frying pan 3 Brush both sides of the steak with oil Drizzle a small amount of oil into the hot pan and then lower the meat onto the hot pan 4 Turn the steak only once during cooking The exact cooking time will depend on the thickness of the steak and how cooked you want it Times may vary from about 2 ...

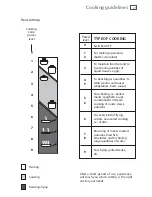
Page 27: ...eats spaghetti soups continuations of steam cooking of roasts stews potatoes For every kind of frying cutlets uncovered cooking i e risotto Browning of meats roasted potatoes fried fish omelettes and for boiling large quantities of water Fast frying grilled steaks etc 0 Power level 1 2 4 5 3 5 6 6 7 8 9 After a short period of use experience will teach you which setting is the right one for your n...

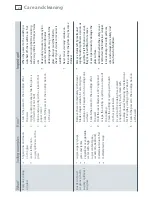
Page 28: ...sugary syrups jams and jellies vegetables or vegetable water with high sugar content peas sweetcorn beetroot melted aluminium foil melted plastic wrap Remove these immediately with a razor blade scraper suitable for ceramic glass cooktops but beware of hot cooking zone surfaces 1 Switch the power to the cooktop off at the wall 2 Hold the razor blade at a 30 o angle and scrape the soiling or spill ...

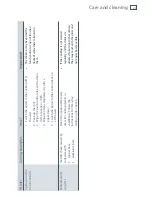
Page 29: ...he cooktop back on at the wall The cooktop may beep and the touch controls may not function locked while there is liquid on them Metallic stains on glass metallic sheen caused by cookware with copper base aluminium base Clean the cooktop after every use with cooktop cleaner or conditioner Follow the instructions for Everyday soiling on glass above If the cooktop is not cleaned regularly and the st...

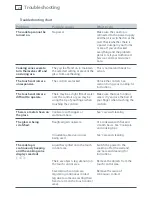
Page 30: ...m of water over the controls or you may be using the tip of your finger when touching the controls Make sure the touch control area is dry and use the ball of your finger when touching the controls There is a metal sheen on the glass Cookware with copper or aluminium base See Care and cleaning The glass is being scratched Rough edged cookware Unsuitable abrasive scourer being used Use cookware wit...

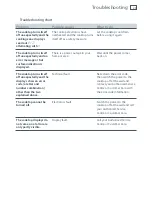
Page 31: ... area Wait until the power comes back on The cooktop turns itself off unexpectedly and the displays show an error code a letter and number combination other than the two explained above Technical fault Note down the error code then switch the power to the cooktop off at the wall and contact your Authorised Serivce Centre or Customer Care with the error code information The cooktop cannot be turned...

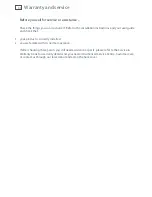
Page 32: ...r guide and check that 1 your product is correctly installed 2 you are familiar with its normal operation If after checking these points you still need assistance or parts please refer to the Service Warranty book for warranty details and your nearest Authorised Service Centre Customer Care or contact us through our local website listed on the back cover ...

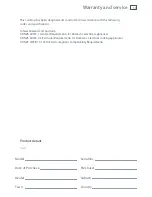
Page 33: ...ia AS NZS 60335 1 General Requirements for Domestic electrical appliances AS NZS 60335 2 6 Particular Requirements for Domestic electrical cooking appliances AS NZS CISPR 14 1 2010 Electromagnetic Compatibility Requirements Product details Haier Model Serial No Date of Purchase Purchaser Dealer Suburb Town Country Warranty and service ...

Page 34: ......

Page 35: ......

Page 36: ...dels described at the date of issue Under our policy of continuous product improvement these specifications may change at any time You should therefore check with your Dealer to ensure this booklet correctly describes the product currently available www haier co nz www haier com au NZ AU 07 2015 F P PN 591029 A F P ITALY PN 1104978 ß1 ...

Reviews: