


STEP 3 - INSTALL COOKTOP
1.
With the adhesive side down, apply the foam tape (provided) around the
underside of the entire cooktop. Place the foam tape so that it is approximately
¹⁄₁₆" (0.16 cm) in f
rom the edge of the cooktop.
NOTE:
The foam tape cushions the underside of the cooktop glass to help
the cooktop rest level on uneven countertops.
a
b
c
A
Cooktop Base
B
Foam Tape
(provided)
C
Cooktop
2.
Turn the cooktop right side up and insert the cooktop base into the cutout
opening.
NOTE:
•
Make sure the cooktop is centered within the opening and that the
front edge of the cooktop is parallel with the front edge of the
countertop.
•
If you need to reposition the cooktop, lift the entire cooktop from the
opening to avoid scratching the countertop.
3.
Working from underneath the cooktop base, remove the clamping bracket
attachment screws (one on each side) from the bottom of the cooktop base.
4.
Determine which mounting holes in the clamping brackets will allow the bracket
to extend out far enough from the cooktop base to accommodate the
installation of clamping screws.
5.
Using the bracket attachment screws removed earlier, insert a screw through
the selected bracket mounting hole, and fasten the clamping bracket to the
cooktop base. Repeat for the other side of the cooktop, and then completely
tighten both attachment screws.
a
c
b
A
Cooktop Base
B
Bracket Mounting Hole
C
Bracket Attachment Screw
7
ENGLISH
Summary of Contents for HCC2220BEB
Page 2: ......
Page 7: ...2 5 08 cm...
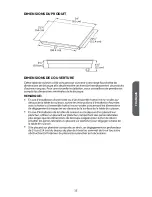
Page 17: ...DIMENSIONS DU PRODUIT DIMENSIONS DE L OUVERTURE REMARQUE FRAN AIS...
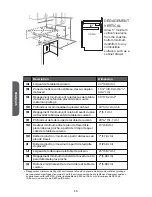
Page 22: ...5 a c b A B C 6 b a c d e f A B C D E F 7 TAPE 4 RACCORDEMENT LECTRIQUE DIRECT FRAN AIS...
Page 31: ...DIMENSIONES DEL PRODUCTO MEDIDAS DE LA ABERTURA NOTA ESPA OL...
Page 35: ...PASO 3 INSTALE LA SUPERFICIE DE COCCI N 1 NOTA a b c A cocci n B C 2 NOTA 3 4 ESPA OL...
Page 42: ......
Page 43: ......