background image

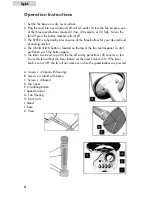
A. Screws x 4 (stand with housing)
B. Screws x 4 (stand with bases)
C. Screws x 4 (bases)
D. Top Cover
E. Oscillating Button
F. Speed Control
G. Fan Housing
H. Front Grill
I. Stand
J. Base
K. Timer

3

English

Operation Instructions

1. Set the fan base on a dry, level surface.
2. Plug the cord into any standard 120-volt AC outlet. To turn the fan on press one

of the three speed buttons marked (1) low, (2) medium, or (3) high. To turn the
fan off press the button marked with (0) off.

3. The SPEED is adjusted by pressing one of the three buttons for your desired level

of cooling comfort.

4. The OSCILLATION button is located on the top of the fan control panel. To start

oscillation, push the button again.

5. The timer can be set to switch the fan off at any point from 120 minutes or less.

To use the fan without the timer feature set the timer knob to ON. If the timer
knob is set at OFF, the fa will not work even when the speed buttons are pressed.

Summary of Contents for FTM140GG - 10-03

Page 1: ...User Manual Model FTM140GG Electric Tower Fan Manual del Usuario Modelo Ventilador Eléctrico Mini Torre ...

Page 2: ...ct unattended while in use especially when children are present Unplug Fan from wall outlet when not in use or moving to another location or for cleaning Always operate the Fan on a flat steady and stable surface to avoid it overturning Keep Power Cord and product away from open flame cooking or heated surfaces Do not operate Fan near or in the presence of explosive or flammable fumes or materials...

Page 3: ...rked electrical rating of the cord set or extension cord should be at least as great as the electrical rating of the product Never use the plug with anextension cord unless the plug can be fully inserted into the extension cord 1 Remove all contents from the box being careful not to discard the manual and hardware needed for assembly 2 Pass the power cord through the channel of the stand and firml...

Page 4: ...d buttons marked 1 low 2 medium or 3 high To turn the fan off press the button marked with 0 off 3 The SPEED is adjusted by pressing one of the three buttons for your desired level of cooling comfort 4 The OSCILLATION button is located on the top of the fan control panel To start oscillation push the button again 5 The timer can be set to switch the fan off at any point from 120 minutes or less To...

Page 5: ...l retail purchaser and excludes any damage to the product resulting from accident or misuse The product is not warranted when used in a commercial or business environment The above warranty is complete and exclusive The warrantor expressly disclaims liability for any special incidental indirect or consequential damages in connection with the purchase or use of this product or costs over the origin...

Page 6: ...ct the Haier Customer Satisfaction Center at 1 877 337 3639 DATED PROOF OF PURCHASE REQUIRED FOR WARRANTY SERVICE IMPORTANTE No Devuelva Este Producto al Establecimiento Compra Si tiene problemas con este producto por favor póngase en contacto con el Centro Haier de Atención al Cliente en el 1 877 337 3639 PARA EL SERVICIO DE GARANTÍA SE REQUIERE PRUEBA DE COMPRA FECHADA No DE MODELO Y No DE SERIE...

Reviews: