background image

12

Connecting to the PDA

You can connect the supplied audio cable from your PDA to the 

FreeCruiser to avail of the HAICOM 3 in 1 car holder's built-in 

speaker. You can connect a GPS antenna to the HAICOM 3 in 1 

car holder if you have a GPS-enabled PDA. 

1. Connect the supplied 

    audio cable to the 

    HAICOM 3 in 1 car 

    holder (

A

) and the 

    PDA (

B

).


2. Connect the PS2 

    jack from the GPS 

    receiver to the 

    HAICOM 3 in 1 car 

    holder (

C

).

3. Position the GPS receiver on the dash or outside the car.

    Important:  If you cannot receive signals from at least 

    three satellites, try relocating the GPS antenna.

Important Safety Notice:

Most GPS software has built-in voice navigation to allow you to 

keep your eyes on the road while driving. If you need to study 

the map on your PDA, stop the car and pull into the side of the 

road first.

C

B

A

Summary of Contents for 3 IN 1 CAR HOLDER

Page 1: ......

Page 2: ...in are used for identification purposes only and may be trademarks and or registered trademarks of their respective companies Limitation of Liability While reasonable efforts have been made to ensure...

Page 3: ...support installation overview Attaching the cradle and support Detaching the cradle Installing the base connector Installing the suction arm support Installing the socket arm support Inserting your P...

Page 4: ...ith years of trouble free use bearing your convenience in mind Cotains Unpack the HAICOM 3 in 1 car holder and check that besides this Installation Manual the following components are included Suction...

Page 5: ...stalled in most car makes Use this installation option if the cigarette lighter can not be easily accessed or if you prefer to install the HAICOM 3 in 1 car holder on the dash Attaching the cradle and...

Page 6: ...A 1 Align the cradle with the support plate as shown below 2 Insert the cradle plate into the groove on the support plate at an angle A and push down B 3 Push the cradle down until it clicks into pla...

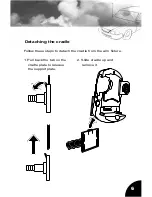
Page 7: ...6 Detaching the cradle Follow these steps to detach the cradle from the arm fixture 1 Pull back the tab on the cradle plate to release the support plate 2 Slide cradle up and remove it...

Page 8: ...g the correct base connector for your model if needed Refer to the following to install the base connector 1 Release the dummy base from the cradle by lifting at tab 2 Remove the dummy base 3 Ensure t...

Page 9: ...before proceeding The suction cup must be mounted on a clean smooth surface such as the windscreen or the dashboard Refer to the following 1 Remove dirt or grease from the surface if necessary 2 With...

Page 10: ...9 3 Push the locking lever towards the base to lock the support in place 4 Insert the power adapter into the socket...

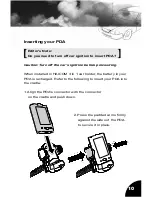
Page 11: ...tion before proceeding When installed in HAICOM 3 in 1 car holder the battery in your PDA is recharged Refer to the following to insert your PDA into the cradle 1 Align the PDA s connector with the co...

Page 12: ...emove your PDA from the cradle 1 Push the release button A on the side of the cradle to release the padded arms 2 Lift the PDA straight up to remove it Caution Do not twist the PDA as this can cause p...

Page 13: ...in 1 car holder A and the PDA B 2 Connect the PS2 jack from the GPS receiver to the HAICOM 3 in 1 car holder C 3 Position the GPS receiver on the dash or outside the car Important If you cannot receiv...

Page 14: ...o the pin assignments shown below The connector is a 6 pin Mini DIN male with 3 6 0 1 mm wire IrDA Connection Installation Setting System Connect Infred turn OFF OK On test program or map select com2...

Page 15: ...14...

Page 16: ......

Reviews: