background image

Interfacing to the KE18 I/O Header

Interface  of  the  KE18  to  switches  and  keypads  is  accomplished  by 
connection to the 40 pin dual row I/O header. Each of the pins of the 
header is connected in parallel with the adjacent pin. This provides 20 
individual interface signals, with both the end pins being logic Ground. 
The 18 connections are marked “A”-“R” are the KE18 inputs.

18 Input Mode

In  the  connection  of  a  switch  in 
the  18  input  mode,  inputs  are 
activated  by  shorting  them  to 
Ground (reference marked “Gnd”). 
The  example  shows  one  side  of 
the  switch  is  connected  to  input 
pin “D” and the other is connected 
to  Ground  (“Gnd”),  producing  the 
keystroke “E” when activated (see 
KE18  keycode  lookup  table  on 
page  6).  There  are  18  individual 
inputs in this mode.

9x9 Matrix Mode

In the 9x9 matrix mode, inputs are 
activated  by  shorting  a  Column 
pin (“A” to “I”) to a Row pin (“J” to 
“R”). The example shows input pin 
“C” which is a Column, and input 
pin “O” which is a Row, producing 
the keystroke “X” when activated 
(see  KE18  keycode  lookup  table 
on  page  6).  A  total  of  81  inputs 
are available in this mode.

NOTE:


KE18 inputs are for “Dry” contacts only! Never connect 

any signal on the KE18 to an external voltage. TTL/CMOS levels 
and analog switches are acceptable.

4

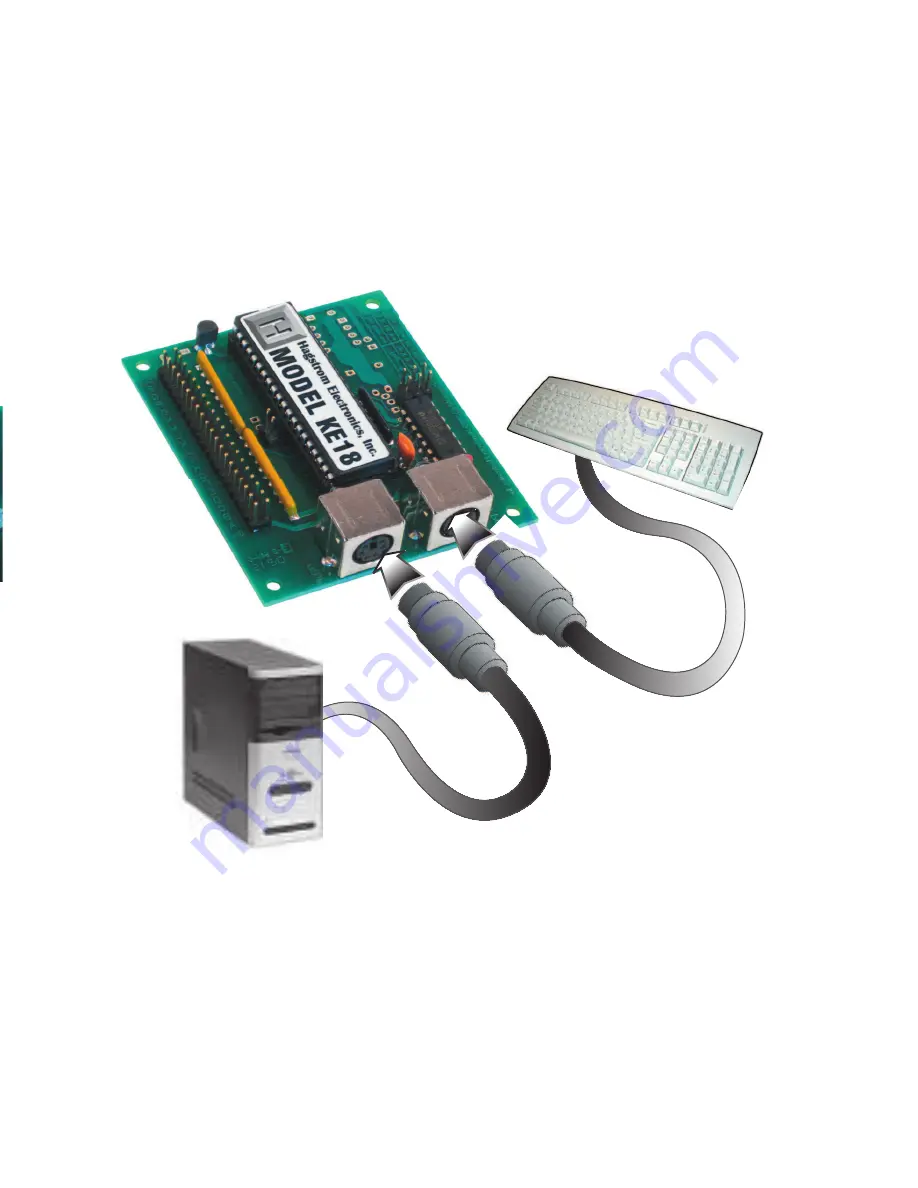
Connection to Computer and Keyboard

There  are  two  miniDIN  connectors  on  your  KE18.  Each  of  these 
connectors has a different function.

The DIN connector which is marked “To PC” is for interface of the KE18 
to  the  computer.  Insert  one  end  of  a  (male  to  male)  shielded  cable 
into this port. The other end of the cable connects to the computer’s 
keyboard input.

The  DIN  connector  marked  “KBD”  is  for  using  an  external  keyboard 
with the KE18. Plug the keyboard into this port to use it in addition to 
the KE18. Use of the keyboard is optional; a keyboard does not need 
to be plugged into this port for the KE18 to operate.

NOTE:


Always perform these connections with the computer’s 

power off.

5

KBD

T

O PC

Summary of Contents for KE18

Page 1: ...KE18 PC Keyboard Encoder User Manual...

Page 2: ...your specific requirements Please take a few minutes to read this manual before using your KE18 Table of Contents Introduction to the KE18 1 Configuring the KE18 Jumpers 2 Interfacing to the KE18 I O...

Page 3: ...he unit may be configured for use with compatible Pentium PS 2 X86 and PC XT computers The 18 pins labeled A R on the I O header provide a means for converting switch closures to keystrokes sent direc...

Page 4: ...until another input is activated Jumper 2 This jumper controls the scanning mode for the I O header on the KE18 If this jumper is in place the KE18 will scan the I O header as 18 individual inputs pi...

Page 5: ...compatible with Pentium and X86 computers When this jumper is in place the KE18 will operate as a PCXT type keyboard This mode allows for compatibility with early PCs and PCXT based single board comp...

Page 6: ...e side of the switch is connected to input pin D and the other is connected to Ground Gnd producing the keystroke E when activated see KE18 keycode lookup table on page 6 There are 18 individual input...

Page 7: ...nd of a male to male shielded cable into this port The other end of the cable connects to the computer s keyboard input The DIN connector marked KBD is for using an external keyboard with the KE18 Plu...

Page 8: ...Home End Page Up Page Down F F1 F2 F3 F4 F5 G 8 9 Pg Up Del Enter F6 F7 F8 F9 F10 H 4 5 6 7 Home _ Caps Lock Num Lock Print Screen I 0 Ins 1 End 2 3 Pg Dn Tab Pause Scroll Lock Header Row Pins Header...

Page 9: ...n y e s s Accessories KE MM6 5 pin DIN Male Male 6 foot cable Connects KE18 with 5 pin DIN connectors to computer 7 KE MM6 mini 6 pin miniDIN Male Male 6 foot cable Connects KE18 with 6 pin miniDIN c...

Page 10: ...ily connect your device to the KE18 40 pin IDE ribbon cable included MTA100 10 12 MTA style connector 10 individual wires 12 inches long Can be used to connect the I O header to your device Sold as a...

Page 11: ...ch you live you may have additional rights Great care has been taken during the assembly testing and burn in of your KE18 to ensure its performance If you have any questions please send us an email or...

Page 12: ...4677 Fax 540 465 4678 Monday through Friday 8 00 am to 5 00 pm EST sales hagstromelectronics com www hagstromelectronics com 1986 Junction Road Strasburg VA 22657 Copyright 2017 HAGSTROM ELECTRONICS...

Reviews: