2
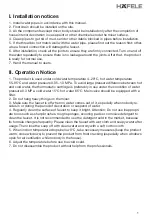
I. Installation notices
II. Operation Notice
1. Install water pipes in accordance with this manual.
2. Floor drain should be installed on the site.
3. All the components except mixer body should be installed only after the completion of
house interior decoration in case paint or other chemicals erode the mixer surface.
4. Clean pipes to get rid of mud, sand or other debris blocked in pipes before installation.
5.
If the thread do not match well with the water pipe, please find out the reason first; other
-
wise a forced connection will damage the faucet.
6.
After installation, check all the joints to ensure they are firmly connected. Turn on and off
the water repeatedly to ensure there is no leakage around the joints. After that, the product
is ready for normal use.
7. Hand the manual to users.
1.
The product is used under cold water temperature 4~29°C, hot water temperature
55~85°C and water pressure 0.05~1.0 MPa. To avoid large pressure difference between hot
and cold water, the thermostatic cartridge is preferably in use under the condition of water
pressure 0.3 MPa, cold water 15°C hot water 65°C. Main valve should be equipped with a
filter.
2.
Do not hang heavy things on the mixer.
3.
Make sure the faucet is off when no water comes out of it, especially when nobody re
-
sides in or during the period of decoration or suspend of water.
4. Regularly clean the surface of faucet to keep it bright. Attention: Do not use inappropri-
ate tools such as sharp brushes, rough sponges, scouring pads or corrosive detergent to
clean the faucet. It is not recommended to use the detergent sold in the market, because
its formula changes frequently. Please clean the faucet with wet cloth and soapy water after
usage. Then rinse the soap off with clean water and dry with a soft cotton cloth.
5.
When indoor temperature drops below 0°C, take necessary measures (keep the product
warm, close windows) to prevent the product from frost cracking (especially when windows
open for air ventilation while nobody in the house).
6.
Adjust the temperature before use to avoid scald.
7. Do not disassemble the product without help from the professionals.
1
Summary of Contents for 589.35.005
Page 2: ......
Page 4: ...3 III Installation Diagram 2 ...
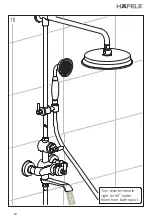
Page 14: ...13 Turn diverter handle right for 90 water flows from bath spout 12 ...
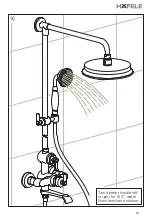
Page 15: ...14 Turn diverter handle left or right for 180 water flows from hand shower 13 ...
Page 17: ...16 Wrench Aerator 15 ...
Page 21: ...20 III Sơ đồ lắp đặt 19 ...
Page 31: ...30 Quay tay cầm lõi chuyển hướng sang phải 90o Cº nước chảy từ vòi tắm 29 ...
Page 32: ...31 Quay tay cầm lõi chuyển hướng sang trái hoặc phải 180ºo nước chảy từ tay sen 30 ...
Page 34: ...33 Đầu tạo bọt Chìa vặn 32 ...


