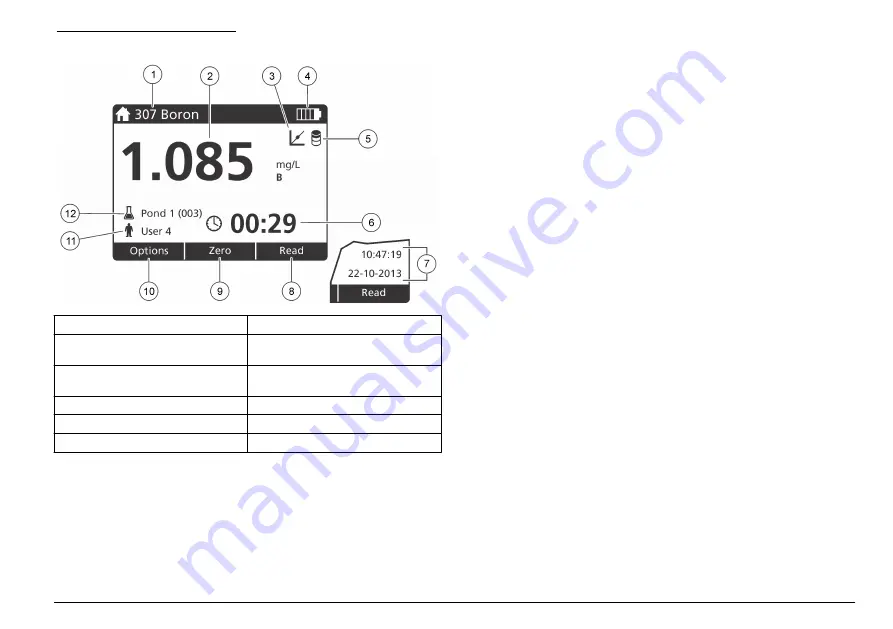
Figure 7 Single screen display
1
Program name and number
7
Time and date
2
Reading value, unit, and chemical
form
8
Read (contextual: done, select,
start, ok)
3
Standard adjust icon
9
Zero (contextual: navigation key UP
arrow)
4
Battery status
10
Options (contextual: back, cancel)
5
Reagent blank icon
11
Operator identification
6
Timer
12
Sample identification
Navigation
The instrument contains menus to change various options. Use the
navigation keys (
UP
,
DOWN
,
RIGHT
and
LEFT
arrows) to highlight
different options. Push the
RIGHT
selection key to select an option.
Enter an option value with the navigation keys. Push the navigation keys
(
UP
,
DOWN
,
RIGHT
and
LEFT
arrows) to enter or change a value. Push
the
RIGHT
arrow to advance to the next space. Push the
RIGHT
selection key under
Done
to accept the value. Push the
LEFT
selection
key to exit the current menu screen to the previous one.
Startup
Set the instrument to on or off
Push the
POWER
key to set the instrument to on or off. If the instrument
does not power on, make sure that the batteries are correctly installed.
Set the language
There are two options to set the language:
• Set the display language when the instrument is set to on for the first
time.
• Set the language from the SETTINGS menu.
1.
Push
SETTINGS>Setup>Language
.
2.
Select a language from the list.
Set the date and time
There are two options to set the date and time:
• Set the date and time when the instrument is set to on for the first
time.
• Set the date and time from the Date & Time menu.
1.
Push
SETTINGS>Setup>Date & Time
.
2.
Push
Date Format
and select a format for the date and time.
3.
Push
Date & Time
.
4.
Use the navigation keys to enter the current date and time, then push
Done
.
English
9


