10
English
Operation
5.2.1 System setup menu
For more information on System Setup (current outputs, relays and network interfaces),
refer to the sc1500 user manual.
5.3 Calibration process
Note:
Make sure that all solutions are available to avoid incorrect measurements.
1.
To start an automatically calibration select
CALIBRATION>CALIBRATION>AUTOMATIC CALIBRATION>INTERVAL.
OR
1.
To start a calibration manually select CALIBRATION>CALIBRATION.
Note:
Press START to confirm and start the calibration process.
After the next measurement and the 5 minutes waiting time, the calibration will
automatically start and proceed with all necessary standards.
Depending on the number of standards requiring calibration, a cycle may take up to
40 minutes. After a successful calibration, the instrument automatically returns to the
measurements.
Note:
When the instrument detects and displays a warning, the measurement process will continue.
Refer to
section 7.2.3 on page 60
to troubleshoot the warning.
Note:
When the instrument detects and displays an error, the instrument stops measuring. Refer to
section 7.2.2 on page 57
to troubleshoot the error.
5.4 Cleaning process
For information about the cleaning interval refer to
Table 4 on page 46
.
Note:
Make sure that the cleaning solution is available that the instrument can work properly.
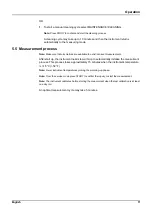
1.
To configure an automatical cleaning interval select
SETTINGS>CLEANING>INTERVAL.
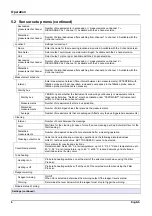
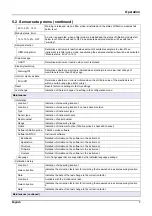
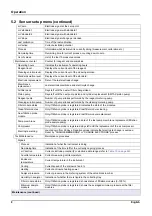
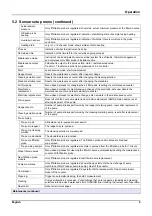
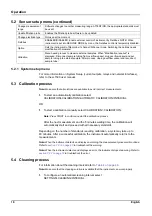
Change measurement
range
Software changes to another measuring range: ATTENTION, the appropriate standards must
be used!
Update filtration probe
Enables the filtration probe software to be updated.
Change electrode type
Not used at the moment
Fieldbus
ENABLED/DISABLED: Enable external control of instrument by Fieldbus. NOTE: When
instrument is put into SERVICE MODE by menu, the Fieldbus control is temporarily disabled.
Option
Sets the instrument to filter-probe/ 1channel/ 2channel mode. Switching the options needs
modification of hardware!
Validation
Menu based process to measure external samples. When "Modification required" is
displayed: Disconnect sample tubing from overflow vessel, plug overflow vessel and put
sample tubing into external sample. After process: Unplug overflow vessel and reconnect
sample tube.
5.2 Sensor setup menu (continued)
Summary of Contents for AMTAX sc
Page 2: ......
Page 4: ...4 Table of contents...
Page 12: ...12 English Operation...
Page 24: ...24 English Maintenance...
Page 32: ...32 English Troubleshooting...
Page 40: ...40 Deutsch Funktion...
Page 52: ...52 Deutsch Wartung...
Page 68: ...68 Espa ol Operaci n...
Page 80: ...80 Espa ol Mantenimiento...
Page 108: ...108 Fran ais Maintenance...
Page 124: ...124 Italiano Procedure...
Page 136: ...136 Italiano Manutenzione...
Page 152: ...152 Nederlands Bedrijf...
Page 182: ...182 Dansk Vedligeholdelse 630 35 6 265 3 570 720 35 6 265 1 1700 Table 55 Reng ringsinterval...
Page 200: ...200 Dansk Fejls gning...
Page 208: ...208 Polski U ytkowanie...
Page 218: ...218 Polski Rozwi zywanie Problem w...
Page 231: ......

