


3
Table of Contents
................................................................................................9
2.1.1 Use of hazard information ................................................................................................... 9
2.1.2 Precautionary labels ........................................................................................................... 9
2.1.3 Change instrument labels ................................................................................................. 10
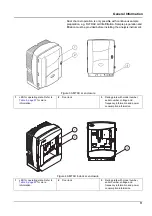
3.1 Basic installation overview ......................................................................................................... 13
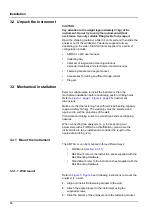
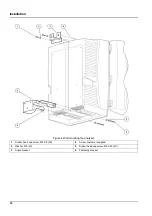
3.2 Unpack the instrument ............................................................................................................... 14
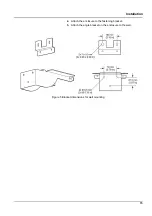
3.3 Mechanical installation ............................................................................................................... 14
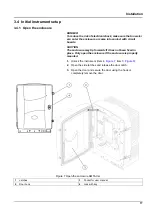
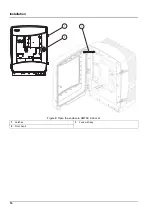
3.4.1 Open the enclosure ........................................................................................................... 17
3.4.2 Remove the shipping transport locks ................................................................................ 19
3.4.3 Installation of the collecting tray ........................................................................................ 21
3.4.4 Connect the humidity sensor ............................................................................................ 22
3.4.5 Determine the appropriate installation option ................................................................... 23
3.5.1 Electrostatic Discharge (ESD) Considerations ................................................................. 25
3.5.2 Enclosure breakouts ......................................................................................................... 25
3.5.3 Insert tubing and/or cables ................................................................................................ 26
3.5.4 Connect the Filter Probe to the analyzer .......................................................................... 26
3.5.5 Connect the optional heated drain .................................................................................... 27
3.6 Installation of reagents ............................................................................................................... 29
3.7 Gas-sensitive electrode ............................................................................................................. 31
3.8 Supply power to the analyzer ..................................................................................................... 33
3.9 Connect the data network .......................................................................................................... 34
5.3 Calibration process .................................................................................................................... 42
5.4 Cleaning process ....................................................................................................................... 42
5.5 Measurement process ............................................................................................................... 43
6.1.2 Replace the fan filter ......................................................................................................... 46
6.1.3 Fuse replacement ............................................................................................................. 47
6.2 Reagent replacement ................................................................................................................. 47
6.3 Routine maintenance schedule .................................................................................................. 48
6.4 Scheduled maintenance ............................................................................................................ 49
Summary of Contents for AMTAX sc
Page 2: ......
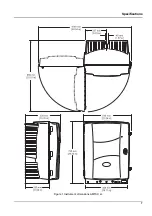
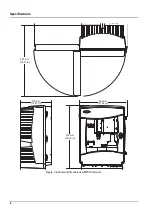
Page 7: ...7 Specifications Figure 1 Instrument dimensions AMTAX sc...
Page 12: ...12 General Information...
Page 36: ...36 System Start Up...
Page 44: ...44 Operation...
Page 56: ...56 Maintenance...
Page 64: ...64 Troubleshooting...
Page 69: ...69 Replacement Parts and Accessorie Figure 23 Analyzer enclosure AMTAX indoor sc...
Page 70: ...70 Replacement Parts and Accessorie Figure 24 Analyzer panel overview...
Page 71: ...71 Replacement Parts and Accessorie Figure 25 Analyzer panel front view details...
Page 72: ...72 Replacement Parts and Accessorie Figure 26 Analyzer panel back view details...
Page 76: ...76 Warranty and liability...