Operating instructions 3745
Flexproof-Cutter
AF-603
Page 8 of
20
Edition: 01/0512
Subject to alterations
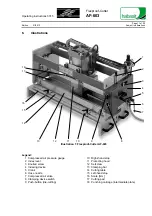
Press push-button (9), the first cutting operation on the left side is effected.
Shift die-cutting head (23) by one finger pitch to the right side by turning crank (5) counterclockwise to
the next snapping in without actuating index lever (2). Press push-button (9), the second cutting
operation is effected.
Repeat the shifting of the die-cutting head (23) to the right side and the cutting operation as often as
required until the entire width of the belt/tape is completely die-cut.
Lift clamping bars (13) with clamping device switch (8).
Remove belt/tape from die-cutting machine.
Close compressed air valve (7).
4.2
Die-cutting of belts/tapes over 600 mm/24 in. width
For the die-cutting of belts/tapes wider than 600 mm/
24 in.
, they have to be exactly cut at right angles to the
required length.
The processing length consists of endless belt/tape 198 mm/
7.8 in.
4.2.1 Die-cutting of the (already cut to length) first belt/tape end
Move punching carriage (18) to the starting position on the right side.
Set the front right-hand stop (10) to the 0-point on the mm-scale (16) and lock it.
Set the rear right-hand stop (10) to 50 mm on the mm-scale (16) and lock it.
Remove (detach) the front left-hand stop (15).
Set the rear left-hand stop (15) to 600 mm on the mm-scale (16) and lock it.
Cover cutting pad (17) with masking (tape wider than finger length).
Slide the first end of belt/tape, with running side facing down, under the clamping bars (13) and in the
left-hand slit against the rear stops (10) and (15) and sideways against the front right-hand stop (10).
Lower clamping bars (13).
Die-cut belt/tape from right to left to the maximum possible width as described under 4.1.
Lift clamping bars (13).
Remove belt/tape from die-cutting machine, separate die-cut fingers and cut off residual strip.
Remove (detach) the front right-hand stop (10).


