background image


61 


NOTE: 

Slot numbers are marked on top of the slots on the M9010 and M9010-GM gateways and on the 
right of the slots on M9006 and M9014 gateways. 


Table 34 Card LED description 

RUN ALM  Description 

Flashing 

Off 

The card is operating correctly.  

Flashing Steady 

on 

The card is loading software. If the LEDs keep in this state, the card 
software version is not compatible with the gateway software 
version. 

Flashing Flashing 

The card temperature exceeds the upper warning threshold or falls 
below the lower warning threshold. 

Steady on 

Steady on 

The card is in boot state or has failed. 

Steady on 

Off 

The MPU is in boot state. 

Off 

Off 

The card is not present. 


NOTE: 

It is normal that the ALM LED for an interface module lights for a period of time at the initial phase of 
the system startup. 


MPU active/standby status LED 

Each MPU has one ACTIVE LED to indicate the active or standby status of the MPU. 

Table 35 MPU ACTIVE LED description 

LED status 

Description 

Steady on 

The MPU is active. 

Off 


The MPU is in standby status. 


The MPU has failed. Examine the card LED for an MPU problem. 


Service module LEDs 

NSQ1FWCEA0 firewall module LEDs 

The NSQ1FWCEA0 firewall module provides LEDs to indicate the operation status for the module 
and its interfaces. 

Table 36 NSQ1FWCEA0 LED description 

LED Status  Description 

ALM 

Off 

The card is operating correctly and no alarm is generated. 

Steady red 

A critical alarm is generated for the card. To resolve the 
problem, view the system logs. 

RUN 

Off 

Power is not being supplied to the card or the card is faulty. 

Steady green 

The card is operating incorrectly. 

Slow flashing (1 Hz) 

The card has booted up and is operating correctly. 

Summary of Contents for SecPath M9000 Series

Page 1: ...06 M9014 gateway 14 Attaching air filters to an M9010 M9010 GM gateway 14 Mounting the gateway in the rack 15 Grounding the gateway 16 Installing FRUs 17 Attaching an ESD wrist strap 17 Installing a c...

Page 2: ...7 Cards 47 MPUs 47 Switching fabric modules 47 Service modules 48 Interface modules 49 Interface subcards 50 Interface switch modules 51 Heat dissipation 51 Environmental specifications 52 Noise 52 Ap...

Page 3: ...neral cabling requirements 77 Prerequisites 77 Cable management guidelines 77 Appendix G Repackaging the gateway 81 Removing cables from the gateway 81 Removing the power cord 81 Removing the console...

Page 4: ...r the work area of possible electricity hazards such as ungrounded power extension cables missing safety grounds and wet floors Locate the emergency power off switch in the room before installation so...

Page 5: ...of your gateway the installation site must meet the requirements in this section Weight support Make sure the floor can support the total weight of the rack chassis and accessories Additionally the f...

Page 6: ...limit particles m3 Dust particles 3 x 10 4 No visible dust on desk in three days NOTE Dust particle diameter 5 m The equipment room must also meet limits on salts acids and sulfides to eliminate corr...

Page 7: ...or more information about system power consumption calculation see Appendix A Chassis views and technical specifications 2 Select power modules and identify the number of power modules The total maxim...

Page 8: ...2 Power module air outlet 3 Chassis air inlet 4 Chassis air outlet Figure 2 Airflow through the M9006 chassis 1 Power module air inlet 2 Power module air outlet 3 Chassis air inlet 4 Chassis air outl...

Page 9: ...f 690 mm 27 17 in between the front rack post and the rear door M9010 M9010 GM Height 886 mm 34 88 in 20 RU Width 440 mm 17 32 in Depth 757 mm 29 80 in 660 mm 25 98 in for the chassis 95 mm 3 74 in fo...

Page 10: ...crimping pliers RJ 45 crimping pliers file and handsaw Auxiliary tools ESD wrist strap hair brush tweezers paper knife hand bellows electric iron solder wire ladder cable stripper vacuum cleaner crow...

Page 11: ...Make sure the heaviest device is placed at the bottom of the rack The gateway is ready for installation and has been carried to a place near the rack and convenient for moving Attaching slide rails to...

Page 12: ...rack post are divided into rack units RUs One RU has two standard installation holes and one auxiliary installation hole in the middle The space between a standard installation hole and an auxiliary i...

Page 13: ...the front end of the slide rail with the cage nuts on the front rack post and attach them with screws as shown in Figure 6 Figure 6 Attaching the slide rail to the rack 5 Keep the slide rail horizont...

Page 14: ...rackets and mounting brackets to the chassis Before installing the gateway to the rack install the cable management brackets and mounting brackets shipped with the gateway Cable management brackets si...

Page 15: ...es on the chassis as shown in Figure 8 3 Fasten the screws to secure the cable management bracket to the chassis Figure 8 Attaching cable management brackets to an M9010 gateway 1 Place the cable mana...

Page 16: ...nted inside the mounting brackets to distinguish between the left and right mounting brackets To install the mounting brackets face the front of the gateway and attach the left and right mounting brac...

Page 17: ...the screws into the screw holes on the air filter and fasten them with a Phillips screwdriver Figure 11 Attaching air filters to an M9006 gateway Attaching air filters to an M9010 M9010 GM gateway Th...

Page 18: ...e gateway in the rack 1 Move the chassis to face the rear of the chassis towards the front of the rack 2 Use at least two people to lift the gateway by using the chassis handles or supporting the bott...

Page 19: ...the cage nuts are installed in the correct holes Figure 14 Securing the chassis to the rack M9006 Grounding the gateway CAUTION Before you use the gateway ground the gateway correctly Use the groundin...

Page 20: ...comes with an ESD wrist strap To minimize ESD damage to electronic components wear the ESD wrist strap and make sure it is correctly grounded when installing modules To attach an ESD wrist strap 1 Mak...

Page 21: ...ake sure its PCB faces up When installing a card in a vertical slot make sure its PCB faces left This section takes installing a horizontally oriented card as an example To install a horizontally orie...

Page 22: ...a Phillips screwdriver to loosen the captive screws on the blank filler panel if any to remove the blank filler panel 2 Follow the installation graph printed on the blank filler panel of the power mo...

Page 23: ...e transceiver module 4 Pivot the clasp of the transceiver module up Holding the transceiver module gently push the module into the slot until it has firm contact with the slot when the bottom spring t...

Page 24: ...slot 2 Fasten the captive screws on the CFP module 4 Connect the optical fiber to the CFP module For information about connecting optical fibers see Connecting optical fibers Connecting networking cab...

Page 25: ...ay and plug the other end into the transceiver module in the peer device 3 Examine the port LEDs to verify the connection after the gateway is powered on For more information about the LED status see...

Page 26: ...cord plug into the power receptacle of the power module 2 Fasten the screw to secure the power cord Figure 24 Connecting the power cord M9010 1 Insert the power cord plug into the power module 2 Fast...

Page 27: ...a DB 9 female connector at the other end A console terminal For example a PC that has a serial port Setting up the configuration environment To connect a terminal for example a PC to the gateway 1 Pl...

Page 28: ...control software and follow the software user guide or help to configure the terminal The following are the required terminal settings Bits per second 9 600 Data bits 8 Parity None Stop bits 1 Flow c...

Page 29: ...ion 4 Set Bits per second to 9600 Data bits to 8 Parity to None Stop bits to 1 and Flow control to None and click OK To restore the default settings click Restore Defaults Figure 28 Setting the serial...

Page 30: ...ndow 6 On the Settings tab set the emulation to VT100 and click OK Figure 30 Setting terminal emulation in Gateway Properties dialog box Powering on the gateway Before power on Before powering on the...

Page 31: ...ng in using Telnet 1 Log in to the gateway through the console port 2 Execute the telnet server enable command in system view to enable the Telnet function 3 Execute the line vty command to enter VTY...

Page 32: ...ns display fan Display interface brief information display interface brief Display brief IP configuration information for the specified Layer 3 interface or all Layer 3 interfaces display ip interface...

Page 33: ...odules and service modules of the gateway provide the port status LEDs with which you can detect port failures For more information about the LED status on the MPUs interface modules and service modul...

Page 34: ...over voltage input under voltage or remote disconnection The DC LED also turns red if the input of the power supply is disconnected while the other power supply is operating correctly In this case con...

Page 35: ...Verify that the power module operates correctly For more information see Power supply system failure 2 Verify that the MPU is fully seated You can remove the MPU and then install it again and make su...

Page 36: ...e sure the interface type is compatible with the transceiver and that the transceiver is compatible with the cable For more information see Appendix B FRUs and compatibility matrixes 5 If the interfac...

Page 37: ...e Before replacing a power module turn off its circuit breaker The power module may be of high temperature Remove it with caution To install the removed power module to the chassis again install it af...

Page 38: ...power module M9006 Replacing a card The cards on the M9000 gateways can be installed in horizontal or vertical slots and the replacement procedures are the same The following takes a card installed i...

Page 39: ...Replacing a card 1 Loosen the captive screw 2 Move the ejector levers outwards 3 Take out the card Replacing a fan tray CAUTION To avoid bodily injury do not touch the rotating fans when replacing th...

Page 40: ...shown in callout 1 on Figure 36 3 Hold the handle of the fan tray with one hand to gently pull the fan tray part way out of the chassis After the fans stop rotating support the bottom of the fan tray...

Page 41: ...ectricity safety when replacing air filters on an operating gateway The air filter removal and installation procedures for all M9000 gateways are the same This section takes removing and installing an...

Page 42: ...or plastic pull latch 3 Grasp the clasp on the module and carefully pull the module out of the slot 4 Put the filler plug on the removed module and put the remove module into its original shipping ma...

Page 43: ...nical specifications Chassis views Every M9000 gateway has an MPU section interface module and service module section switching fabric module section power module section and fan tray section Figure 3...

Page 44: ...41 Figure 39 Front and rear views of the M9010 and M9010 GM...

Page 45: ...es and service modules installed You must install service modules on the chassis Interface modules are optional components for the chassis For the available interface modules and service modules see A...

Page 46: ...014 gateway you must install a switching fabric module in slot 14 or slot 15 Weights and dimensions Table 9 Gateway weights and dimensions Model Weight Height Width Depth M9006 85 kg 187 39 lb 353 mm...

Page 47: ...A0 4 8 kg 10 58 lb 40 mm 1 57 in 399 mm 15 71 in 352 mm 13 86 in NSQ1FWCEA0 3 9 kg 8 60 lb 40 mm 1 57 in 399 mm 15 71 in 352 mm 13 86 in NSQM1NATDFGB0 4 8 kg 10 58 lb 40 mm 1 57 in 399 mm 15 71 in 352...

Page 48: ...consumption The power consumption of the cards depends on the card model and state Table 13 shows the power consumption for different card models The static power consumption of a card refers to the p...

Page 49: ...NSQM1NATDFGB0 180 W 260 W NSQM1ADEDFGA0 180 W 260 W NSQM1SSICASK1 128 W 210 W NSQM1AFC2000GDFGA0 180 W 260 W NSQM1GMDSCA1 55 5 W 56 W NOTE The card model is printed on the card front panel Fan tray po...

Page 50: ...is 2 50 1 157 2 65 240 627 W Cards MPUs You can install one MPU or two MPUs for redundancy for the gateway The NSQ1SUPB0 MPU is available for the gateway Table 15 describes the NSQ1SUPB0 MPU specific...

Page 51: ...wall module One console port RJ 45 One GE copper port RJ 45 NSQM1FWDFGC0 Firewall module One console port RJ 45 One GE copper port RJ 45 NSQM1FWDFGD1 Firewall module One console port RJ 45 One GE copp...

Page 52: ...e RJ 45 48 10 100 1000 Mbps N A NSQ1GP24 TXEA0 16 port Gigabit 8 port combo 2 port 10 Gigabit optical Ethernet interface module LC 24 1000 100 Mbps Gigabit SFP transceiver module 100 Mbps SFP transcei...

Page 53: ...ed When you enable one of the two ports the other port is automatically disabled The default operating port is the copper port Interface subcards The subcards are installed on the subslots of the inte...

Page 54: ...modules The interface switch modules provide slots for interface subcards Table 20 describes the interface switch modules available for the gateway and interface subcards supported by the interface s...

Page 55: ...C 40 F to 158 F Relative humidity 10 to 95 non condensing 5 to 95 non condensing Noise The gateway uses fans with the automatic speed adjustment function so the sound pressure levels are different wh...

Page 56: ...e and gateway compatibility Service module model Description Applicable gateways NSQ1FWCEA0 Firewall module M9006 M9010 M9010 GM M9014 NSQM1FWDFGA1 Firewall module NSQM1FWDFGB0 Firewall module NSQM1FW...

Page 57: ...ce switch modules Table 26 describes the compatibility between interface switch modules and subcards Table 26 Compatibility matrix between interface switch modules and subcards Interface switch module...

Page 58: ...W 220 VAC 2400 W Temperature requirements Operating temperature 10 C to 50 C 14 F to 122 F Operating temperature 10 C to 50 C 14 F to 122 F Storage temperature 40 C to 85 C 40 F to 185 F Storage tempe...

Page 59: ...ll the air filters at the air inlet vents The M9000 security gateway air filters include the M9006 air filter the M9010 air filter the M9010 GM air filter and the M9014 air filter Order air filters co...

Page 60: ...r outline Power cord outline Connector outline 2 Connector type Code Length Countries or regions where the type of power cords conforms to local safety regulations and can be used legally Other countr...

Page 61: ...egions where the type of power cords conforms to local safety regulations and can be used legally Other countries or regions using this type of power cords Countries or regions seldom using this type...

Page 62: ...conforms to local safety regulations and can be used legally Other countries or regions using this type of power cords Countries or regions seldom using this type of power cords I type 0404A01A 3 m i...

Page 63: ...ement Ethernet port is receiving or sending data Steady on Off A link is present Off Off No link is present Fan LEDs Each MPU provides one OK LED and one FAIL LED for a fan tray The M9006 M9010 and M9...

Page 64: ...eriod of time at the initial phase of the system startup MPU active standby status LED Each MPU has one ACTIVE LED to indicate the active or standby status of the MPU Table 35 MPU ACTIVE LED descripti...

Page 65: ...input or the module is faulty System run LED Steady green The system is operating correctly Flashing green HDM is initializing Flashing green and yellow A general alarm has occurred including HDM alar...

Page 66: ...to indicate the link status and data receiving forwarding status of the Ethernet ports Table 39 RJ 45 Ethernet port LED description LED status Description Flashing yellow The port is receiving or send...

Page 67: ...Off No link is present QSFP port LEDs The interface modules provide a LED for each QSFP port to indicate the link status and data receiving forwarding status of the QSFP port Table 43 QSFP port LED de...

Page 68: ...receiving forwarding status of the 10GBASE R port Table 47 10GBASE R port LED description LED status Description Flashing The port is receiving or sending data On A link is present but no data is bei...

Page 69: ...Red The power module is experiencing an output problem including output short circuit output overcurrent output overvoltage input under voltage or remote power off and has entered the self protection...

Page 70: ...U slots slots 0 and 1 Slots for interface modules and service modules slots 2 to 5 At the right edge of the slot M9010 M9010 GM MPU slots slots 4 and 5 Slots for interface modules and service modules...

Page 71: ...ch module The value is 1 or 2 Z Number of the port on the card The number starts from 1 for each port type The management port is numbered M GE0 0 0 when the gateway operates in standalone mode and M...

Page 72: ...s under route mode Link ADM administratively down Stby standby Protocol s spoofing Interface Link Protocol Main IP Description GE1 2 0 1 DOWN DOWN 192 168 1 1 GE1 2 0 2 DOWN DOWN GE1 2 0 3 DOWN DOWN...

Page 73: ...le is an 8 core shielded cable with a crimped RJ 45 connector at one end for connecting to the console port of the gateway and a DB 9 female connector at the other end for connecting to the serial por...

Page 74: ...at a maximum speed of 100 Mbps with a bandwidth of 100 MHz Category 5e Transmits data at a maximum speed of 1000 Mbps with a bandwidth of 100 MHz Category 6 Transmits data at a speed higher than 1 Gbp...

Page 75: ...ossover cable Pin assignments Select an Ethernet twisted pair cable according to the RJ 45 Ethernet interface type on your device An RJ 45 Ethernet interface can be MDI or MDIX For the pinouts of RJ 4...

Page 76: ...directional data cable C To ensure normal communication the pins for sending data on one port should correspond to the pins for receiving data on the peer port When both of the ports on the two devic...

Page 77: ...iber It is mostly used for communication over shorter distances Table 57 Allowed maximum tensile force and crush load Period of force Tensile load N Crush load N mm Short period 150 500 Long term 80 1...

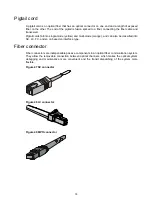
Page 78: ...ow and multi mode orange and can also be classified into SC LC FC and so on based on interface type Fiber connector Fiber connectors are indispensable passive components in an optical fiber communicat...

Page 79: ...h the end face only in one direction You also need to brush the end face of the fiber port Never bend or curve a fiber when connecting it After a fiber is installed well the bend radius must be not le...

Page 80: ...east seven times the cable s outer diameter The curvature radius of an ordinary attached coaxial cable should be at least seven times of the cable s outer diameter If the coaxial cable is frequently b...

Page 81: ...tips When you route cables through sharp sheet metal penetration points or along sharp edges of mechanical parts use bushings or take any other action to protect the cables from being cut or abraded T...

Page 82: ...the part Cables must be protected at points where they might rub or come in contact with sharp edges or heated areas Use high temperature cables near heat sources Securely fasten cables and take adequ...

Page 83: ...dle diameter mm Space between bundles mm 10 80 to 150 10 to 30 150 to 200 30 200 to 300 Do not tie cables or bundles in a knot The metal parts of the crimped cold pressed terminal blocks such as circu...

Page 84: ...rd Remove the cable tie that secures the power cord and then pull out the plug DC power cord Remove the cable tie that secures the power cord loosen the fastening screw on the power cord and then pull...

Page 85: ...s at the input end of all power cords and remove all the power cords to avoid device damage and bodily injury To repackage a power module 1 Prepare the packing bag and box of the power module Make sur...

Page 86: ...and tape the flaps of the box with packing tape Place the card in a correct direction onto the foam cushion in the box otherwise the power module cannot be completely seated into the foam cushion Repa...

Page 87: ...Replacing an air filter 3 Put the air filter into the bag Removing cable management brackets and mounting brackets Before repackaging the gateway chassis remove the cable management brackets and mount...

Page 88: ...e chassis bottom to route power cords The procedure for removing the cable management bracket on an M9006 M9014 and M9010 are the same This section takes removing a cable management bracket from an M9...

Page 89: ...management brackets to the chassis 2 Remove the cable management brackets Repackaging the gateway chassis 1 Align the screw holes on the two sides of the chassis bottom to the L type brackets on the...

Page 90: ...wooden carton at the clearance between the chassis and the wooden panel 6 Cover the foam cushion to the chassis top and make sure the surface of the foam cushion aligns to the upper rims of the wooden...

Reviews: