background image


18 

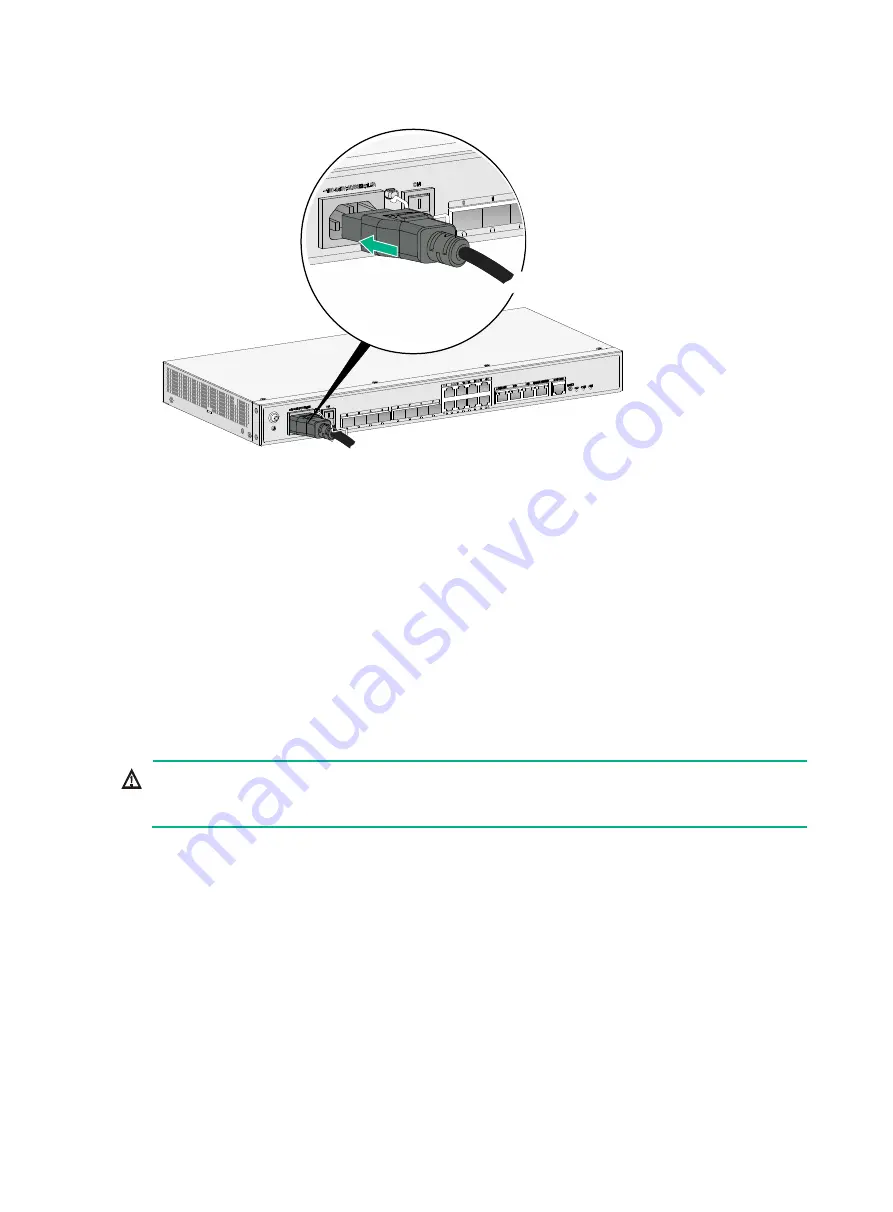
Figure 20 Connecting the AC power cord 


Verifying the installation 

Verify the following items before you power on the router: 


There is enough space around the router for heat dissipation. 


The router is reliably grounded. 


The power source is as required by the router. 


The router is connected correctly to the configuration terminal and other devices. The 
configuration terminal is configured correctly and has been started. 

Starting the router 


WARNING! 

Before powering on the router, locate the switch for the power source so that you can cut off power 
promptly in case of an emergency. 


To start the router: 

1. 

Verify the installation and the configuration environment is as described in "

Verifying the 

installation

." 

2. 

Power on the router. 

3. 

During the booting process, verify the following items: 

{


The LEDs on the front panel are in the states as described in "

Appendix B LEDs

." 

{


The configuration terminal displays information correctly. Observe the information displayed 
on the configuration terminal. 
The router first initializes its memory at startup. Then it runs BootWare. 

System is starting...                                                            

Press Ctrl+D to access BASIC-BOOTWARE MENU...                                    

Press Ctrl+T to start heavy memory test                                          

Summary of Contents for RA100

Page 1: ...H3C RA100 Router Installation Guide New H3C Technologies Co Ltd http www h3c com hk Document version 6W100 20170608...

Page 2: ...r trademarks that may be mentioned in this manual are the property of their respective owners Notice The information in this document is subject to change without notice Every effort has been made in...

Page 3: ...s enclose a set of required syntax choices separated by vertical bars from which you select one x y Square brackets enclose a set of optional syntax choices separated by vertical bars from which you s...

Page 4: ...switch such as a Layer 2 or Layer 3 switch or a router that supports Layer 2 forwarding and other Layer 2 features Represents an access controller a unified wired WLAN module or the access controller...

Page 5: ...ion configuration and maintenance click http www h3c com hk Technical_Documents To obtain software version information such as release notes click http www h3c com hk Software_Download Technical suppo...

Page 6: ...on the rack 13 Connecting interface cables 14 Connecting an Ethernet copper cable 14 Connecting an Ethernet optical fiber 15 Connecting the console cable and setting terminal parameters 16 Connecting...

Page 7: ...ii Technical specifications 24 Appendix B LEDs 25 Index 27...

Page 8: ...Make sure the router is reliably grounded Do not remove and install the chassis cover when the router is operating Connect the interface cables correctly Use an uninterrupted power supply UPS Do not w...

Page 9: ...aging of components as shown in Table 3 Table 3 Harmful gas limits in an equipment room Gas Maximum concentration mg m3 SO2 0 2 H2S 0 006 NH3 0 05 Cl2 0 01 Cooling system To ensure good ventilation f...

Page 10: ...nductance coupling Electromagnetic wave radiation Common impedance including the grounding system coupling To prevent EMI use the following guidelines If AC power is used use a single phase three wire...

Page 11: ...available EMI prevention A single phase three wire power receptacle with protection earth PE is available for filtering interference from the power grid The router is far away from radio transmitting...

Page 12: ...ure The emergency power switch in the equipment room is identified and accessible Installation tools and accessories Installation accessories supplied with the router are ready User supplied tools are...

Page 13: ...es You have read Preparing for installation carefully All requirements in Preparing for installation are met Installation flowchart You can install the router on a workbench on a wall or in a rack Det...

Page 14: ...he weight of the router Do not place any objects on the router Mounting the router in a 19 inch rack 1 Use a 19 inch rack mounting bracket to mark the cage nut installation holes in the front rack pos...

Page 15: ...shown in Figure 5 a Insert one ear of a cage nut into the marked installation hole b Use a flathead screwdriver to push another ear into the same hole Figure 5 Installing cage nuts 3 Use screws to att...

Page 16: ...he router to the rack Mounting the router in an ETSI rack 1 Perform the following tasks as shown in Mounting the router in a 19 inch rack a Use a mounting bracket to mark the cage nut installation hol...

Page 17: ...kets on the router to the front rack posts with the other hand Figure 9 Securing the router to the ETSI rack Mounting the router on a workbench IMPORTANT Make sure the workbench is clean stable and re...

Page 18: ...up on the workbench Make sure the rubber feet stand securely on the workbench Figure 11 Mounting the router on a workbench Installing the router on a wall CAUTION Make sure the port side of the router...

Page 19: ...tach 19 inch rack mounting brackets to both sides of the router Figure 13 Attaching mounting brackets to the router 3 Align the screw holes in the mounting brackets with the holes in the wall and use...

Page 20: ...rounding the router To ground the router through the grounding terminal on the rack 1 Remove the grounding screw from the grounding hole in the front panel of the chassis 2 Use the grounding screw to...

Page 21: ...s to describe the cable connection procedures Connecting an Ethernet copper cable 1 Connect one end of the cable to the Ethernet copper port on the router Connect the other end of the cable to the Eth...

Page 22: ...lug into any open fiber port to protect them from contamination To connect an Ethernet optical fiber 1 Remove the dust plug from the Ethernet fiber port 2 Identify the upside and downside of the trans...

Page 23: ...PC A PC is more commonly used 2 Connect the DB 9 connector female of the console cable to the RS 232 serial port on the configuration terminal and the RJ 45 connector to the console port of the router...

Page 24: ...Connect the other end of the power cord to the DC power source Figure 19 Connecting the DC power cord Connecting the AC power cord 1 Make sure the router is reliably grounded 2 Connect one end of the...

Page 25: ...ocate the switch for the power source so that you can cut off power promptly in case of an emergency To start the router 1 Verify the installation and the configuration environment is as described in...

Page 26: ...KB Flash Size 256MB CPLD Version 130 0 PCB Version 2 0 BootWare Validating Press Ctrl B to access EXTENDED BOOTWARE MENU Loading the main image files Loading file flash ra100 cmw710 system a020101 bin...

Page 27: ...the router 2 Verify that the router is connected to the power source correctly 3 Verify that the power source is operating correctly 4 Verify that the power cord is in good condition 5 If the problem...

Page 28: ...uration terminal No boot information is displayed on the configuration terminal when the router starts up or restarts up Solution To resolve the problem 1 Verify that the serial console cable is in go...

Page 29: ...er If you have saved the configuration delete the configuration file at the CLI or press the RESET button to restore the factory settings Scenario 3 Symptom The router crashes Solution Press the RESET...

Page 30: ...t 6 Console port 7 Reset button RESET 8 Gigabit Ethernet copper ports GE8 to GE15 9 Gigabit Ethernet fiber ports GE0 to GE7 10 DC input power receptacle Figure 22 RA100 front panel 1 Grounding termina...

Page 31: ...0 205 mm 1 74 17 32 8 07 in Memory 1 GB DDR3 Flash 256 MB Rated AC voltage 100 VAC to 240 VAC 50 to 60 Hz Rated DC voltage 48VDC to 60VDC Maximum power 66 W Console port 1 GE port 8 SFP port 8 Managem...

Page 32: ...Both PTP and network synchronization are configured The time and frequency have been synchronized Network synchronization is configured and a non local clock source is taken as the clock reference Net...

Page 33: ...E fiber port LED Steady green A 1000 Mbps link is present Flashing green Data is being received or transmitted at 1000 Mbps Steady yellow A 10 100 Mbps link is present Flashing yellow Data is being re...

Page 34: ...safety 1 EMI prevention 3 ESD prevention 2 G General safety recommendations 1 L Lightning protection 3 M Mounting the router in a 19 inch rack 7 Mounting the router in an ETSI rack 9 R Reset button u...

Reviews: