background image


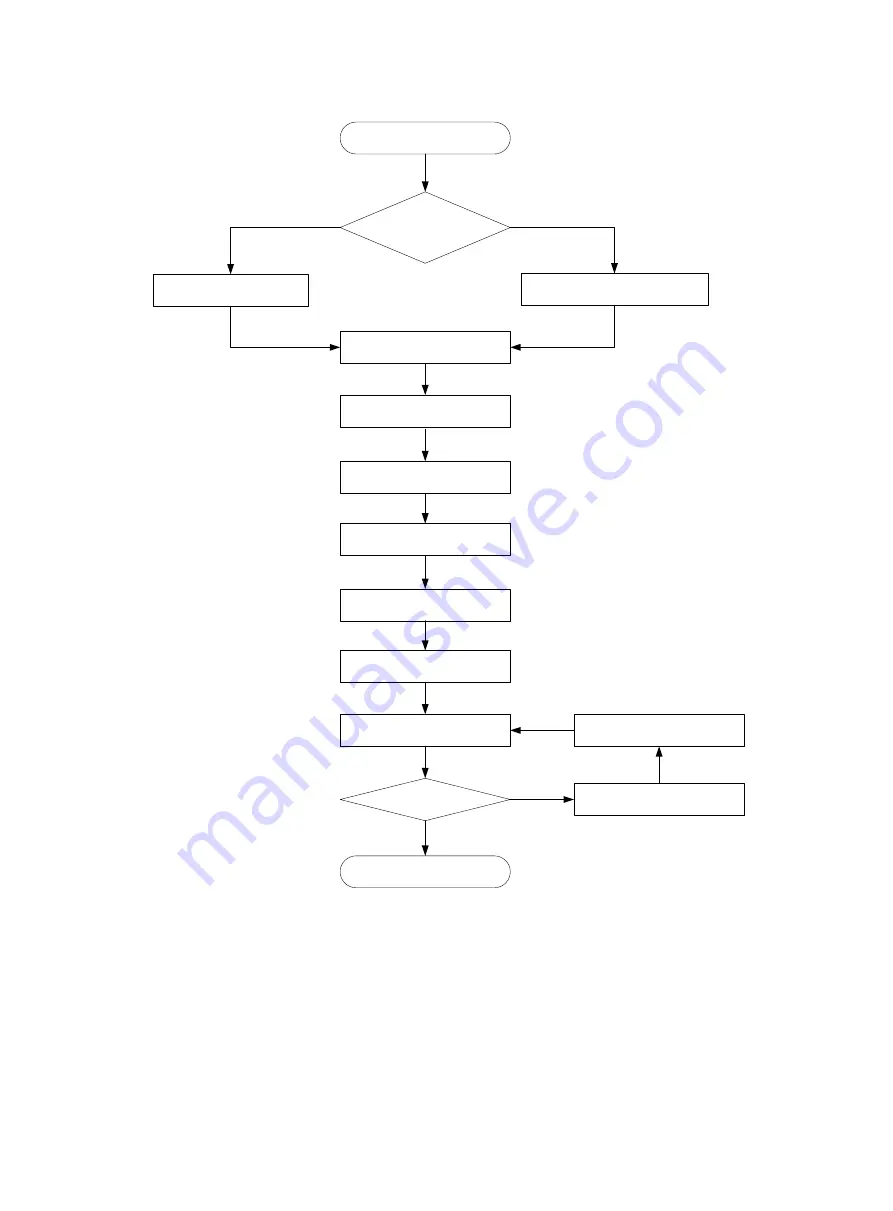
Figure 4 Installation flowchart 


Installing the gateway 

The installation procedure is the same for the MSR2600-6-X1 and 2600-10-X1 gateways. The 
following figures use the MSR2600-10-X1 gateway. 

Yes

No

Start

Ground the gateway

Install SICs

Connect interface cables

Connect the gateway to a 

configuration terminal

Connect the power cord

Verify the installation

Power on the gateway

Troubleshoot the gateway

Power off the gateway

Operating correctly? 

End

Mount the gateway 

on a workbench

Mount the gateway 

in a rack

Determine the 

installation position

Workbench-mounting

Rack-mounting

Summary of Contents for MSR2600-6-X1

Page 1: ...H3C MSR2600 6 X1 10 X1 Gigabit Ethernet Integrated Service Gateway Installation Guide New H3C Technologies Co Ltd http www h3c com Document version 6W103 20180505...

Page 2: ...ay be mentioned in this manual are the property of their respective owners Notice The information in this document is subject to change without notice All contents in this document including statement...

Page 3: ...alic Italic text represents arguments that you replace with actual values Square brackets enclose syntax choices keywords or arguments that are optional x y Braces enclose a set of required syntax cho...

Page 4: ...s Convention Description Represents a generic network device such as a router switch or firewall Represents a routing capable device such as a router or Layer 3 switch Represents a generic switch such...

Page 5: ...ardware model configuration or software version It is normal that the port numbers sample output screenshots and other information in the examples differ from what you have on your device Documentatio...

Page 6: ...ding the gateway 13 Installing interface modules 16 Connecting interface cables 17 Connecting the console cable and setting terminal parameters 19 Connecting the AC power cord 20 Verifying the install...

Page 7: ...s 29 Appendix A Chassis views and technical specifications 30 Chassis views 30 MSR2600 6 X1 30 MSR2600 10 X1 31 Technical specifications 31 Appendix B LEDs 33 MSR2600 6 X1 33 MSR2600 10 X1 33 Appendix...

Page 8: ...occurs Disconnect the power cord from the gateway if necessary Make sure the gateway is reliably grounded Connect the interface cables correctly Use an uninterrupted power supply UPS Always make sure...

Page 9: ...rostatic adsorption can cause communication failure Table 2 Dust concentration limit in the equipment room Substance Concentration limit particles m3 Dust particles 3 x 10 4 No visible dust on the tab...

Page 10: ...le Place the removed interface module on an antistatic workbench with the circuit board upward or put it in an antistatic bag Touch only the edges instead of electronic components on the circuit board...

Page 11: ...rent caused by lightning strikes route interface cables only indoors Lightning protection To enhance lightning protection for the gateway follow these guidelines Make sure the gateway is reliably grou...

Page 12: ...on tools Figure 3 Installation accessories Cage nut user supplied Grounding cable M6 rack screw Mounting brackets M4 mounting bracket screw Rubber feet Removable cable tie for the MSR2600 6 X1 Power c...

Page 13: ...h frequency devices Electromagnetic shielding for example shielded interface cables is used as required Lightning protection The gateway is reliably grounded The AC power receptacle is reliably ground...

Page 14: ...nting screw on the chassis cover intact and if you want to open the chassis contact H3C for permission Otherwise H3C shall not be liable for any consequence Installation prerequisites You have read Pr...

Page 15: ...ay Yes No Start Ground the gateway Install SICs Connect interface cables Connect the gateway to a configuration terminal Connect the power cord Verify the installation Power on the gateway Troubleshoo...

Page 16: ...ay for heat dissipation Do not place heavy objects on the gateway To mount the gateway on a workbench 1 Place the gateway upside down on the workbench and attach the rubber feet to the four round hole...

Page 17: ...10 Mounting the gateway in a rack Gateway dimensions and rack requirements Figure 6 MSR2600 6 X1 gateway dimensions 60 mm 2 36 in 300 mm 11 81 in 60 mm 2 36 in Mounting bracket Power cord E1 cable...

Page 18: ...sts and the front door A minimum of 360 mm 14 17 in between the front rack posts and the rear door MSR2600 10 X1 Height 44 2 mm 1 74 in 1 RU Width 360 mm 14 17 in Depth 423 5 mm 16 67 in 303 5 mm 11 9...

Page 19: ...holes on the front rack posts are on a horizontal line Figure 8 Marking cage nut installation holes 2 Install cage nuts as shown in Figure 9 a Insert one ear of a cage nut into the marked installation...

Page 20: ...ateway to the rack Grounding the gateway CAUTION Correctly connecting the grounding cable is crucial to lightning protection and EMI protection When you install and use the gateway first ground the ga...

Page 21: ...in the rear panel of the chassis 2 Use the grounding screw to attach the ring terminal of the grounding cable to the grounding hole See Figure 12 3 Remove the hex nut from a grounding post on the grou...

Page 22: ...ateway with a grounding strip 1 Remove the grounding screw from the grounding hole in the rear panel of the chassis 2 Use the grounding screw to attach the ring terminal of the grounding cable to the...

Page 23: ...coated Weld the yellow green grounding cable to the angel iron or steel tube and treat the joint for corrosion protection Installing interface modules Installing a SIC CAUTION SIC interface modules ar...

Page 24: ...for other types of ports see the interface module manuals Connecting a copper Ethernet port 1 Connect one end of the cable to the target Ethernet port on the gateway and the other end to an Ethernet...

Page 25: ...ess than 100 mm 3 94 in Keep the fiber end clean Make sure the Tx and Rx ports on a transceiver module are connected to the Rx and Tx ports on the peer end respectively Only an MSR2600 6 X1 gateway su...

Page 26: ...eway first connect the PC end To disconnect a PC from an operating gateway first disconnect the gateway end To connect the console cable 1 Select a configuration terminal which can be an ASCII termina...

Page 27: ...the terminal emulator programs see the user guides for these programs The following are the required terminal settings Baud rate 9600 Data bits 8 Stop bits 1 Parity none Flow control none Connecting t...

Page 28: ...ore you power on the gateway There is enough space around the gateway for heat dissipation The interface modules are installed correctly The gateway rack and power source are reliably grounded The pow...

Page 29: ...perating correctly SYS Flashing green slowly The gateway system is operating correctly The configuration terminal displays information correctly The gateway first initializes its memory at startup The...

Page 30: ...age file flash msr2600 10 X1 cmw710 boot e0006p05 bin is self decompressing Done System image is starting Line aux0 is available Press ENTER to get started Press Enter The gateway is ready to configur...

Page 31: ...all a new SIC install a filler panel in the slot and fasten the screws on the filler panel See Figure 23 Figure 23 Installing a filler panel Replacing a transceiver module Only an MSR2600 6 X1 gateway...

Page 32: ...25 Figure 24 Removing a transceiver module...

Page 33: ...esolve the issue 1 Power off the gateway 2 Verify that the gateway is connected to the power source correctly 3 Verify that the power source is operating correctly 4 Verify that the power cord is in g...

Page 34: ...e console cable is in good condition 5 If the issue persists contact H3C Support Garbled display on the configuration terminal Symptom The configuration terminal has garbled display when the gateway i...

Page 35: ...m You want to access the gateway that you are to replace with a new one but you cannot remember the password Solution If you are not to save the configuration press the RESET button for over four seco...

Page 36: ...to reboot the gateway Reset button usage guidelines The RESET button is used to reboot the system or restore the factory settings To reboot the gateway press the RESET button for a short time To reboo...

Page 37: ...r illustration only MSR2600 6 X1 Figure 25 Front panel 1 Power receptacle 2 Gigabit Ethernet copper port GE0 3 Gigabit Ethernet copper ports GE1 to GE4 4 Gigabit Ethernet fiber port SFP5 5 Console por...

Page 38: ...ESET 6 USB port 7 Gigabit Ethernet port GE0 Figure 28 Rear panel 1 SIC 3 2 SIC 2 3 SIC 1 4 Grounding terminal Technical specifications Table 6 Technical specifications Item MSR2600 6 X1 MSR2600 10 X1...

Page 39: ...303 5 mm 1 74 14 17 11 95 in Rated AC voltage 100 to 240 VAC 50 60 Hz 100 to 240 VAC 50 60 Hz Max power consumption 30 W 30 W Operating temperature 0 C to 45 C 32 F to 113 F 0 C to 45 C 32 F to 113 F...

Page 40: ...le 7 LED description LED Status Description System status LED SYS Slowly flashing green Comware has started with the configuration file and the gateway has booted up Fast flashing green The system sof...

Page 41: ...ransmitted at 1000 Mbps Steady yellow A 10 100 Mbps link is present Flashing yellow Data is being received or transmitted at 10 100 Mbps Off No link is present LED for Gigabit Ethernet fiber port SFP5...

Page 42: ...Appendix C Slot arrangement The gateway provides SIC slots The fixed ports on the gateway panel are in slot 0 Table 1 Slot arrangement Gateway model Slot arrangement MSR2600 6 X1 MSR2600 10 X1 SIC sl...

Page 43: ...e gateway 13 I Installing interface modules 16 L Lightning protection 4 M Mounting the gateway in a rack 10 Mounting the gateway on a workbench 9 MSR2600 10 X1 31 MSR2600 6 X1 30 R Rack requirements 4...

Reviews: