


Page 2
The counterweight rod is having a rear overhang of 70 mm (2 3/
4”) as to the center of the said bush. If
there is plenty of room for the counterweight rod consideration should be taken as to where the arm
base should be positioned to give a convenient position for the armtube when resting in the arm rest.
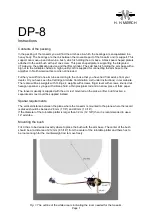
(See fig. 1)
If a separate arm rest is used, it should be placed so that the armtube when resting on it is at a suit-
able distance from the record.
Mark the center of the hole for the bush and check that the distance to the center of the turntable
platter is 212 mm (8 5/16"). Then drill a 20 mm (13/16") hole with center in this mark. Also, if separate
arm rest is used, drill a 10 mm (13/32") hole for the bush for the arm rest about 155 mm (6 1/8") in
front the 20 mm hole.
Accommodate the bush with the heavy central body of the tonearm in the 20 mm hole so that the
“narrow” end of the black pear shaped plate is pointing forwards. Then pull out the piece of rubber,
which is squeezed in under this heavy body.
Put the armtube on top of the arm base with the 5 pins in the flange of the armtube inserted into the 5
holes in the plexiglass. Secure the armtube with the knurled nut screwed onto the thread going
through the flange of the armtube.
The position of the black pear shaped plate must be adjusted so that the armtube can move in a
suitable angle over the turntable platter and so that the armtube can rest in the arm rest in a suitable
distance from the turntable platter: Move the armtube resting on the girder of the raised pick-up lifter
all the way to the end of the girder. Then turn the pear shaped plate, so that the position of the stylus
is on line with the direction from the center of knurled nut holding the armtube to the center of the
turntable spindle.
Then put the big nut onto the thread of the bush and tighten it - making sure that the bush with the
pear shaped plate does not turn (Fig. 1).
Mounting the cable to the amplifier
Put the plug of the tonearm cord into the socket inside the bottom of the arm pillar. Make sure that the
big nut holding the arm base is tightened before pushing the connector of the tonearm cord into the
arm base. Try to avoid bending the cable too sharply right next to the tonearm connector. If the
turntable has a floating sub chassis, the cable should not be restricted in any way, and it should be
arranged in a suitable arc, so that it does not limit the free movements of the suspension. Remember
that the ground wire should always be connected to the chassis (ground terminal) of the amplifier. The
chassis of the turntable in most cases also has to be electrically connected to the arm base.
Putting on the side weights
First the weights for the side rods should be put on. Take the smaller of the weights
with screws
and
hang one on each side rod (without tightening the screws). Then likewise take the bigger weights with
screws and hang one on each side rod (Fig. 2).
Fig. 2. All the weights with screws hanging on the side rods.


