background image

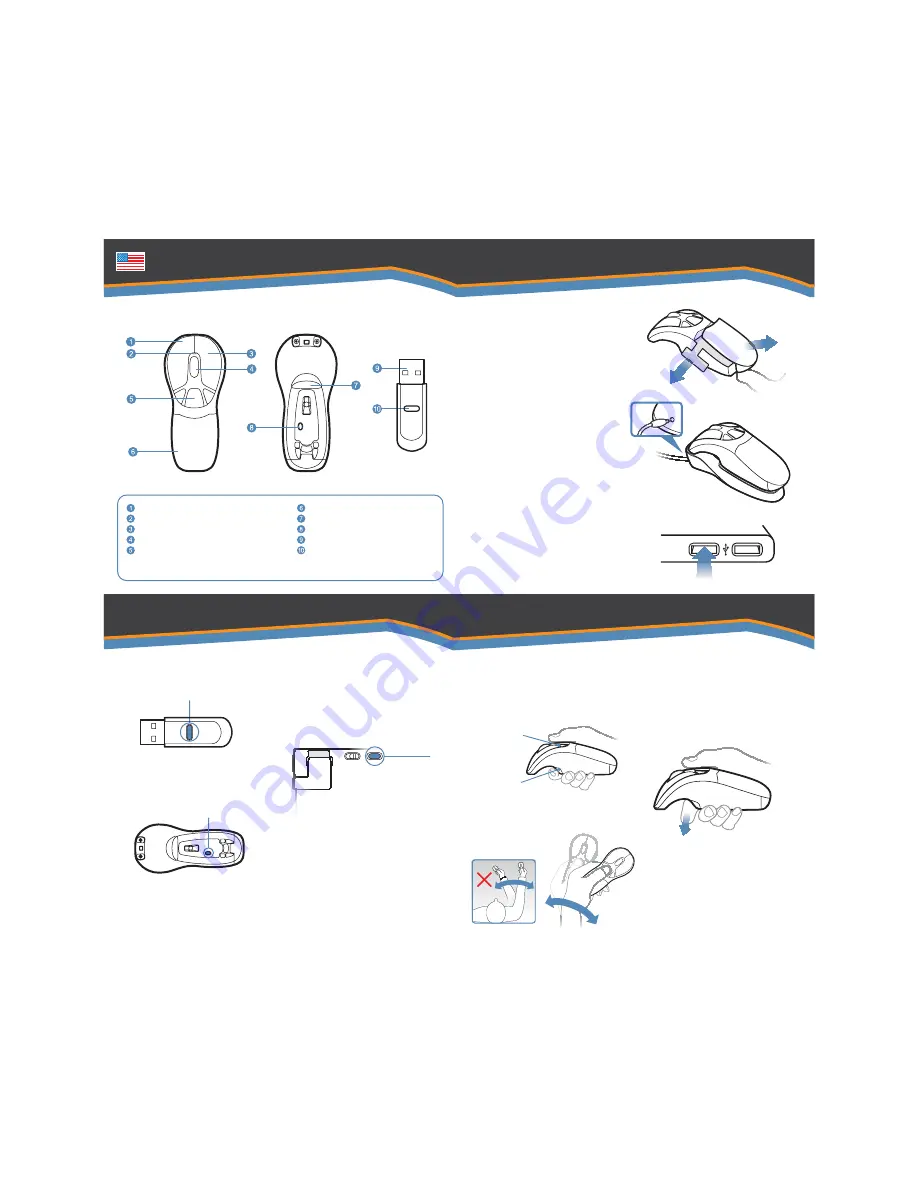
Lithium-ion Battery
In-Air Activation Trigger
Mouse Connect Button
2.4 GHz USB Receiver
USB Receiver Connect Button

Left Mouse Button
LED light
Right Mouse Button
Scroll Wheel
Programmable Mouse Buttons (3)

Getting Started

In-Air Operation

2


1


Removing Insulator tab.

9

Hold the mouse using a comfortable 
handshake position. Use your index 
finger to access the in-air activation 
trigger and your thumb to access the 
top mouse buttons.

11

Click and hold the in-air activation 
trigger then move the cursor over a 
target and release the trigger before 
clicking. This parks the cursor over 
the target and allows you to click 
more accurately.

12

Double-clicking the in-air activation 
trigger puts the Air Mouse in motion 
mode so you can move the cursor 
without holding the trigger.

10


Press and hold the in-air activation trigger 
and move the cursor by flexing only your 
wrist while keeping your arm and body 
stationary.

Overview

Press the release button on the bottom 
of the mouse and remove battery pack.  
Remove and discard the plastic 
insulator tab.  Replace battery.

4


Press the connect button on the USB 
receiver.

3


Insert the USB receiver into an 
available USB port on your computer.

5


Press the connect button on the 
bottom of the mouse


6


Top Buttons

Trigger

Plug one end of the included USB 
charging cable into the desktop 
charger and the other end into an 
available USB port. Place the mouse 
on the charging cradle and charge for 
8 hours. The blue LED will flash  while 
charging.

If your product includes the compact 
keyboard, turn the keyboard over, 
insert the 2AAA batteries and turn on 
the keyboard. Repeat step 4 then 
press the connect button on the back 
of the keyboard.

Visit www.gyration.com/Motiontools 
to download the MotionTools 
software (Mac and PC) and enjoy 
gesture recognition for your favorite 
applications.

8

7

The computer will automatically 
detect and configure the Air Mouse.

Summary of Contents for GYM1100EU

Page 1: ...yration Air Mouse Choose your product Cliquez sur votre produit Selecta su producto Warranty Garantie Garant a Air Mouse GO Plus GYM1100NA GYM1100EU Air Mouse Elite GYM5600NA GYM5600EU www gyration co...

Page 2: ...Gyration Air Mouse Elite User Guide Guide de l utilisateur Bedienungsanleitung Manual de usuario Manuale dell utente Gebruikershandleiding www gyration com...

Page 3: ...keeping your arm and body stationary Overview 4 Press the connect button on the bottom of the mouse 3 Press the connect button on the USB receiver 7The computer will automatically detect and configure...

Page 4: ...c puis d placez le curseur par simple flexion du poignet sans bouger votre bras ni le reste de votre corps Pr sentation 4 Appuyez sur le bouton de connexion situ sous la souris 3 Appuyez sur le bouton...

Page 5: ...rn Sie den Cursor indem Sie nur Ihr Handgelenk bewegen Arm und K rper halten Sie dabei ruhig bersicht 4 Dr cken Sie die Verbindungstaste an der Mausunterseite 3 Dr cken Sie die Verbindungstaste am USB...

Page 6: ...activaci n a rea y desplace el cursor flexionando nicamente la mu eca sin mover el brazo ni el cuerpo Componentes 4 Pulse el bot n de conexi n en la parte inferior del rat n 3 Pulse el bot n de conex...

Page 7: ...e di attivazione delle funzioni In aria e spostare il cursore muovendo solo il polso Braccio e corpo devono restare fermi Introduzione 4 Premere il pulsante di connessione sul fondo del mouse 3 Premer...

Page 8: ...w arm en lichaam stil Overzicht 4 Druk op de verbindingsknop aan de onderzijde van de muis 3 Druk op de verbindingsknop op de USB ontvanger 5 Als uw product bevat de toetsenbord draai het toetsenbord...

Page 9: ...Gyration Air Mouse GO Plus User Guide Guide de l utilisateur Bedienungsanleitung Manual de usuario Manuale dell utente Gebruikershandleiding www gyration com...

Page 10: ...by flexing only your wrist while keeping your arm and body stationary Overview Press the release button on the bottom of the mouse and remove battery pack Remove and discard the plastic insulator tab...

Page 11: ...essez le bouton de connexion sur le r cepteur USB 3 Ins rez le r cepteur USB dans un port USB disponible sur votre ordinateur 5 Pressez le bouton de connexion au bas de la souris 8 7 L ordinateur d te...

Page 12: ...toffisolierstreifen Setzen Sie den Akku wieder ein 4 Dr cken Sie die Verbindungstaste am USB Empf nger 3 Schlie en Sie den USB Empf nger an einen freien USB Anschluss an Ihrem Computer an 5 Dr cken Si...

Page 13: ...vaci n a rea y desplace el cursor flexionando nicamente la mu eca sin mover el brazo ni el cuerpo Presione el bot n de apertura en la parte inferior del rat n y quite las pilas Desprenda y deseche la...

Page 14: ...Rein serire le batterie 4 Premere il pulsante di connessione sul ricevitore USB 3 Inserire il ricevitore USB in una porta USB del computer 5 Premere il pulsante di connessione sul fondo del mouse 8 7...

Page 15: ...ndingsknop op de USB ontvanger 3 Steek de USB ontvanger in een vrije USB poort op de computer 5 Druk op de verbindingsknop aan de onderzijde van de muis 8 7 De computer wordt automatisch gedetecteerd...

Page 16: ...UWLFXODUO LPSRUWDQW LQ UXUDO DUHDV DXWLRQ 8VHUV VKRXOG QRW DWWHPSW WR PDNH VXFK FRQQHFWLRQV WKHPVHOYHV EXW VKRXOG FRQWDFW WKH DSSURSULDWH HOHFWULF LQVSHFWLRQ DXWKRULW RU HOHFWULFLDQ DV DSSURSULDWH 6 D...

Page 17: ...OHQ 0RYHD ZZZ J UDWLRQ FRP QIRUPDWLRQV UpJOHPHQWDLUHV YLV DX XWLOLVDWHXUV HW pTXLSHPHQW D pWp WHVWp HW VD FRQIRUPLWp D pWp pWDEOLH SDU UDSSRUW DX OLPLWHV DSSOLFDEOHV j XQ GLVSRVLWLI GH FODVVH FRQIRUPp...

Page 18: ...QHQ HUIDKUHQHQ 5XQGIXQN XQG HUQVHKWHFKQLNHU LHVHV 3URGXNW YHUZHQGHW EHL HWULHE RFKIUHTXHQ GLH 9HUZHQGXQJ LQ OXJ HXJHQ NDQQ GDKHU DXIJUXQG P JOLFKHU 6W UXQJHQ HLQJHVFKUlQNW VHLQ UNOlUXQJ LHVHV HUlW LVW...

Page 19: ...GDG HOHFWURPDJQpWLFD GH DFXHUGR FRQ OD QRUPDWLYD 1 ODVH YLVR VREUH HO HTXLSR GH QGXVWU DQDGD D FHUWLILFDFLyQ GH QGXVWU DQDGD LGHQWLILFD HO HTXLSR FHUWLILFDGR VWD FHUWLILFDFLyQ UHSUHVHQWD TXH HO HTXLSR...

Reviews: