background image

Taking a Look 

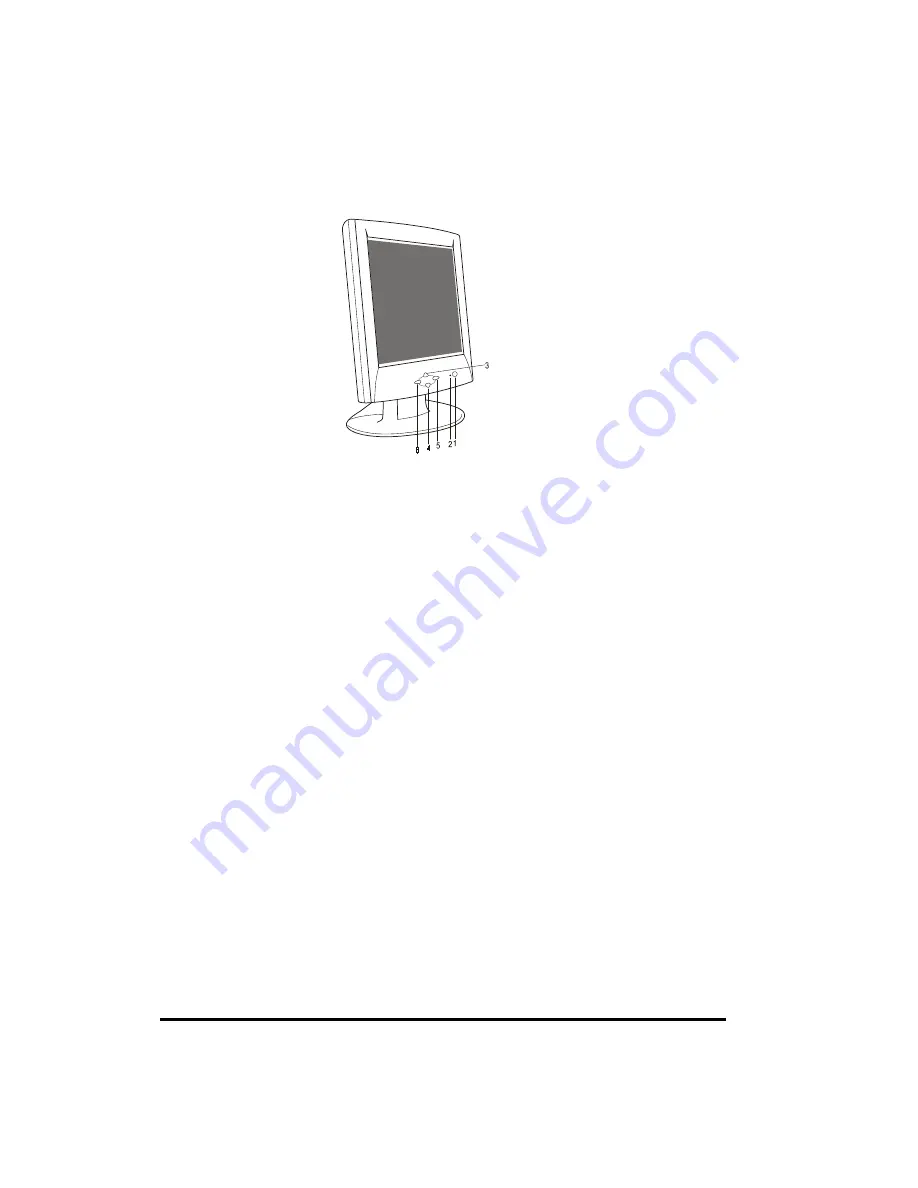
Front View


1. 

Power Switch 

Pressing this button turns the display system power 

on

 or 

off

2. 

Power LED

    This indicator illuminates when the power is turned on. It is also used to 

indicate each power saving stage of monitor by changing it color. 

3. 

Menu/Select


  Pressing this button pops up the OSD menus on the screen, and used to 

select  (“Up” direction) the OSD control options on the screen. 

4. 

Select  

▼  

This button is used to select  (“Down” direction) the OSD control options on 

the screen. 

5. 

    This button is used to increase the value of the selected OSD control option. 

6. 

0

    This button is used to decrease the value of the selected OSD control option. 


Quick Adjustment Function 

When the OSD Menu is not active, the following functions are available for the quick 

adjustment. 


Pressing  

 button once pops up the OSD Function Main Menu .


Pressing 

 button once pops up the small Brightness icon.  Use 

or 

0

button to adjust 

the Brightness level. 


Pressing  

 button once pops up the small Volume icon.  Use 

or 

0

button to adjust the 

Volume level. 


Pressing  

0


button once pops up the small Input Select icon.  Press  

0

 button again to 

switch to the digital interface or video-in function.  (Only for the model with digital input 

or video-in function)


Summary of Contents for P17PH-L

Page 1: ...ting instructions Improper adjustment of other controls may result in damage and will often require extensive work by a qualified technician to restore the product to normal operation If the product has been dropped or the cabinet has been damaged If the product exhibits a distinct change in performance indicating a need for service Power and extension cords Do not allow anything to rest on the po...

Page 2: ...e receiver is connected Consult the dealer or an experienced radio TV technician for help This device complies with Part 15 of the FCC Rules Operation is subject to the following two conditions 1 This device may cause harmful interference and 2 this device must accept any interference received including interference that may cause undesired operation Notice The use of non shielded interface with t...

Page 3: ...system provides sound performance Power management system conforms to VESA DPMS standard Universal power adapter Support DDC1 2B for Plug Play compatibility Advanced OSD control for picture quality adjustment Detachable stand for wall mounting application Optional digital interface Cleaning Gently wipe the screen with a clean camel hair lens brush or a soft clean lint free cloth This removes dust ...

Page 4: ...d to increase the value of the selected OSD control option 6 0 This button is used to decrease the value of the selected OSD control option Quick Adjustment Function When the OSD Menu is not active the following functions are available for the quick adjustment Pressing button once pops up the OSD Function Main Menu Pressing button once pops up the small Brightness icon Use or 0button to adjust the...

Page 5: ...ver you adjust it and do not touch the screen Controls and Adjustment Adjusting with the OSD Control To Display and Select the OSD Functions Pressing or once pops up the OSD function main menu and then pressing or a second time to select the different OSD control option To Adjust the Value of the Control Option Pressing button changes the value of the selected OSD control option 5 ...

Page 6: ...tal CONTRAST Adjust the contrast using and buttons BRIGHTNESS Adjust the brightness using and buttons VOLUME Adjust the speaker volume using and buttons AUTO TUNE Press or buttons to make LCD monitor adjust the related parameters automatically for optimal display status H POSITION Pressing moves the display image to the right Pressing moves the display image to the left V POSITION Pressing moves t...

Page 7: ...must be connected to a computer which supports VESA DPMS to fulfill the requirements in the NUTEK specification 80329994 96 Time settings are adjusted from the system unit by software From indicated inactivity to Power Saving Position Off the to total time must not be set to more than 70 minutes Mode Power LED Color Power Consumption On Green 48W max Stand by Orange 2W Suspend Orange 2W Off Orange...

Page 8: ... 31 500 5 640X480 VESA75 37 500 75 000 31 500 6 800X600 SVGA 35 156 56 250 36 000 7 800X600 SVGA 37 879 60 317 40 000 8 800X600 VESA72 48 077 72 188 50 000 9 800X600 VESA75 46 875 75 000 49 500 10 1024X768 VESA60 48 363 60 004 65 000 11 1024X768 VESA70 56 476 70 069 75 000 12 1024X768 VESA75 60 023 75 029 78 750 13 1152X864 VESA 67 5 75 0 108 0 14 1280X960 VESA 60 0 60 0 108 0 15 1280X1024 VESA 64...

Page 9: ... Signal Connector Analog 15 Pin D Sub Digital 24 pin DVI option Plug Play DDC1 2B Audio System 1W Per Channel Power Adapter Input AC 100 240V 50 60Hz Output DC 12V 4 0A Operating Temperature 5o C 35o C 41o F 95o F Conditions Humidity 20 80 no condensation Altitude To 10 000 Feet Storage Conditions Temperature 20o C 60o C 4o F 140o F Humidity 10 90 no condensation Dimensions WxHxD 439 x 461 x 195 m...

Reviews: