


Modular design of the matrix switch
12
· G&D ControlCenter-Digital-160
3. Press the levers in the direction of the card’s left and right outer edges.
4. Pull the card slightly upwards to remove it from the housing.
How to install the controller card:
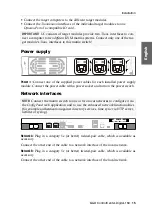
1. Turn off the power supply modules at the
Power 1
,
Power 2
and
Power 3
buttons.
2. Press the red sliders of the card you want to install in the direction of the arrow to
release the lever.
3. Place the card on the slot’s guard rail.
4. Press the middle of the front panel to slide the card horizontally in the slot until
the levers are connected to the housing.
5. Push the levers inwards without using much force and fix the card in the housing.
Installing or replacing the switch card
How to replace the switch card:
1. Turn off the power supply modules at the
Power 1
,
Power 2
and
Power 3
buttons.
2. Press the card’s red sliders in the direction of the arrow to release the lever.
3. Press the levers in the direction of the card’s left and right outer edges.
4. Pull the card horizontally out of the housing.
How to install the switch card:
1. Press the red sliders of the card you want to install in the direction of the arrow to
release the lever.
2. Place the card’s aluminium carrier sheet (under the board) into the guide rail of
the slot.
3. Press the middle of the front panel to slide the card horizontally in the slot.
4. Make sure that the levers are connected to the housing and are placed at the
height of the holes of the perforated rail.
5. Push the levers inwards to fix the card in the housing.
IMPORTANT:
Installing and replacing the switch card requires using a certain force.
Make sure to put force on both levers.