Gunter & Hauer EOV 7510 BS Instruction Manual Download Page 4


F.  Digital display 

G.  Adjust key down 

H.  Adjust key up 

I. 

Confirm key 

J.  Start/Pause/ Lock key 

K.  Dripping pan or baking sheet   

L.  Guides for sliding the racks or dripping pan in and out 

M.  Oven Rack   


Initially use the oven                                                                                

This multi-function oven combines the advantages of traditional convection ovens with those of the more 

modern fan assisted models in a single appliance. 


It is an extremely versatile appliance that allows you to choose easily and safely between 5 different cooking 

modes. The various features offered by the oven are selected by means of selector knob “B” and thermostat 

“C” situated on the control panel. 

Notice:   

Some modes feature the pull push knob, to use the special knob, users have to push it out firstly, then turn it 

around to your desired function/temperature/cooking time. Once the setting is finished, the ovens will start to 

work no matter knob still stands out or is pushed in the position.   


Notice:   

This first time you use your appliance, we recommend that you set the thermostat to the highest setting and 

leave the oven on for about half an hour with nothing in it, with the oven door shut. Then, open the oven door 

and let the room air  in. The odor  that is often detected during this initial use is due to the evaporation of 

substances used to protect the oven during storage and until it is installed. 


Notice:   

Place the dripping pan provided on the bottom shelf of the oven to prevent any sauce and/or grease from 

dripping onto the bottom of the oven only when grilling food or when using the rotisserie (only available on 

certain models). For all other types of cooking, never use the bottom shelf and never place anything on the 

bottom of the oven when it is in operation because this could damage the enamel. Always place your cookware 

(Dishes, aluminium foil, etc.) on the grid provided with the appliance inserted especially along the oven guides. 


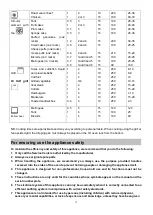
Defrost 


The fan runs without heat to reduce the defrosting time of frozen foods. The time required to defrost the food 

will depend on the room temperature, the quantity and type of food. 


“Top” oven 


Pre-set temperature”: between 50

℃ and 250℃. The top hea

ting element comes on. 

This mode can be used to brown food at the end of cooking. 


Conventional mode 


Pre-set temperature: between 50

℃ and 250. On this settin

g, the top and bottom heating elements come on. 

Summary of Contents for EOV 7510 BS

Page 1: ...Gunter Hauer Instruction Manual Built in oven EOV 7510 BS EOV 7510 BSX...

Page 2: ...ating elements Children less than 8 years of age shall be kept away unless continuously supervised 2 CONNECTION OF THE FEEDING CABLE TO THE MAINS Connect the feeding cable of the oven to a plug suitab...

Page 3: ...hock 2 Accessible parts may become hot during use Children should be kept away 4 Do not use harsh abrasive cleaners or sharp metal scrapers to clean the oven door glass since they can scratch the surf...

Page 4: ...t half an hour with nothing in it with the oven door shut Then open the oven door and let the room air in The odor that is often detected during this initial use is due to the evaporation of substance...

Page 5: ...rly recommended for dishes requiring a gratin finish or for those requiring considerably prolonged cooking times such as for example lasagna pasta bakes roast chicken and potatoes etc Moreover the exc...

Page 6: ...ing between the oven door and the control panel How to operate your oven Set the clock When the oven is on at the first time the clock 88 88 will keep flashing press the key or to set local time Press...

Page 7: ...oduct for oven cleaning following the instructions provided on the packet 3 If you use your oven for an extended period of time condensation may form Dry it using a soft cloth 4 There is a rubber seal...

Page 8: ...ore replacing the lamp to avoid the possibility of electric shock 2 Remove the glass cover of the lamp holder 3 Remove the lamp and replace with a lamp resistant to high temperature 300C with the foll...

Page 9: ...racks During fan assisted cooking use two of the three central racks the lowest and highest racks receive the hot air directly and therefore delicate foodstuffs could be burnt on these racks 2 As a ge...

Page 10: ...gy approx 10 When using this mode we advise you to set the thermostat to 200 as it is the most efficient way to use the grill which is based on the use of infrared rays However this does not mean you...

Page 11: ...perature setting Place the meat on the centre of the grid and place the dripping pan beneath it to catch the fat Make sure that the grid is inserted so that it is in the centre of the oven If you woul...

Page 12: ...g to personal taste When cooking using the grill or fan assisted grill the dripping pan must always be placed on the 1st oven rack from the bottom For ensuring use the appliance safety To maintain the...

Page 13: ...ntact with the hot parts of the appliance exposing the appliance to atmospheric agents such as rain or sunlight using the oven for storage purposes using flammable liquids near the appliance using ada...

Page 14: ...nly by a qualified person in compliance with the instructions provided The manufacturer declines all responsibility for improper installation which may harm persons and animals and damage property Imp...

Page 15: ...ith the electrical parts of the oven must not be possible once it has been installed All parts which ensure the safe operation of the appliance must be removable only with the aid of a tool To fasten...

Page 16: ...h Directive 2002 96 EC It will then be recycled or dismantled to minimize impacts on the environment electrical and electronic products are potentially dangerous for the environment and human health d...

Page 17: ...M hlenstrasse 8a Berlin 14167 Germany www gunter hauer eu e mail info gunter hauer de...

Reviews: