background image

Customer Helpline

0333 3201989

13

Operating Instructions

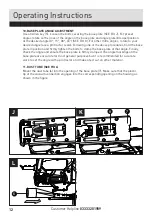
12� FINGER PROTECTION 

The finger protection is located in front of the blade holder. Whilst working, it will help 
prevent accidental contact with moving blade.

13� DUST BLOWER AIR HOLE

This is a small aperture located underneath the housing just behind the blade guide. 
Ensure this is kept clean to allow the air flow to continually blow dust away from the cutting 
area.

14� WORK LIGHT 

Press the on/off switch (2), the work light(14)will illuminate. Release the on/off switch to 
turn off the work light.

CAUTION:

 Do not look into the strong light or see the source of light directly.

If your jigsaw becomes too hot, especially when used at low speed, set the speed to 
maximum and run no Load for 2-3 minutes to cool the motor. Avoid prolonged usage at very 
low speeds.

GENERAL

Always use a blade suited to the material and material thickness to be cut. Always ensure 
the work–piece is firmly held or clamped to prevent movement. For easier control, use low 
speed to start cutting, then increase to correct speed.
Any movement of the material may affect the quality of the cut. The blade cuts on the 
upward stroke and may chip the uppermost surface or face of the work piece. Ensure your 
uppermost surface is a non-visible surface when your work is finished.

CUTTING LAMINATES

Use a fine tooth blade when cutting most laminates and thin wood materials. To reduce 
edge chipping, clamp pieces of waste wood at both ends on both sides and cut through the 
waste wood during cutting.

CIRCLE CUTTING

Do not use the pendulum action when cutting tight circles or angles.

Working Hints For Your Jigsaw

Summary of Contents for PSJ700G

Page 1: ...uild jigsaw These instructions contain important information that will help you get the best from your Guild jigsaw ensuring it remains safe to operate If you need help or have damaged or missing parts call the Customer Helpline on 0333 3201989 After Sales Support PSJ700G UK Ireland 0333 3201989 Help guildpowertools co uk ...

Page 2: ...Safety Information 3 In The Box 7 Accessories 7 Operating Instructions 8 Working Hints For Your Jigsaw 13 Maintenance 15 Technical Data 15 Environmental Protection 16 Guarantee 17 Declaration of Conformity 17 Plug Replacement Uk Ireland Only 18 ...

Page 3: ...dicate the appropriate safety measures you should take when assembling and operating the jigsaw To reduce the risk of injury Please read the instruction manual Wear eye protection Wear ear protection Wear dust mask Warning Double insulation Waste electrical products must not be disposed of with household waste Please recycle where facilities exist Check with your local authorities or retailer for ...

Page 4: ...r grounded c Do not expose power tools to rain or wet conditions Water entering a power tool will increase the risk of electric shock d Do not abuse the cord Never use the cord for carrying pulling or unplugging the power tool Keep cord away from heat oil sharp edges or moving parts Damaged or entangled cords increase the risk of electric shock e When operating a power tool outdoors use an extensi...

Page 5: ...itch is dangerous and must be repaired c Disconnect the plug from the power source and or the battery pack from the power tool before making any adjustments changing accessories or storing power tools Such preventive safety measures reduce the risk of starting the power tool accidentally d Store idle power tools out of the reach of children and do not allow persons unfamiliar with the power tool o...

Page 6: ...gs 1 Hold jigsaw by insulated gripping surfaces when performing an operation where the cutting accessory may contact hidden wiring or its own cord Cutting accessory contacting a live wire may make exposed metal parts of the power tool live and could give the operator an electric shock 1 Always wear a dust mask Additional Safety Rules for Jigsaw ...

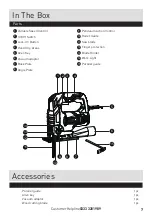
Page 7: ... Blade Holder Work Light Parallel guide Variable Speed Control On Off Switch Lock On Button Hand Grip Areas Allen Key Vacuum adaptor Base Plate Angle Plate 1 2 3 11 4 5 6 7 8 9 10 12 13 14 15 12 11 13 14 7 8 9 10 1 2 3 4 5 6 15 Accessories Parallel guide 1pc Allen key 1pc Vacuum adaptor 1pc Wood cutting blade 1pc ...

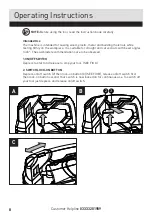
Page 8: ...raight and curved cuts with bevel angles to 45 The saw blade recommendations are to be observed 1 ON OFF SWITCH Depress to start and release to stop your tool SEE FIG A 2 SWITCH LOCK ON BUTTON Depress on off switch 2 then lock on button 3 SEE FIG B release on off switch first then lock on button second Your switch is now locked on for continuous use To switch off your tool just depress and release...

Page 9: ...he material material thickness and blade specification to be used also possible during no load operation See Chart 1 for general guidance on speed selection Avoid prolonged use at very low speed as this may damage your jigsaw s motor Chart 1 Material Speed setting Wood 5 6 Metal 3 4 Aluminum 3 5 PVC 3 4 Ceramic 3 5 Operating Instructions ...

Page 10: ...acing forward Insert the blade s mounting portion into the groove in the blade holder until it touches the bottom of the holder Then firmly tighten the set screw as shown in FIG E NOTE To fit the blade firmly do not insert the blade over the line SEE FIG G WARNING blade teeth are very sharp For best cutting results ensure you use a blade suited to the material and cut quality you need 6 ROLLER GUI...

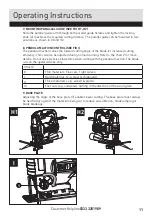
Page 11: ...tting efficiency This can also be adjusted during no load running Refer to the chart 2 for more details Do not use excessive blade force when cutting with the pendulum action The blade cuts on the upward stroke only Chart 2 0 Thin materials Fine cuts Tight curves I Hard materials e g steel chipboard II Thick materials e g wood plastic III Fast cuts e g softwood Cutting in the direction of the wood...

Page 12: ...above procedures hold the base plate in position and firmly tighten the bolts to clamp the base plate at that angle Finally check the angle and ensure the base plate is firmly clamped The angle markings on the base plate are accurate for most general purposes but it is recommended for accurate work to set the angle with a protractor and make a test cut on other material 11 DUST TUBE SEE FIG L Moun...

Page 13: ...maximum and run no Load for 2 3 minutes to cool the motor Avoid prolonged usage at very low speeds GENERAL Always use a blade suited to the material and material thickness to be cut Always ensure the work piece is firmly held or clamped to prevent movement For easier control use low speed to start cutting then increase to correct speed Any movement of the material may affect the quality of the cut...

Page 14: ...ests on the work piece continue to saw along the cutting line SEE FIG M N METAL CUTTING Use a finer tooth blade for ferrous metals and a coarse tooth blade for non ferrous metals When cutting thin sheet metals always clamp wood on both sides of the sheet to reduce vibration or tearing of the sheet metal Both wood and sheet metal must be cut Do not force the cutting blade when cutting thin metal or...

Page 15: ...free of dust Occasionally you may see sparks through the ventilation slots This is normal and will not damage your power tool If the supply cord is damaged it must be replaced by the manufacturer its service agent or similarly qualified persons in order to avoid a hazard Maintenance Technical Data Voltage 230 240V 50Hz Power input 710W No load speed 0 3000 min Stroke length 20mm Bevel capacity 45 ...

Page 16: ...ool being in good condition and well maintained The use the correct accessory for the tool and ensuring it is sharp and in good condition The tightness of the grip on the handles and if any anti vibration accessories are used And the tool is being used as intended by its design and these instructions This tool may cause hand arm vibration syndrome if its use is not adequately managed WARNING To be...

Page 17: ...hown to have an inherent defect present at the time of sale the store will provide you with a replacement Your statutory rights remain unaffected Issue1 08 2015 Declaration of Conformity This Guild 710W Jigsaw model number PSJ700G fully complies with the Machinery Directive 2006 42 EC Electromagnetic Compatibility Directive 2004 108 EC before 2016 04 20 and 2014 30 EC since 2016 04 20 RoHS Directi...

Page 18: ...loured blue must be connected to the terminal which is marked with N The wire which is coloured brown must be connected to the terminal which is marked with L WARNING Never connect live or neutral wires to the earth terminal of the plug Only fit an approved BS1363 A plug and the correct rated fuse Note If a moulded plug is fitted and has to be removed take great care in disposing of the plug and s...

Page 19: ......

Page 20: ......

Reviews: