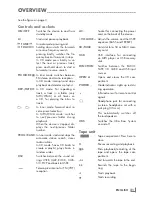
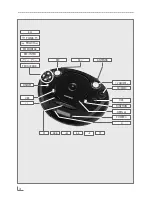
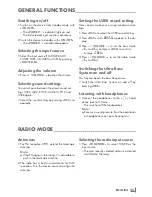
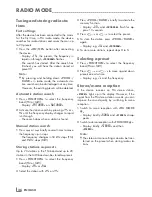
Grundig RRCD 3720 DEC User Manual Download Page 11

ENGLISH

26 

RADIO MODE

---------------------------------------------------------------------------------------------------------------------------

Tuning and storing radio sta-

tions

First settings

After the device has been connected to the mains 

for  the  first  time,  in  FM  radio  mode,  the  device 

searches for radio stations and saves them on up 

to 20 presets.

1

 Press  the  »

ON/OFF

«  button  after  connecting 

the device.

–  Display:  »

FM

«,  the  presets,  the  frequency  in 

rapid run-through, »

PROGRAM

« flashes.

–  The search has started. After the search has 

finished,  you  will  hear  the  station  stored  at 

preset 01.

Note:

7  

By  pressing  and  holding  down  »

PROG./

RAND.

«  in  radio  mode,  the  automatic  sta-

tion search can be started again at any time. 

However, the existing presets will be deleted.

Automatic station search

1

 Press  »

FUNCTION

«  to  select  the  frequency 

band (FM or MW).

– Display: »

FM TUNER

« or »

MW TUNER

«.

2

 Activate the station search by pressing » « or »

« until the frequency display changes to rapid 

run-through.

– The search stops when a station is found.

Manual station search

1

 Press » « or » « briefly several times to move 

the frequency up in steps.

–  The frequency changes in 50 kHz steps (FM) 

and 9 kHz steps (MW).

Storing stations as presets

Up to 20 stations in the FM band and up to 20 

stations in the MW band can be stored as presets.

1

 Press  »

FUNCTION

«  to  select  the  frequency 

band (FM or MW).

– Display: »

FM

« or »

MW

«.

2

 Select the station with » « or » «.

3

 Press »

PROG./RAND.

« briefly to activate the 

memory function.

–  Display:  »

00

«  and  »

PROGRAM

«  flash  for  ap-

prox. 10 seconds.

4

 Press »


&

« or »  

%

« to select the preset.

5

 To  store  the  station,  press  »

PROG./RAND.

«


again.

– Display: e.g. »

10

« and »

PROGRAM

«.

6

 To store more stations, repeat steps 

2

 to 

5

.

Selecting a preset

1

 Press  »

FUNCTION

«  to  select  the  frequency 

band (FM or MW).

2

 Press »


&

« or »  

%

« to move up and down 

presets one at a time.

– Display: e.g. »

7

« and the frequency.

Stereo/mono reception

If  the  device  receives  an  FM  stereo  station,  

»

STEREO

« lights up in the display. However, if the 

signal from the FM stereo station is weak, you can 

improve  the  sound  quality  by  switching  to  mono 

reception.

1

 Switch  to  mono  reception  with  »

FM  MODE 

7

«.

–  Display: briefly »

MONO

« and »

STEREO

« disap-

pears.

2

 Switch to stereo reception with »

FM MODE 

7

«.

–  Display: briefly »

STEREO

« and then 

»

STEREO

«.

Note:

7  

The stereo or mono settings can also be trans-

ferred on the preset when storing radio sta-

tions.

Summary of Contents for RRCD 3720 DEC

Page 1: ...NL DE NO EN DA FR SV IT TR ES FI RU RADIO CASSETTE RECORDER WITH CD RRCD 3720 DEC ...

Page 2: ... 3 TRACK ON OFF TUNE eII PROG RAND REP INTRO DSC AC VOLUME SD MMC FUNCTION OPEN POWER USB FM MODE 7 II 7 rr ee r ANTENNA UBS 0 ...

Page 3: ...FUNZIONI GENERALI 53 FUNZIONAMENTO RADIO 55 MODALITÀ CD MP3 58 MODALITÀ USB E SD MMC 58 MODALITÀ CASSETTA 60 INFORMAZIONI РУССКИЙ ЯЗЫК 62 УСТАНОВКА И БЕЗОПАСНОСТЬ 63 ОБЗОР 66 ЭЛЕКТРОПИТАНИЕ 67 ОБЩИЕ ФУНКЦИИ 67 РЕЖИМ РАДИОПРИЕМНИКА 69 РЕЖИМ CD MP3 72 РЕЖИМ USB И SD MMC 72 РЕЖИМ TAPE 74 ИНФОРМАЦИЯ ESPAÑOL 76 INSTALACIÓN Y SEGURIDAD 77 VISTA GENERAL 80 ALIMENTACIÓN DE CORRIENTE 81 FUNCIONES GENERALES...

Page 4: ...37 ALLMÄNNA FUNKTIONER 137 RADIO 139 CD MP3 SPELAREN 141 USB OCH SD MMC SPELAREN 142 KASSETTBANDSPELAREN 144 INFORMATION SUOMI 146 SIJOITTAMINEN JA TURVALLISUUS 147 YLEISKATSAUS 150 VIRRANSYÖTTÖ 151 YLEISET TOIMINNOT 151 RADIO TOIMINTO 153 CD MP3 TOIMINTO 156 USB JA SD MMC TOIMINTO 156 KASETTITOIMINTO 158 TIETOJA TÜRKÇE 160 YERLEŞTİRME VE EMNİYET 161 GENEL BAKIŞ 164 GÜÇ KAYNAĞI 165 GENEL İŞLEVLER ...

Page 5: ...tilation when positioning the device There must be a free space of at least 10 cm behind the device Do not place objects on the ventilation slots Do not cover the device with newspapers table cloths curtains etc 7 Do not place any vessels containing liquids for example vases on the device Do not place any naked flames such as candles on the de vice Do not insert objects into the CD compart ment of...

Page 6: ...ation search stores radio stations In CD mode Saves CD tracks to create a playlist plays tracks in random order DSC Switches between the sound set tings USER JAZZ ROCK CLAS SIC POP and back to USER Telescopic antenna for FM VHF reception OVERVIEW AC Socket for connecting the power cord on the back of the device VOLUME Adjusts the volume and the USER equaliser BASS and TREBLE SD MMC Card slot for a...

Page 7: ...racks is played MP3 In MP3 mode shows that an MP3 track is being played back WMA In WMA mode shoes that an WMA track is being played back OVERVIEW 00000 00 STEREO MP3 REPEAT 1 ALL FOLDER RANDOM INTRO WMA tII USB SD PROGRAM kHz MHz t In CD USB and SD MMC mode lights up during playback II In CD USB and SD MMC mode lights up during playback pause STEREO In tuner mode an FM stereo sta tion is being re...

Page 8: ...S and TREBLE In tuner mode pressing and hold ing down starts the forwards or reverse frequency search press ing briefly switches the frequency back or forwards in steps In CD USB and SD MMC mode press briefly to select the next or previous track Press and hold down to start a forward or reverse search OVERVIEW ON OFF Switches the device to and from standby mode CD eII In CD USB and SD MMC mode sta...

Page 9: ...en the battery compartment by pressing in OPEN bottom of the device and pushing the lid in the direction of the arrow S 2 Insert six batteries 6 x 1 5 V type LR20 AM1 D size observing the polarity marked in the battery compartment 3 Close the battery compartment Notes 7 Do not expose the batteries to extreme heat caused for example by direct sunlight hea ters or fire 7 Remove the batteries when th...

Page 10: ...ic antenna 2 The radio has a built in rod antenna for MW reception Turn the device around to align the antenna Setting the USER sound setting Here you can make your own personal sound set tings 1 Press DSC to select the USER sound setting 2 Press DSC until BASS 0 appears in the dis play 3 Press VOLUME to set the bass scale 6 to 6 and press DSC to confirm Display TRE 0 4 Press VOLUME to set the tre...

Page 11: ...y changes in 50 kHz steps FM and 9 kHz steps MW Storing stations as presets Up to 20 stations in the FM band and up to 20 stations in the MW band can be stored as presets 1 Press FUNCTION to select the frequency band FM or MW Display FM or MW 2 Select the station with or 3 Press PROG RAND briefly to activate the memory function Display 00 and PROGRAM flash for ap prox 10 seconds 4 Press or to sele...

Page 12: ...adhesive labels to CDs Keep the sur faces of CDs clean You can play standard 12 cm CDs as well as 8 cm CDs on your device An adapter is not necessary Selecting the CD input source 1 Press FUNCTION to select the CD input source 2 Press OPEN to open the CD compart ment 3 Insert a disc in the compartment with its label facing upwards CD MP3 MODE 4 Close the lid of the CD compartment by press ing OPEN...

Page 13: ...REPEAT disappears Repeating all the tracks of a folder Repeat Folder MP3 WMA only 1 Press REP INTRO twice during playback All the tracks on the current folder are played back repeatedly 2 To quit the function press REP INTRO re peatedly until the repeat indicator REPEAT disappears Repeating all tracks Repeat All 1 During playback press REP INTRO re peatedly until REPEAT ALL appears in the dis play...

Page 14: ...on with PROG RAND Display P 01 for the first preset PROGRAM flashes 2 Press or to select the track 3 Save the track by pressing PROG RAND Display P 02 for the second preset PROGRAM flashes 4 To store more files repeat steps 2 to 3 Playing back a playlist 1 Press eII to start playing the playlist Playback begins with the first programmed track 2 Press FM MODE 7 to end playback 3 To play the playlis...

Page 15: ... taken into account when it was developed Due to rapid de velopments in MP3 technology and new manufacturers appearing every day the compatibility of MP3 players USB memory sticks can only be partially guaranteed 7 If USB operation is impaired or is not pos sible this does not indicate a malfunction of the device 7 Bi directional data transfer as defined for ITE devices in EN 55022 EN 55024 is not...

Page 16: ...e and select the radio station 3 Press to start recording The r button is automatically engaged The device automatically stops recording at the end of the tape 4 Press II to pause recording Press II to resume recording 5 Press 7 to stop recording Recording from the CD CARD or USB input sources 1 Insert a tape without deletion protection and search for the desired tape position with rr or ee 2 Pres...

Page 17: ...ompartment moisten a cotton swab with alcohol or a special head cleaning flu id and clean the idler 3 the capstan 2 and the magnetic heads 1 Close the tape compartment You can also play a cleaning cassette to clean the magnetic heads 1 Environmental note This product has been made from high quality parts and ma terials which can be re used and recycled Therefore do not throw the product away with ...

Page 18: ...t in again after a few seconds Remove any batteries RADIO Poor radio reception Weak radio antenna signal Interference from electrical devices such as televisions video recorders computers neon lamps etc VHF FM tilt and turn the telescop ic antenna MW turn the whole device Keep the radio recorder away from electrical devices CD Playback will not start The CD is damaged or dirty Replace or clean the...

Page 19: ...Grundig Intermedia GmbH Beuthener Strasse 41 90471 Nürnberg www grundig com 72011 408 3600 13 05 ...

Reviews: