background image


- 6 - 


Wall Mount Bracket Installation 

1. 

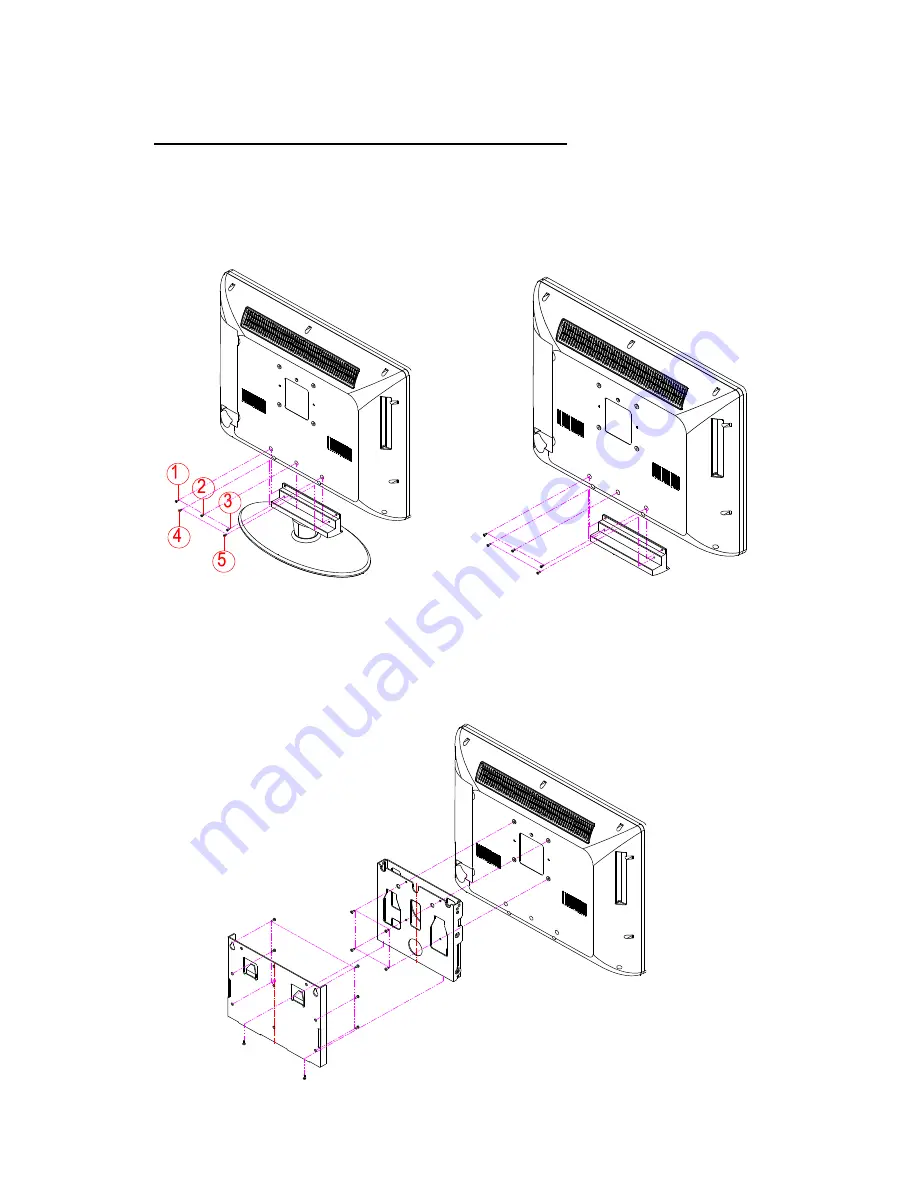
Place the “LCD TV” on a solid surface. Use soft material to place over 

the front screen to avoid any damage.   

2.  Remove  the  5  screws  (

①②③④⑤

)  from  the  unit  and  take  away  the 

stand (Refer picture 1). 


(Picture 1)                                                              (Picture 2) 

3.  Using the plastic cover that came with the LCD screw in the 5 screws to 

fix the plastic cover on the bottom of the unit (Refer picture 2). 

4.  Use 4 screws to fix the TV on the wall mount bracket .Please find there 

are 4 VESA holes on the back of the unit (Refer picture 3). 


Summary of Contents for GLCD1908HDV

Page 1: ...MISURO HD LCD TV WITH DVD PLAYER GLCD1908HDV GLCD2208HDV The Gold Technical Support Line 1902 215 259 Charges will apply at 2 95 per minute...

Page 2: ...features and to ensure you get the very best from your purchase Safety is important Your safety and the safety of others is important Therefore please ensure you read the Safety Instructions before y...

Page 3: ...cket Installation 6 View of TV 7 8 Remote Control 9 12 Installation and Connection 13 TV Basic Operation 14 15 TV Channel Menu 16 28 DVD Player Operation 28 37 Multimedia Operation 38 39 Other Operati...

Page 4: ...en exposed to rain or moisture does not operate normally or has been dropped 10 The television should not be exposed to dripping or splashing water and no objects filled with liquids such as vases sho...

Page 5: ...er the ventilation openings when using the TV Additional Safety Notes Never tamper with any components inside the TV or any other adjustment controls not mentioned in this manual To clean up dust wate...

Page 6: ...______________________ Please make sure that the following items are included with your LCD TV If any item is missing please contact the warranty line TFT LCD TV Remote Control Operation Manual DC Ada...

Page 7: ...e 5 screws from the unit and take away the stand Refer picture 1 Picture 1 Picture 2 3 Using the plastic cover that came with the LCD screw in the 5 screws to fix the plastic cover on the bottom of th...

Page 8: ...7 View of the TV Front View Back View 1 2...

Page 9: ...the Source Button to select input source 12 DVD Disc Input The DVD Disc Input allows you to enter your DVD for playback 13 DC Input The DC Input allows you to connect your DC 12 Volt power supply 14...

Page 10: ...9 Remote Control...

Page 11: ...USB SD or MMC play modes 16 FAV Play Pause Button Press the FAV Button to display the Favourite Menu in DTV mode or press the Play Pause Button in DVD USB SD or MMC modes 17 Hold Skip Forward Button...

Page 12: ...m Guide 34 FAV Right Arrow Button Press the FAV Button to add a program to the favourite list Press the Right Arrow Button to increase the speed of DVD playing 35 Sleep Button Press the Sleep Button t...

Page 13: ...or throw batteries into a fire 3 Always replace both batteries at the same time Never mix new and old batteries or batteries of a different type 4 If you don t intend to use the remote control for an...

Page 14: ...e TV CATV net You can use 75 coaxial cable to connect the outdoor antenna Outdoor Antenna Connection Use 75 coaxial cable plug or 300 75 impedance converter to plug in antenna input terminal on the re...

Page 15: ...on the front of the TV will turn blue to indicate power on Press the POWER Button again to switch off the TV the indicator will turn red 2 Press the VOL or VOL Button to adjust the volume level Press...

Page 16: ...in to turn sound on again 7 Press the DISPLAY Button to display the information of the channel playing View Different Input Signal Sources Press the Input Button on remote control and then press the o...

Page 17: ...ogram Edit and Signal Information To enter the TV Channel Menu make sure you are in either the DTV or ATV modes Then press the LCD MENU Button and the Channel Menu will appear Press the or buttons to...

Page 18: ...ning this screen will be displayed and the channel scan will begin automatically DTV Manual Tuning Press the or Buttons to select the individual DTV channel you wish to tune Then press the ENTER to st...

Page 19: ...the TV sound system setting Current CH Press the or Buttons to select the current ATV channel Search Press the or Buttons to search backward forward through the manual scan Press the LCD MENU Button o...

Page 20: ...k will be displayed Then move cursor by pressing the or Buttons and press the or Buttons to select characters Press the LCD MENU Button to confirm and return to previous Menu Swap To move the position...

Page 21: ...he FAV Button and this mark will appear next to the program To cancel the favourite setting press the FAV Button again and this mark will disappear PICTURE Menu To enter the Picture Menu press the LCD...

Page 22: ...ress the or Buttons to adjust the tint this option only works in VGA mode and when the VGA input is connected Colour Temperature Press the or Buttons to select the colour temperature Cool User Warm an...

Page 23: ...ound Mode press the or Buttons You will scroll through the sound modes User Standard Music Movie and Sports Treble Press the or Buttons to adjust the treble Bass Press the or Buttons to adjust the bas...

Page 24: ...or minutes Press the or Button change the time Off Time Press the or Buttons to select the Off time Setting This will set the TV to an exact turn off time Press the Button to enter a Setup Sub Menu th...

Page 25: ...rn to Standby Mode automatically if there is no signal input for a period of about 5 minutes Time Zone Press the or Button to set your local time zone OPTION Menu To enter the Option Menu press the LC...

Page 26: ...e you have selected the Restore Setting press the Button to confirm This will begin to reset your TV to the factory default settings and clear any previous settings LOCK Menu To enter the Lock Menu pr...

Page 27: ...Lock Menu Press the or Button to select the channel you want to lock and then press the Green Button to block The lock icon will appear behind the locked channel To un lock the channel select the lock...

Page 28: ...mber to locked Picture Lock To set the Picture Lock Mode press the or Buttons to turn it on or off Key Lock To set the Lock Key Lock Mode press the or Buttons to turn it on or off Max Volume To set th...

Page 29: ...ing to be broadcast after the current programme press the Button Press the Button to move to the current time To view a different channel press the or Buttons If you wish to book a program to watch la...

Page 30: ...Button to play How to Pause Play During play press the PLAY PAUSE Button once to pause and press again to resume normal playback How to Stop Playback During play press the STOP Button to stop play To...

Page 31: ...at the end of the section The unit will now repeat the selection of play you desire If you want to cancel the repeat section press the A B Button once more Note Some discs will not respond to the A B...

Page 32: ...bers of your favourite titles and chapters Then press the or Buttons to move the cursor to input the next one 3 Press the or Buttons to select and highlight the word PLAY then press the ENTER Button T...

Page 33: ...g playback until the subtitles disappears Notes With some DVD discs you may not be able to turn off the subtitles and they will appear on screen automatically As you press the SUBTITLE Button the subt...

Page 34: ...nu Button to enter into the picture preview mode It will display 12 pictures at a time Press the or Buttons to select the next or last page Press the numeric Buttons corresponding pictures you would l...

Page 35: ...4 3 PS 4 3LB 16 9 4 3PS Normal Normal Pan and Scan is used for most normal television broadcasts It has an aspect ratio of 4 3 Choose this setting when viewing movies the picture will fill the screen...

Page 36: ...TV or display aspect ratio PASSWORD This is used to lock and unlock the RATING setting The default setting is locked Enter the default password 0000 and then Press the ENTER Button to unlock RATING Yo...

Page 37: ...Note Audio languages Subtitle languages and Menu languages are DVD specified 3 Audio Setup AUDIO OUTPUT Press the or Buttons to select the AUDIO OUT setup icon Press the ENTER Button to confirm SPDIF...

Page 38: ...s the or Buttons to adjust the Tone setting 4 Digital Setup DYNAMIC RANGE Press the or Buttons to adjust the compression ratio for different audio effect When you select Full the peak signal value is...

Page 39: ...u See below the Menu options Photo Press the or Buttons to select the Photo Menu Then press the ENTER Button to enter the Menu Press the or Buttons to select the image file you wish to play Press the...

Page 40: ...Please follow the DVD Basic Operations Other Operation Headphone Operation This unit includes a Headphone Input You can connect headphones via a 3 5mm headphone jack into the input provided Once plugg...

Page 41: ...ng to return settings back to the factory default and clear any incorrect settings Disc is playing abnormally Remove the disc from the DVD player and make sure there are no scratches or marks on the D...

Page 42: ...ur DVD Setup Audio Settings are correct Conduct a restore setting to return settings back to the factory default and clear any incorrect setting Color distortion Ensure that the equipment is connected...

Page 43: ...FN Packed Carries 2K 8K Guard Interval 1 4 1 8 1 16 1 32 Tuner Integrated and frequency synthesis DVD Compatible with CD MP3 WMA JPEG VCD DVD formats USB SD MMC Compat ble with MPEG4 MPEG2 MPEG1 BMP P...

Page 44: ...ked Carries 2K 8K Guard Interval 1 4 1 8 1 16 1 32 Tuner Integrated and frequency synthesis DVD Compatible with CD MP3 WMA JPEG VCD DVD formats USB SD MMC Compat ble with MPEG4 MPEG2 MPEG1 BMP PNG JPG...

Page 45: ...in the table above 2 There are 13 available modes compatible with windows for PC connection 3 There can be image disruption in PC mode This can occur as result of a signal from the VGA card which does...

Page 46: ...0 259 New Zealand and have your receipt of purchase on hand This guarantee is subject to the following provisions It is only valid within boundaries of the country of purchase The product must be corr...

Page 47: ...46 PO BOX 6287 Silverwater NSW 1811 www grundig net au Ver 1 24 MAY 2010...

Reviews: