Grundig GD-CI-AP4746P Quick Manual Download Page 14


13 

3.2.1


Activation via Web Browser 

Steps: 

1.


Power on the camera. Connect the camera to your computer or the switch/router 
which your computer connects to. 

2.


Input the IP address into the address bar of the web browser and press Enter to 
enter the activation interface. 

Notes: 


The default IP address of the camera is 192.168.1.100 


The PC and the camera should belong to the same subnet. 


For the camera enables the DHCP by default you need to use the Grundig 

IP-Finder Tool to search the IP address. 
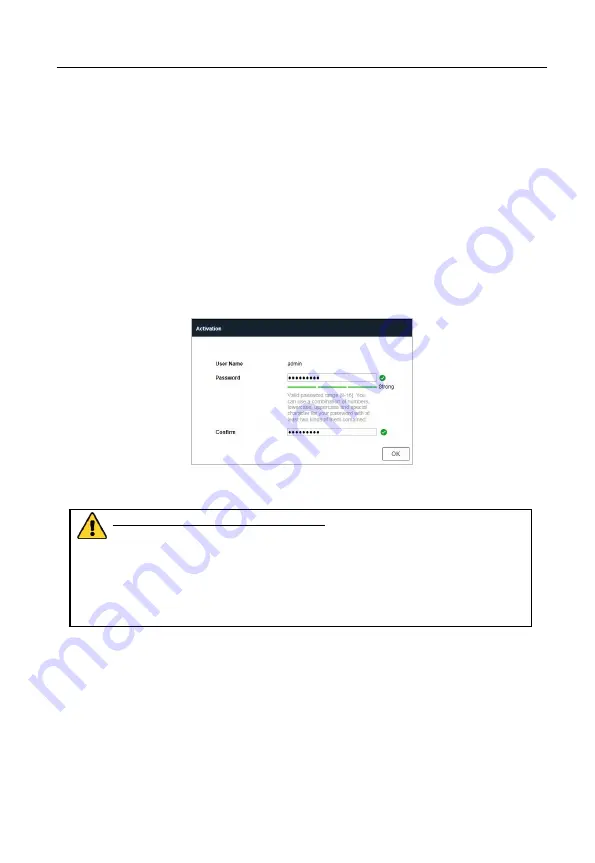


Figure 3-3


Activation Interface (Web) 

3.


Create a password and input the password into the password field. 

STRONG PASSWORD RECOMMENDED

– We highly recommend you create a 

strong password of your own choosing (Using a minimum of 8 characters, 
including at least three of the following categories: upper case letters, lower 
case letters, numbers, and special characters.) in order to increase the 
security of your product. And we recommend you reset your password 
regularly, especially in the high security system, resetting the password 
monthly or weekly can better protect your product. 

4.


Confirm the password. 

5.


Click 

OK 

to activate the speed dome and enter the live view interface.   

3.2.2


Activation via Grundig IP-Finder Tool 

The Grundig IP-Finder tool is used for detecting the online device and activating the 
camera.   
Get the Grundig IP-Finder tool from the supplied disk or the official website and install 
the software according to the prompts. Follow the steps to activate the camera, please 
refer to the User manual for other activation methods. 

Summary of Contents for GD-CI-AP4746P

Page 1: ......

Page 2: ...or documentation in connection with the use of this product even if our company has been advised of the possibility of such damages Regarding to products with internet access the use of the product s...

Page 3: ...tilation openings if there are any Ensure that the product is well ventilated to prevent any over heating Do not subject the device to physical shock or drop the product If the product uses batteries...

Page 4: ...rsible damage to the camera can be caused by a strong light Do not expose the sensor of the product to laser beams as this may damage the sensor If the product supports IR you need to take some precau...

Page 5: ...n 7 2 1 Installing the IR Speed Dome 7 2 1 1 Wall Mounting 7 2 1 2 Ceiling Mounting 9 3 Setting the Speed Dome over the LAN 11 3 1 Wiring 11 3 2 Activating the Camera 11 3 2 1 Activation via Web Brows...

Page 6: ...Overview of the IR Speed Dome 1 2 Cable Interface The cable interfaces of the speed dome are shown in Figure 1 2 The cables are distinguished by different colors Refer to the labels attached on the c...

Page 7: ...6 Figure 1 2 Cable Interfaces 1 3 Alarm Output Alarm output is shown in Figure 1 3 Figure 1 3 Alarm Output...

Page 8: ...peed dome with its waterproof cables otherwise the waterproof performance is affected Figure 2 1 Do Not Drag the Cables 2 1 Installing the IR Speed Dome 2 1 1 Wall Mounting Notes For cement wall you n...

Page 9: ...ket 1 Get the bracket and screws from the packing box as shown in Figure 2 3 Figure 2 3 Wall Mounting Bracket 2 Drill four screw holes in the wall according to the holes on the bracket and then insert...

Page 10: ...ecure the speed dome and the bracket 2 1 2 Ceiling Mounting Notes The thickness of the ceiling must range from 5 mm to 40 mm The ceiling must be strong enough to withstand more than four times the wei...

Page 11: ...ll screw holes and a cable hole optional according to the drill template 2 Install the speed dome to the ceiling 1 Align the ceiling bracket with the screw holes on the drill template and secure the c...

Page 12: ...e strengthen your own protection If the product does not work properly contact your dealer or the nearest service center for help 3 1 Wiring Connect the camera to the network according to the followin...

Page 13: ...12 Activation via Web Browser and activation via Grundig IP Finder are supported We will take activation via Grundig IP Finder tool and Activation via Web Browser to introduce the camera activation...

Page 14: ...ng password of your own choosing Using a minimum of 8 characters including at least three of the following categories upper case letters lower case letters numbers and special characters in order to i...

Page 15: ...cters including at least three of the following categories upper case letters lower case letters numbers and special characters in order to increase the security of your product And we recommend you r...

Page 16: ...tool 2 Select an active device 3 Change the device IP address to the same subnet with your computer by either modifying the IP address manually or checking the checkbox of DHCP Figure 3 4 Modify the...

Page 17: ...ps 1 Open the web browser 2 In the browser address bar input the IP address of the network camera and enter the login interface Note The default IP address is 192 168 1 100 You are recommended to chan...

Page 18: ...2 to step 4 to login Note For detailed instructions of further configuration refer to the user manual of network camera 4 1 Initializing the Memory Card Steps Check the memory card status by tapping o...

Reviews: