background image

ENGLISH

50 

SETTINGS

 ---------------------------------------------------------------------------------------------------------------------------------------

Selecting internet router

Time/Date

Connecting

Easypairing Wi-Fi 

Ethernet

Wi-Fi

Offline Mode
11:17

1

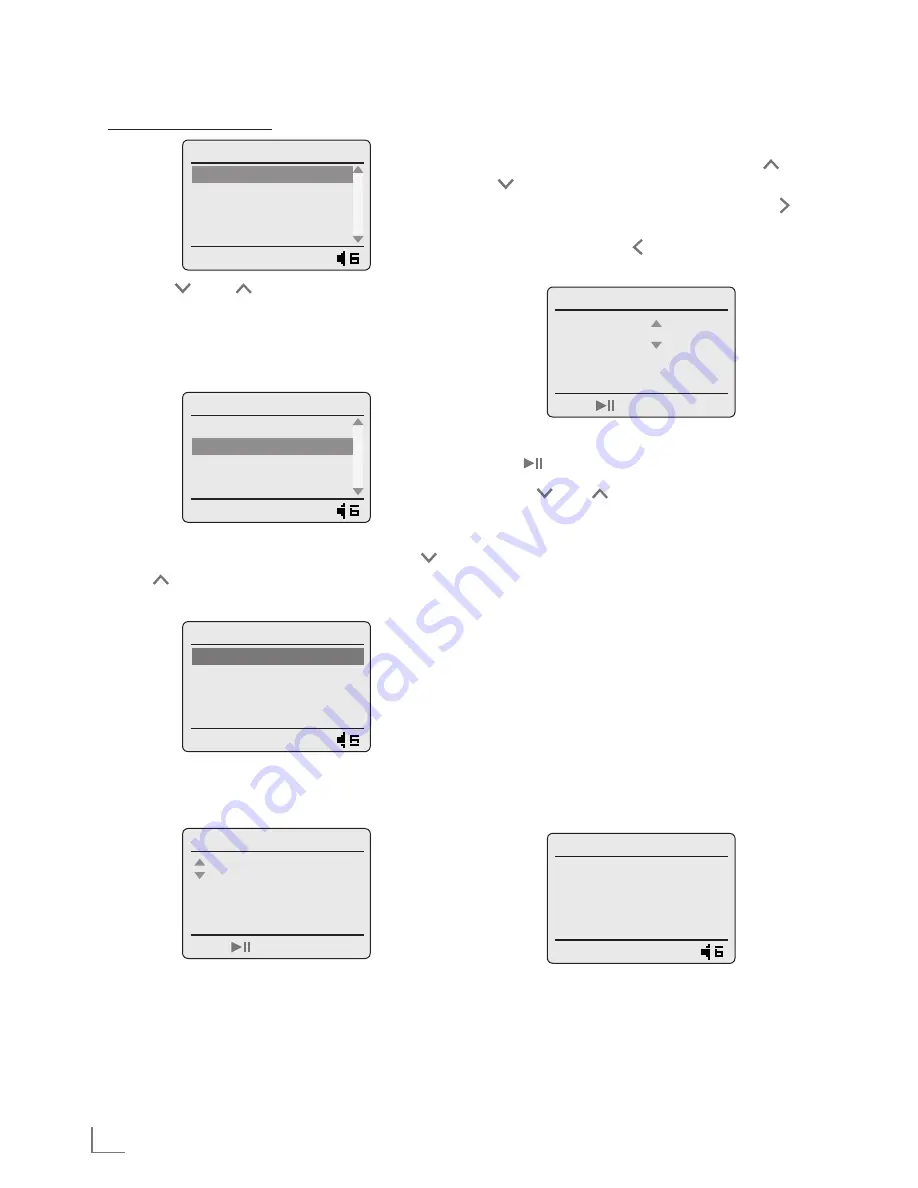
 Press  » «  or  » «  or  turn  the  Jog-Shuttle  to 

select  the  »Easypairing  Wi-Fi«  option  (if  you 
use a internet router with the Push Button pro-
cedure) or  the »Wi-Fi« option (if you use a cus-
tomary router) and confirm by pressing »

OK

«.

Time/Date

Connecting

Easypairing Wi-Fi

Ethernet

Wi-Fi

Offline Mode
11:17

2

 Select your wireless network by pressing » « 

or » « or turn the Jog-Shuttle and confirm by 
pressing »

OK

«.

Time/Date

Wi-Fi network

Grundig network

11:17

  –  » WEP key«  or » WPA key« menu opens, the 

cursor  is  positioning  on  the  first  input  posi-
tion.

Time/Date

WPA key

Press   to validate key

Note:

7  

You  should  enter  the  code  (WEP  or  WPA) 

corresponding to your wireless network.

3

 Enter your wireless security code. 

Select the first character (capital and small 

letters, numbers, symbols) by pressing » « or 

» « or turn the Jog-Shuttle.  

Select the next digit position by pressing » « 

or press the Jog-Shuttle (you can come back 
to a character with » « or »

BACK

«). 

Repeat the procedure for all characters. 

Time/Date

WPA key

801156

Press   to validate key

4

 Confirm your wireless security code by press-

ing » « on the remote control.

Press » « or » « or turn the Jog-Shuttle to se-
lect the »Automatic mode (DHCP)« option.

Notes:

7  

If you use an internet router with the Push But-

ton procedure, you will get a confirmation 
message, to push the button on the router. 

7  

For informations about the submenu  

»Static IP«, please see the chapter  
“Special Settings” – “Registering the 
device …”.

6

 Press the »

PBC

« or »

Wi-Fi

« button on the In-

ternet Router.

7

 Confirm the processing by pressing »

OK

«.

  – Processing starts. 

Time/Date

DHCP status

Connecting..

11:17

  –  If the connection is successful, »Connecting 

successful« appears on display.

  –  If the connection is failed, »Connecting 

failed« appears on display.

Summary of Contents for Cosmopolit 3M WEB

Page 1: ...INTERNET RADIO Cosmopolit 3M WEB en fr de...

Page 2: ...52 Muting 53 INTERNET RADIO MODE 53 Listening to an Internet radio station from Orange Liveradio service 53 Selecting the Internet radio stations input source 53 Browsing the Internet radio stations...

Page 3: ...WLAN router with individual setting in the net work Static IP 64 Setting the time time zone and date automatically 65 Setting the time time zone and date manually 65 Update the software of the device...

Page 4: ...io sources Your Grundig Cosmopolit 3M WEB embeds the Orange Liveradio service lets you listen to more than 10 000 Internet radio stations from all over the world as well as thousands of on demand radi...

Page 5: ...e the device in a moderate climate 7 Do not place the device close to heating units or in direct sunlight as this will impair cooling 7 Do not place any vessels containing liquids such as vases on the...

Page 6: ...more details please see Jog Shuttle section V Turn left or right for adjusting the volume _ Turn left or right for selecting menu options OK Press for confirming the selected option Display of the de...

Page 7: ...eption LINE OUT Audio signal output for con necting to an external source AUX IN Audio signal input for connect ing an external source U Headphone socket for connect ing a stereo headphone set with a...

Page 8: ...ck on again Indicates the software version and the MAC address Switches between the random playback repeating the current track repeating all files modes in USB mode EQ Opens the sound setting options...

Page 9: ...iefly press to select files or tracks backwards or forwards m In FM radio mode press briefly to change the frequency backwards or forwards with 50kHz in steps In USB mode Press to start searching back...

Page 10: ...he station type provided RDS information is being received the preset for a saved radio station USB mode displays elapsed playing time total playing time and information of the file Playback Pause The...

Page 11: ...face of the MP3 player to the USB socket on the device on the back using a standard USB cable or insert the USB plug of the USB memory stick in the USB socket on the device on the back Notes 7 To remo...

Page 12: ...also affect this Note The lines represent the function Internet radio Music archive audio streaming WLAN Modem router Cosmopolit 3M Media servers on the computer Telephone socet Splitter Note 7 Switc...

Page 13: ...isconnect the device from the mains 7 Make sure that the power adapter plug is easily accessible during operation and not hindered by other objects Putting battery in the remote control 1 Open the bat...

Page 14: ...pressing the MENU button after finishing the settings switch back to the previous menu by pressing the MENU button again Switch back from the respective submenu to the main menu by pressing the BACK...

Page 15: ...SID must be visible and the MAC address of the device may be entered in the WiFi router 7 Perform the registration process in the prox imity of the router in order to avoid prob lems with the Wi Fi ra...

Page 16: ...ect the first character capital and small letters numbers symbols by pressing or or turn the Jog Shuttle Select the next digit position by pressing or press the Jog Shuttle you can come back to a char...

Page 17: ...uttle to se lect the FM Radio option and press OK to confirm Time Date FM radio Tune FM presets 11 17 3 Press or or turn the Jog Shuttle to se lect the Tune option and press OK to confirm 4 For automa...

Page 18: ...sting the volume 1 Adjust the volume by pressing _ or on the remote control or rotate the Jog Shuttle on the device Selecting sound settings You can choose between different preset sound settings By u...

Page 19: ...NTERNET RADIO MODE Listening to an Internet radio station from Orange Liveradio service With the Orange Liveradio service you can access to thousands of radios from all over the world You can browse t...

Page 20: ...Europe Middle East Oceania and press OK to confirm Time Date Internet Radio Stati Latin America Asia Europe Middle East 11 17 3 Press or or turn the Jog Shuttle to select the country and press OK to c...

Page 21: ...ss OK to con firm appears in the display after a short time the station is played INTERNET RADIO MODE Adding Internet radio stations to presets You can use the remote control to fill 8 presets with th...

Page 22: ...or a few minutes 1 Open the Main menu by pressing MENU 2 Press or or turn the Jog Shuttle to select the Podcast option and confirm by pressing OK Display Podcast submenu opens Time Date Podcasts Best...

Page 23: ...rvers can be used in parallel Selecting the media server input source 1 Open the Main menu by pressing MENU 2 Press or or turn the Jog Shuttle to se lect the My Media Servers option and con firm by pr...

Page 24: ...n the remote control to stop play back Pausing and resuming playback 1 Press during playback to pause Display II playing time stops information of the track or file appear as a scrolling text 2 Contin...

Page 25: ...to stop playback and quit the function Notes 7 The USB socket on the device does not sup port a connection for a USB extension cable and is not designed for directly connecting to a computer 7 The US...

Page 26: ...the connected ex ternal device through your system s speakers 1 Use a standard audio cable not supplied to connect AUX IN on the back of the device to an AUDIO OUT or U headphone socket on an external...

Page 27: ...or turn the Jog Shuttle to set the alarm minute and press OK to confirm Display the previous menu which is Alarm menu comes back automatically 8 In the Alarm menu select Audio source by pressing or or...

Page 28: ...s again OK to activate Display Enable alarm and ap pears in the display if the timer is activated Display Enable alarm disap pears if the timer is deactivated Interrupting the timer 1 During the timer...

Page 29: ...confirm by pressing OK 5 Press MENU to end the settings Activate the internet connection 1 Open the Main menu by pressing MENU 2 Press or or turn the Jog Shuttle to se lect the Set up option and conf...

Page 30: ...t position by pressing or turn the Jog Shuttle you can switch return with on the remote control or BACK on the device Repeat the procedure for all characters Confirm the number by pressing OK 12 Enter...

Page 31: ...the left corner at the bottom of the display 9 Press MENU to end the setting Update the software of the device This function enables you to use the device with the latest software 1 Open the main menu...

Page 32: ...menu by pressing MENU 2 Press or or turn the Jog Shuttle to select the Set up option and press OK to confirm 3 Press or or turn the Jog Shuttle to select the Reset option and press OK to confirm Disp...

Page 33: ...g to the applicable EU directives This product fulfils the European directives 1999 5 EC and 2009 125 EC The type plate is located on the bottom of the device Do not open the device casing under any c...

Page 34: ...r is encrypted Enter the network key WEP or WPA on the device If this does not help check the entire router configuration Music playback is briefly interrupted High network usage on the radio station...

Page 35: ...connection is made Check the setting of the firewall if installed for the UPnP server and correct if necessary Enable the device on the UPnP server in use The music archive is empty Enable the folder...

Reviews: