background image

ENGLISH

25

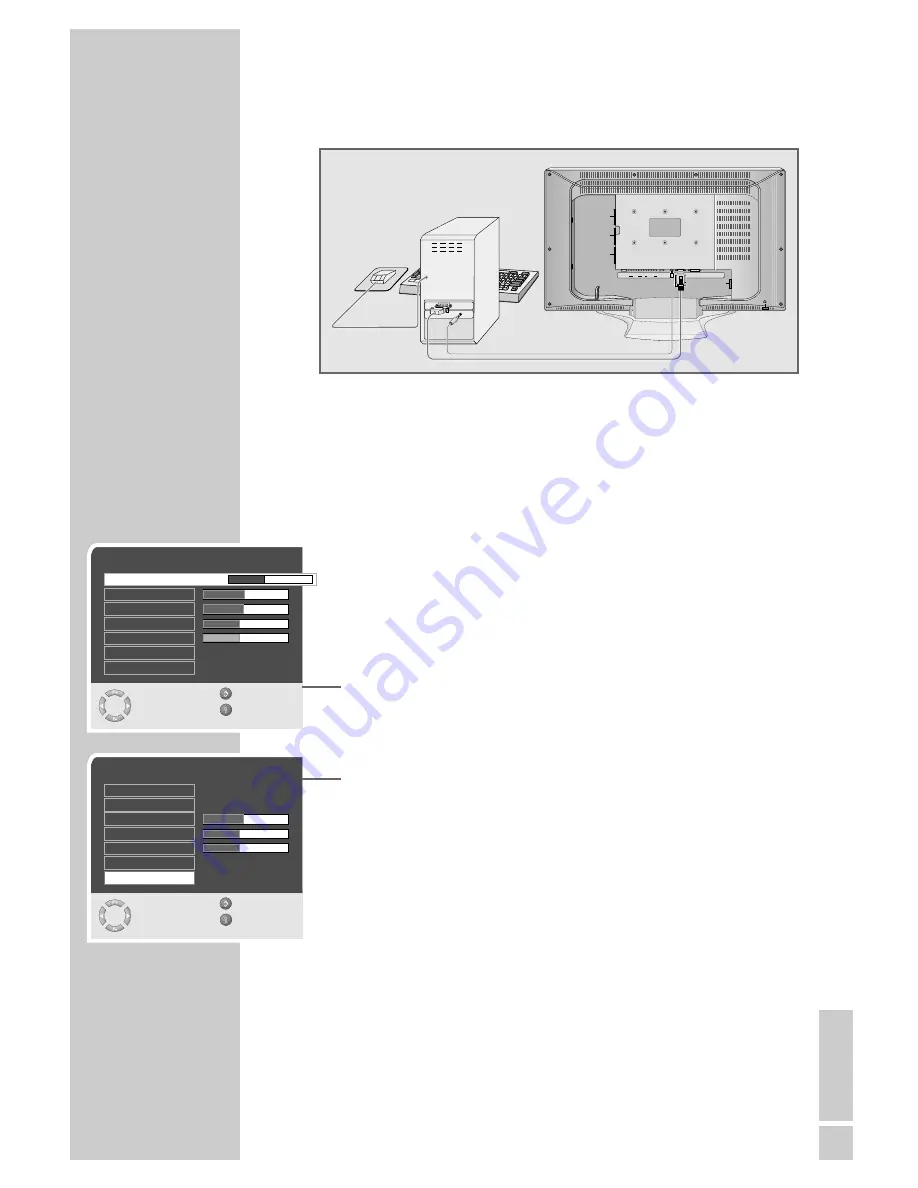
Connecting a PC

1

Connect the socket »

PC IN

« or »

DVI-D

« on the television to

the corresponding socket on the PC using a VGA cable.

2

Connect the socket »

PC-DVI AUDIO IN

« on the television to

the corresponding socket on the PC using a cinch cable (audio
signal).

Selecting the channel position for the PC

1

Press »

AV

«, select the »PC« or »DVI« channel with »

P+

« or

»

P-

« and press »

OK

« to confirm.

Settings for the PC

1

Press »

i

« to open the »MAIN MENU« menu.

– The »MAIN MENU« menu appears.

2

Select »Picture« with »

P+

« or »

P-

« and press »

OK

« to 

confirm.
– The »Picture« menu appears.

3

Select »Brightness« with »

P+

« or »

P-

« and press »

P+

« again.

– The second page of the picture menu appears.

4

Press »

P+

« or »

P-

« to select the function or setting.

– Options:

»H Position« – adjust the horizontal picture position
»V Position« – adjust the vertical picture position
»Phase« – removes horizontal flicker, blurring and horizontal

lines

»Auto position« – for automatic adjustment to the PC

5

Press »

OK

« to activate the function and »

Ǹ

« or »

Ƿ

« to adjust.

6

Press »

i

« to finish the setting.

PC MONITOR MODE

__________________________

AV 3

AV 2

AV 1

AC IN

PC-IN

DVI-D

PC-DVI

AUDIO IN

S-VHS

AV OUT

L

R

VIDEO

AV-4

L

R

VIDEO

ANT IN

Picture

Select

Back

and open

Exit

OK

H Position

V Position

Phase

Auto position

Zoom

Noise reduction

Sharp

Rich

Picture smart

Picture 

Select

Back

and edit

Exit

OK

Brightness

39

Contrast

Colour

Sharpness

Hue

Noise reduction

Sharp

User

Picture smart

Summary of Contents for AMIRA 26

Page 1: ...ǵ COLOR TELEVISION AMIRA 26 LXW 68 7515 REF AMIRA 32 LXW 82 7515 REF DEUTSCH ENGLISH FRANÇAIS ITALIANO NEDERLANDS TÜRKÇE POLSKI ...

Page 2: ...n 15 Changing the picture format 16 PIP mode 17 18 Teletext mode 17 TOP text or FLOF text mode 17 Normal text mode 17 18 Additional functions 19 Convenience functions 19 Convenience functions with the Features menu 20 24 Using external devices 20 Decoder or satellite receiver 21 22 Video recorder DVD player or SET TOP box 23 Headphones 24 Camcorder 24 HiFi system 25 Operation as a PC Monitor 25 Co...

Page 3: ...gerous and shortens the operating life of the television set For reasons of safety have a specialist remove any dirt deposits in the set from time to time Do not open the television set under any circumstances Warranty claims are excluded for damage resulting from improper handling Ensure that the mains cable and the mains adapter are not damaged The television set may only be operated with the ma...

Page 4: ...eries Mignon type for example UM 3 or AA 2x1 5V Observe the polarity marked on the base of the battery compartment 3 Close the battery compartment Note If the television no longer reacts properly to remote control commands the batteries may be flat Be sure to remove used batteries The manufacturer accepts no liability for damage re sulting from used batteries Environmental note Batteries including...

Page 5: ...one jack 3 5 mm ø jack plug High definition HD ready Your television can receive high definition television signals HDTV You can connect the input sources HDTV set top box or HDTV DVD player to either the DVI D socket digital HDTV signal or the PC IN socket analogue HDTV signal This ensures that you can view digital HDTV programmes even if they are copy protected HDCP High Definition Copy Protecti...

Page 6: ...MENU closes all menus Z Zap function P P Switches the television on from standby selects stations step by step moves the cursor in the menus up and down Ǹ Ƿ Adjust the volume move the cursor left right OK Calls up the preset list activates various functions TXT Switches from TV mode to teletext mode and back to TV mode AV Opens the pre selection for AV channels Then selection with P or P SCAN Reve...

Page 7: ...RUNDIG satellite receiver or a GRUNDIG DVD player Keep the appropriate button VCR SAT DVD pressed down Then press the appropriate button Note The functions available depend on the model of the device you are using Just try it out Tele Pilot 160 C VCR DVD SAT z TXT PIP AV POS SIZE PAP SCAN d Controls on the television P Switches the television on from standby channel selection TV AV Selects the AV ...

Page 8: ... Changing stored channels You can delete channels that have been stored more than once during the automatic search You can also store channels in a diffe rent preset position change or enter the name of a channel as well as skip channels Deleting channels 1 In the Program table menu select the station to be deleted with P P Ǹ or Ƿ 2 Highlight the channel with Ƿ Ƿ yellow 3 Press Ƿ Ƿ yellow to delet...

Page 9: ... during selection with P or P A selection with the number keys is also possible 1 In the Program table menu select the desired channel with P P Ǹ or Ƿ 2 Highlight the channel with z red An S appears behind the name of the television station You can deselect the selected channel by pressing the red button again Concluding the settings 1 Press i to finish the settings SETTINGS ______________________...

Page 10: ...then press OK to confirm 6 Press i to finish the settings Audio settings 1 Press i to open the MAIN MENU The MAIN MENU appears 2 Select Sound with P or P and confirm with OK The Sound menu appears Note Further operation is explained in the following sections Volume 1 Select Volume with P or P and adjust the setting with Ǹ or Ƿ Balance 1 Select Balance with P or P and adjust the setting with Ǹ or Ƿ...

Page 11: ...vision channels broadcast at different volumes The automa tic volume limiting AVL function means the volume is kept the same when you switch between channels 1 Select AVL with P or P and then select On with Ǹ or Ƿ Equaliser The equaliser offers you four preset sound settings Music Sport Cinema and Dialogue and one which you can create yourself User 1 Select Equalizer with P or P and confirm with O...

Page 12: ...rce table menu with AV 2 Select the desired AV channel position with P or P and press OK to confirm 3 Switch back to the television channel with 1 0 Adjusting the volume 1 Adjust the volume with Ǹ or Ƿ Muting 1 Use p to switch the sound off mute and to switch it on again Displaying time 1 You can display the time by pressing the Ȅ button only for channels with teletext Displaying information 1 Pre...

Page 13: ...r sound settings see the Equaliser chapter on page 11 Zap function This function allows you to save the television channel which you are currently watching and switch to other channels zapping 1 Select the channel you want to save in the zap memory with 1 0 or P P e g channel 1 BBC 1 and save by pressing Z The display z 1 appears in the screen 2 Change channels with 1 0 or P P 3 You can now use Z ...

Page 14: ...with P or P and press P again Zoom is selected 4 Press OK to activate the zoom function 5 Press P or P to change the size of the picture 6 To change the picture section press OK and then Ǹ Ƿ P or P to select the section 7 Press i to quit the zoom function The display disappears TELEVISION OPERATION ___________________ Picture Select Back and edit Exit OK H Position V Position Phase Auto position Z...

Page 15: ... the picture fills the screen completely and with the correct geometry Letterbox format The letterbox setting is especially suitable for programmes in 16 9 format The black borders which are usually at the top and bottom of the screen are eliminated 4 3 pictures fill the screen The transmitted pictures are enlarged but are slightly cropped at the top and bottom The picture geometry remains unchang...

Page 16: ...ble window 1 Press P or P to move up and down channel positions one at a time Selecting the channels for the main picture and the left side of the screen double window 1 Press 1 0 to select channels directly or select the video source DVD player video recorder SAT receiver then call the Source table menu by pressing AV select the desired AV channel position with P or P and press OK to confirm Swap...

Page 17: ... switch to teletext mode 2 You can directly select teletext pages with 1 0 3 Press P to scroll back a page 4 Press P to scroll to the next page 5 To switch off teletext press TXT twice Additional functions Skipping the waiting time While a page is being searched for you can switch to the television channel 1 Enter the teletext page number using 1 0 and then press POS As soon as the page is found t...

Page 18: ...3 Press P to scroll to the next page Reveal answer Certain teletext pages contain hidden answers or information which can be called up 1 Display information with SCAN 2 Conceal information with SCAN Split screen double window With this function you can see the television channel on the left and the teletext page on the right 1 To activate the window function press PAP The television channel and th...

Page 19: ... Ǹ or Ƿ and press OK to confirm 3 Press i to finish the setting Entering the switch off time for the sleep timer You can enter a switch off time After this time has elapsed the tele vision switches to standby mode 1 Select Sleep timer with P or P and press OK to confirm 2 To enter the switch off time from 15 to 120 minutes press Ǹ or Ƿ 3 Press i to conclude the setting CONVENIENCE FUNCTIONS_______...

Page 20: ...tion a decoder is needed Connecting a decoder or satellite receiver 1 Connect the AV1 socket on the television set and the appropriate socket on the decoder using a EURO AV cable Notes A satellite receiver can also be connected to this socket If you want to use both a satellite receiver and a decoder the decoder must be connected to the satellite receiver Using a decoder 1 Switch on the television...

Page 21: ...OP box 1 Switch on the video recorder DVD player or SET TOP box and select the function you wish to use 2 Press AV select the channel AV2 AV3 or YPBPR YUV with P or P and press OK to confirm You can hear and see the video and audio information from the video recorder or the SET TOP box on the television set Connecting the SVHS video recorder If you own a SVHS video recorder you can connect it usin...

Page 22: ...ision Connect the playback device to Euro AV socket AV2 and the recording device to Euro AV socket AV3 and in the Special functions menu select the required setting AV2 output TV the television channel that you are viewing or AV3 the audio video signal from Euro AV socket AV3 AV3 output TV the television channel that you are viewing or AV2 the audio video signal from Euro AV socket AV2 1 Call up t...

Page 23: ...en the MAIN MENU 2 Select Sound with P or P and confirm with OK 3 Select Headphones with P or P and confirm with OK 4 Select Volume Balance Bass Treble or Soundtype with P or P and set with Ǹ or Ƿ 5 Press i to finish the setting USING EXTERNAL DEVICES_______________ AC IN PC IN DVI D PC DVI AUDIO IN S VHS Headphones Select Back and edit Exit OK Volume 30 Balance Sound type Bass Treble Stereo ...

Page 24: ...ra is connected connect the white socket AV4 L on the television and the corresponding socket on the camera Select Mono in the Sound menu for mono operati on Operating with a camcorder 1 Switch on the camcorder insert a cassette and start playback 2 Press AV select the AV4 or SVHS channel with P or P and press OK to confirm You will see the picture and hear the sound of the camcorder on the televi...

Page 25: ...again The second page of the picture menu appears 4 Press P or P to select the function or setting Options H Position adjust the horizontal picture position V Position adjust the vertical picture position Phase removes horizontal flicker blurring and horizontal lines Auto position for automatic adjustment to the PC 5 Press OK to activate the function and Ǹ or Ƿ to adjust 6 Press i to finish the se...

Page 26: ...eceived the search is interrupted and the picture appears Repeat the search until the channel you want appears on the screen Note The current system is automatically displayed in the System line Select System with P or P if the colour or sound are incorrect Select the setting required with Ǹ or Ƿ 6 Select Store with P or P and confirm with OK The Stored message appears Note To set other television...

Page 27: ...t the preset channel with Ǹ or Ƿ 5 Select Channel with P or P 6 Press Ǹ or Ƿ to switch up and down channels or use 1 0 to enter the channel number directly 7 Select Band with P or P 8 Press Ǹ or Ƿ to choose between S special channel and C channel Note The current system is automatically displayed in the System line Select System with P or P if the colour or sound are incorrect Select the setting r...

Page 28: ... Autoprogram with P or P and confirm with OK A warning message appears 6 Press Ȅ green to start the search The search begins It may last a few minutes depending on the number of television stations found The automatic search may last a few minutes depending on the number of television channels received Note You can interrupt the search by pressing OK SPECIAL SETTINGS ______________________________...

Page 29: ...e 170 hor 170 vert Contrast ratio 600 1 Amira 26 700 1 Amira 32 Brightness 450cd m2 Amira 32 500cd m2 Amira 26 Max resolution WXGA 1280 x 768 Amira 26 WXGA 1366 x 768 Amira 32 Service information for dealers The television set may only be operated with the mains adapter sup plied The product complies with the following EU directives 73 23 EEC directive for electrical equipment to be used within de...

Page 30: ...ition unde fined Parental lock has been activated Remedy Is the antenna cable connected Start the station search Adjust the brightness contrast or colour setting Test with another channel Change the position of the device Automatic or manual chan nel setting fine tuning Have antenna cable or system checked Turn up the colour Select the correct colour standard Test with another channel Turn up or s...

Page 31: ... must be protected by a 5A fuse either in the plug or at the distribution board If this type of plug becomes defective ensure that the fuse is removed before disposal to eliminate potential shock hazard If it is necessary to change the fuse in the non rewireable plug the correct type and rating 5A ASTA or BSI approved BS1362 must be used and the fuse cover must be refitted If the fuse cover is los...

Reviews: