5
GROWSPAN
™
GOTHIC PREMIUM HIGH TUNNELS
Revision date: 01.08.21 108185_86_87_88_89H
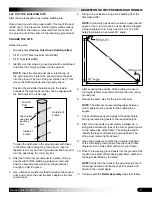
Ground Level
Inside of Frame
Outside of
Frame
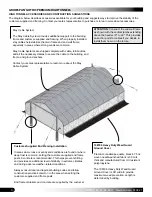
BASEBOARD
A customer-supplied baseboard and retaining board
are
required
to attach the drop-down side panels. See the
exploded view below.
Minimum lumber dimensions are
also shown.
The baseboard runs the length of the frame at ground
level. The retaining board secures the drop-down panel to
the baseboard.
The baseboard and retaining boards are
supplied by the customer.
Retaining boards are attached during the drop-down panel
installation. The retaining board is not needed when the
building is equipped with a roll-up panel.
Fasteners (1/4" x 4" carriage bolts (FAH009B) and
FA4652 wood screws) are included. Depending on board
width, use two (2) carriage bolts per rafter connection
for the baseboard. Evenly space the wood screws at
24" on-center when attaching the retaining board to the
baseboard during the side panel installation. Countersink
carriage bolt heads if needed to install the retaining board.
Secure baseboard and ribbon board joints between rafters
on the inside of the frame as shown to prevent conflicts
with other components.
NOTE:
If your high tunnel is equipped with roll-up side panels, skip this page and continue with the next.
A c
ustomer-supplied two-piece ribbon board
is required for the drop-down panel. Fasteners are included.
Customer
supplies the materials for the ribbon board.
Minimum board requirements are shown in the diagrams below.
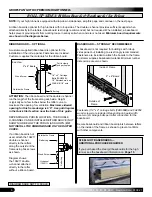
RIBBON BOARD
The ribbon board runs the length of the frame along each
side. Height is determined by frame design and is typically
set a few inches below the rafter curve to maximize the
opening for ventilation.
Maximum sidewall opening for
this frame design is 6' 6". See grid diagram in the
Quick Start section near the back of this guide.
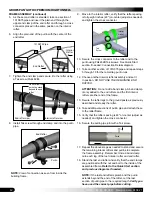
The diagram shows a customer-supplied ribbon board
as attached to the frame. Diagram applies to buildings
equipped with drop-down side panels.
DROP-DOWN SIDES: Ribbon Boards & Baseboards (Required)
ATTENTION:
DEPENDING ON PURLIN LOCATION,
RIBBON BOARD CAN BE INSTALLED EITHER ABOVE
(NOT SHOWN) OR BELOW THE PURLIN (AS SHOWN
ABOVE.)
DO NOT INSTALL THE RIBBON BOARD ON
THE RAFTER CURVE.
Use two (2) carriage bolts per rafter connection for the
ribbon board. When attaching the second board to the
ribbon board, space the wood screws at 24" on-center.
Ground Level
Drop-Down Panel
End Panel
(if equipped)
Retaining Board
(1" x 4" or 2" x 4")
View shown from outside the high tunnel.
2" x 6" Board
DIAGRAMS ARE NOT TO SCALE.
Rafter
1" x 4" Board
FA4652
Wood
Screws
Purlin clamp
and purlin pipe.
1/4" x 4" Carriage
Bolts (FAH009B),
1/4" flat washers, and
FALB01B 1/4" nuts.
U-channel
102197
2" x 6" Board
Outside the Frame
Inside the Frame


