GROWSPAN
™
GOTHIC PREMIUM HIGH TUNNELS
12
108185_86_87_88_89H Revision date: 01.08.21
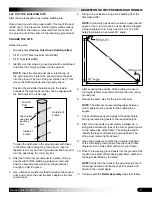
FRAME ASSEMBLY (continued)
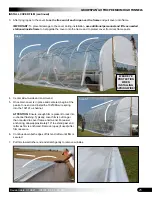
5. As the second rafter is steadied, take one section of
131S075 pipe and insert the plain end through the
upper end clamp of the end rafter and through a cross
connector placed in the same position on the
interior
rafter.
6. Align the plain end of the purlin with the center of the
end rafter.
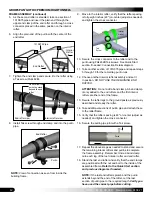
7. Tighten the end clamp and secure it to the rafter using
a Tek screw (FA4482B).
8. Install Tek screw through end clamp and into the purlin
pipe.
Do not allow the
purlin to extend
beyond the end
rafter
.
End rafter view
Interior rafter view
9. Move to the interior rafter, verify that the rafter spacing
is forty-eight inches (48") on-center (adjust as needed),
and tighten the cross connector.
10. Secure the cross connector to the rafter and to the
purlin using FA4482B Tek screws. See Quick Start
section if needed: Connection Details diagram.
11. Take another section of 131S075 pipe and repeat steps
5 through 10 for the remaining purlin runs.
12. Choose another interior rafter assembly and set it
in position.
DO NOT USE THE REMAINING END
RAFTER.
ATTENTION:
Do not add a band clamp. A band clamp
is only added to the
end rafters
and the
first interior
rafters
at either end of the frame.
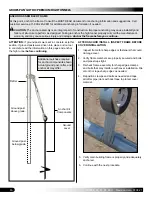
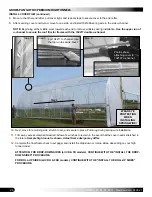
13. Secure the rafter legs to the ground posts as previously
described and steady the rafter.
14. Take additional sections of purlin pipe and attach these
to the rafter/frame.
15. Verify that the rafter spacing is 48" on-center (adjust as
needed) and tighten the cross connector.
16. Secure the purlin pipe joint with a Tek screw.
Interior
Rafter
End Rafter
131S075 Pipe
NOTE:
View of connection as seen from inside the
building frame.
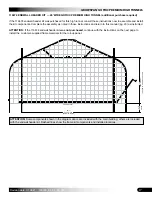
17. Repeat the above steps as needed to stand and secure
the remaining interior rafters and purlins to complete
the frame assembly. Remember:
Slide a band clamp
onto each leg of the last interior rafter and end rafter.
18. Stand the last end rafter and verify that the end clamps
are positioned with the nut and bolt to the inside of the
assembled frame.
Refer to the Quick Start section
and previous diagrams if needed.
NOTE:
If the last end rafter is plumb and the purlin
extends beyond the end of the rafter, cut the last
section of purlin pipe to the required length.
Verify you
have used the correct pipe before cutting.
Purlin
Purlin
End Rafter
Interior
Rafter
Purlin
Tek
Screw


