background image

Model T32859 (Mfd. Since 08/21)

-3-

Safety & Correct Use

Storage

DO NOT exceed table weight capacity of 

350 lbs. Sudden change in dynamic load 

at maximum weight capacity could cause 

table to tip or collapse, resulting in serious 

personal injury or property damage.

• 

Do not apply an unbalanced load.

• 

Keep  unsupervised  children  away  from  the 
table.

• 

Do not stand or climb on the table.

• 

Do not use in wet or damp  locations.

• 

Do  not  leave  rags  or  other  items  that  are 
damp with water, oil, paint, or solvents on the 
table.

• 

Set  up  the  table  in  a  well-ventilated  area 
where there are no hazardous or combustible 
materials  that  could  ignite  during  welding 
operations.

• 

While  using  an  electric  welder,  the  welder 
must  be  grounded  to  either  the  workpiece 
or  the  table  before  the  welding  operation. 
If  grounding  to  the  table,  the  workpiece 
must  contact  the  table  so  the  current  may 
flow through the workpiece to the grounding 
clamp  and  close  the  welding  circuit.  Ensure 
there is insulation between  the operator and 
the electric current (a dry rubber mat, rubber 
gloves, etc.).

• 

Lubricate  the  hinge  pins  holding  the  legs 
together  and  the  shoulder  screws  attaching 
the legs to the frame with light machine oil if 
folding the table becomes difficult.

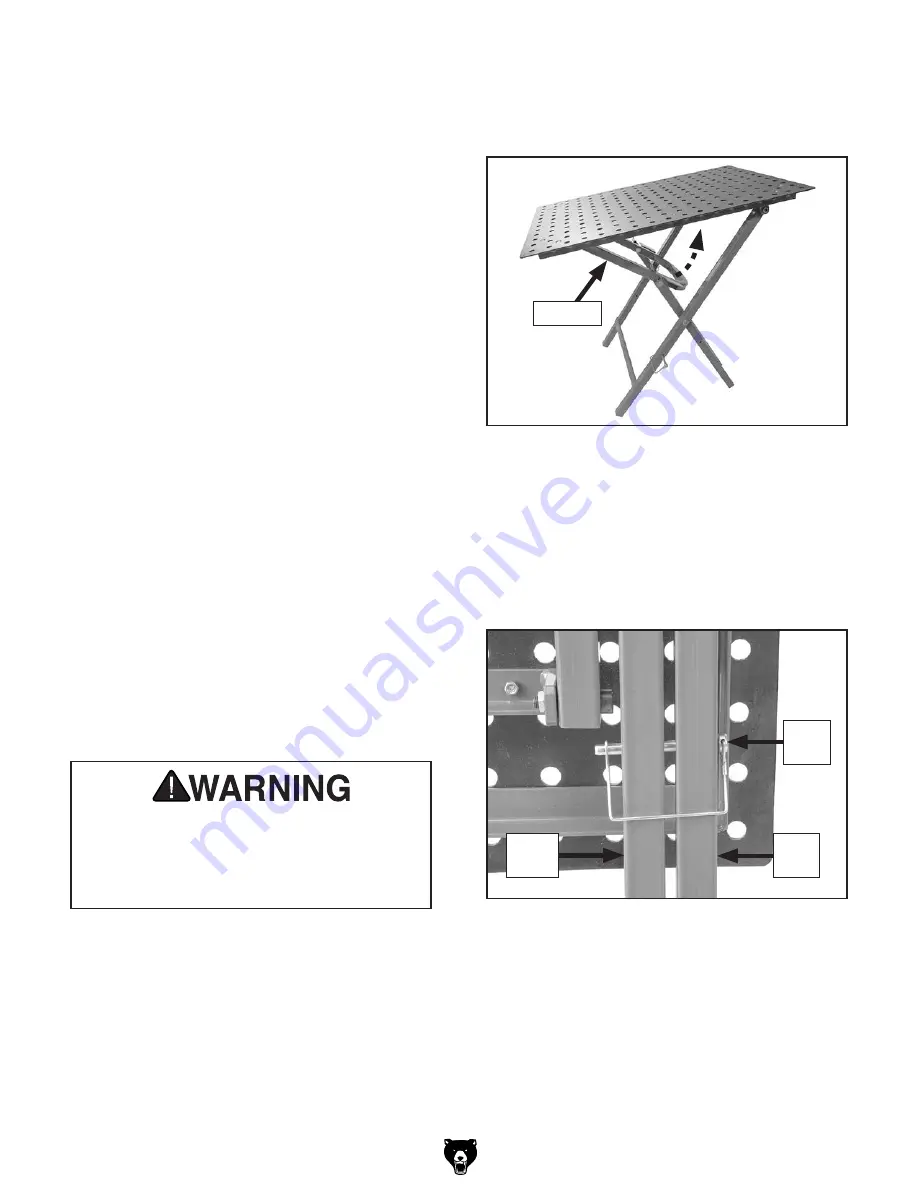
1.  Lift  U-brace  toward  underside  of  table,  as 

shown in 

Figure 6.

Figure 6. Lifting U-brace to fold table.

 Note: 

You may need to adjust folding lock pin  

(see 

Figure 7) out of the way if pin prevents 

folding.

2.  Lean top of table against wall or work table to 

secure short leg, and lock legs together with 
lock pin shown in 

Figure 7.

Figure 7. Long and short legs secured with lock 

pin.

3.  Slide into convenient location for storage.

U-Brace

Lock

Pin

Long 

Leg

Short

 Leg

Summary of Contents for T32859

Page 1: ... grizzly com MODEL T32859 24 X 36 FOLDING WELDING TABLE INSTRUCTIONS Specifications Weight Capacity 350 lbs Work Table Size 24 x 36 Work Table Thickness 9 Gauge Work Table Working Height 3111 16 Inventory Large Items Figure 1 Qty A Table Assembly 1 B Leg Assembly 1 Fasteners Figure 2 Qty C Hex Nuts M10 1 5 Thin 2 D Shoulder Screws M10 1 5 x 18 2 E Flat Washers 10mm 4 F Shaft Sleeves 2 G Hinge Pins...

Page 2: ...3 Attach long leg to table frame with 2 M10 1 5 x 18 shoulder screws and M10 1 5 hex nuts see Figure 3 5 Secure fasteners by inserting 3 5 x 75mm cot ter pin through hinge pin hole see Figure 5 6 Repeat Steps 4 5 with other side of short leg 7 Have one other person help you lift welding table and place on legs Figure 5 Cotter pin inserted through hinge pin 4 Attach one side of short leg to U brace...

Page 3: ...he table before the welding operation If grounding to the table the workpiece must contact the table so the current may flow through the workpiece to the grounding clamp and close the welding circuit Ensure there is insulation between the operator and the electric current a dry rubber mat rubber gloves etc Lubricate the hinge pins holding the legs together and the shoulder screws attaching the leg...

Page 4: ...h en clo sin g sta nd PIN CH HA ZA RD Ke ep ha nd s aw ay fro m hin ge are a wh en clo sin g sta nd 20 20 19 T32859 21 T3 28 59 23 22 REF PART DESCRIPTION REF PART DESCRIPTION 1 PT32859001 FRAME 13 PT32859013 HINGE PIN 10 X 80 LOWER 2 PT32859002 LEG LONG 14 PT32859014 FLAT WASHER 10MM 3 PT32859003 LEG SHORT 15 PT32859015 HINGE PIN 10 X 85 UPPER 4 PT32859004 U BRACE 16 PT32859016 FLAT HD SCR M6 1 X...

Reviews: