


Model T10824 (Mfd. Since 07/14)
-19-
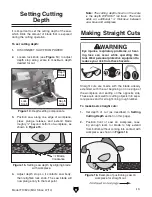
Setting Cutting
Depth
To set cutting depth:
1. DISCONNECT SAW FROM POWER!
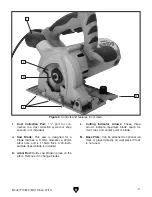
2. Loosen lock knob (see Figure 14) to adjust
depth stop along scale to maximum depth
desired for cut.
Figure 14. Depth-setting components.
Depth
Scale
Depth
Stop
Lock
Knob
3. Position saw along one edge of workpiece,
press plunge release, and extend blade
roughly
1
⁄
8
" beyond bottom of workpiece, as
shown in
Figure 15.
Note: The cutting depth shown on the scale
is the depth WITHOUT rail track. The track
adds an additional
3
⁄
16
" thickness between
saw base and workpiece.
Figure 15. Setting saw depth by aligning blade
with workpiece.
1
⁄
8
" Blade
Clearance
Making Straight Cuts
It is important to set the cutting depth of the saw,
which limits the amount of blade that is exposed
during the cutting operation.
4. Adjust depth stop so it contacts saw body,
then retighten lock knob. The saw blade will
now plunge only to that set point.
Straight cuts are made with the blade already
extended, with the cut beginning on one edge of
the workpiece and ending on the opposite side.
These cuts work well for cutting objects into sepa-
rate pieces and for straight-lining rough lumber.
To make basic straight cuts:
1. Set depth of cut (as described in Setting
Cutting Depth section on this page).
2. Position front of saw on workpiece, leav-
ing enough room for blade to fully extend
from bottom without coming into contact with
workpiece, as shown in
Figure 16.
Figure 16. Example of positioning saw on
workpiece for straight cut.
Eye injuries, respiratory problems, or hear-
ing loss can occur while operating this
tool. Wear personal protective equipment to
reduce your risk from these hazards.
Summary of Contents for T10824
Page 32: ......