background image

G8689 Mini Mill (Mfg. 8/06+)

-19-

Power Shutdown

It  is  important  to  shut  the  power 

OFF  when  the 

mill  is  not  in  use.  Leaving  the  power 

ON  keeps 

the  circuit  board  cooling  fan  running.  This  will 
cause unnecessary wear on the fan and electrical 
system.

To completely shut the system power OFF:

1.  Turn the SPINDLE ON & RPM Control Knob 

OFF.

2.  Turn the SYSTEM ON Toggle Switch OFF.

3.  Press the EMERGENCY STOP BUTTON.
 

At  this  point  the  green  power  light  and  the 
amber fan power light should not be lit.


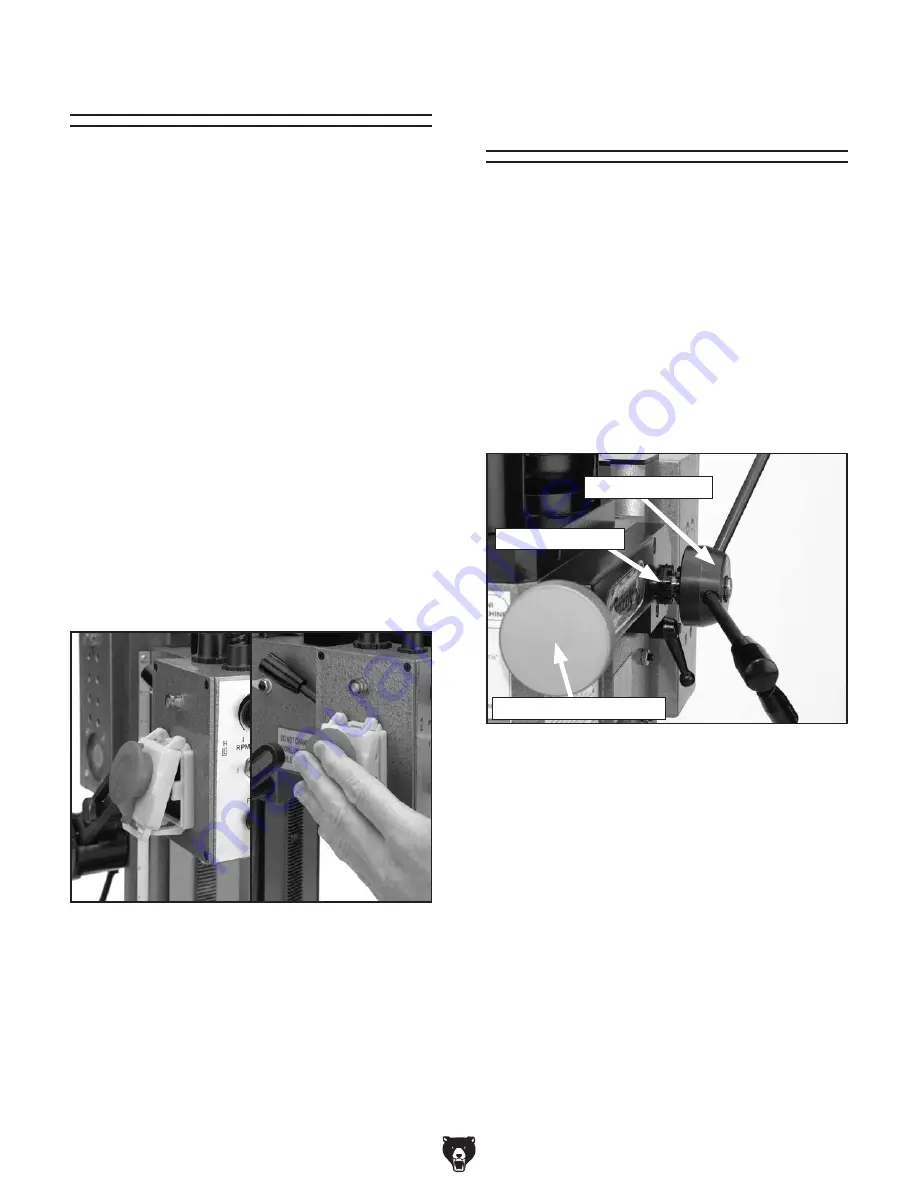
Note:  The EMERGENCY STOP Button is 
a flap style button that lays over the switch. 
Closing the flap shuts 

OFF power to the 

system. The system can be re-activated by 
opening the switch cover. This is done by 
pushing in and up on the button and allowing 
the inner button to release.

Rapid & Micro 

Downfeed Controls

The Model G8689 spindle height is controlled by 
two  methods.  The  rapid  downfeed  works  similar 
to a drill press. The micro downfeed will allow you 
to make adjustments to 0.001". One full revolution 
is 0.060".

To use the rapid downfeed:

1.  Make sure the column lock is released from 

the head.

2.  Pull  the  downfeed  handle  hub  out  to  disen-

gage the teeth as shown in 

Figure 13.

3.  Turn the levers to lower and raise the head.

To use the micro downfeed:

1.  Make sure the column lock is released from 

the head.

2.  Push  the  feed  handle  hub  in  so  the  teeth 

engage.

3.   Turn the micro downfeed knob to the desired 

depth.

Figure 12. EMERGENCY STOP Button.

Figure 13. Downfeed handle.

Downfeed Hub

Downfeed Teeth

Micro Downfeed Knob

Summary of Contents for G8689

Page 1: ...REVISED MARCH 2009 TS WARNING NO PORTION OF THIS MANUAL MAY BE REPRODUCED IN ANY SHAPE OR FORM WITHOUT THE WRITTEN APPROVAL OF GRIZZLY INDUSTRIAL INC FOR MODELS MANUFACTURED SINCE 8 06 PC7203 PRINTED...

Page 2: ...g grinding tool integrity and the usage of personal protective equipment The manufacturer will not be held liable for injury or property damage from negligence improper training machine modifications...

Page 3: ...ndles 15 Drill Chuck Removal 16 SECTION 4 OPERATIONS 17 Control Panel 17 Test Run and Spindle Break in 18 Power Shutdown 19 Rapid Micro Downfeed Controls 19 Limit Block 20 Table Travel 20 Graduated Di...

Page 4: ...If you find this to be the case and the dif ference between the manual and machine leaves you in doubt check our website for the latest manual update or call technical support for help Before calling...

Page 5: ...x Width x Height 20 x 21 x 30 in Must Ship Upright Yes Electrical Power Requirement 110V Single Phase 60 Hz Prewired Voltage 110V Full Load Current Rating 4 5A Minimum Circuit Size 15A Connection Typ...

Page 6: ...Vertical Spindle Speeds 0 2500 RPM Quill Diameter 1 580 in Drawbar Thread Size M12 1 75 Drawbar Length 4 in Spindle Bearings Ball Bearings Construction Spindle Housing Quill Cast Iron Table Ground Cas...

Page 7: ...el F Table G Scale Pointer H Table Lock I Way Cover J Cross Feed Handwheel K Column Pivot Scale Identification L Column M Limit Block N Chip Shield O Spindle Cover P System Power Light Q Spindle Power...

Page 8: ...nd can cause cancer and severe respiratory illnesses For Your Own Safety Read Instruction Manual Before Operating this Machine The purpose of safety symbols is to attract your attention to possible ha...

Page 9: ...E SURE GUARDS ARE IN PLACE AND WORK CORRECTLY BEFORE USING MACHINERY Safety Instructions for Machinery 17 REMOVE ADJUSTING KEYS AND WRENCHES Make a habit of checking for keys and adjusting wrenches be...

Page 10: ...llow the mill to gain its full speed before beginning a cut 6 POWER DISRUPTION In the event of a local power outage during use of the mill turn OFF all switches to avoid possible sud den start up once...

Page 11: ...ment of a part Dividing Head A milling machine accessory used to divide a circular object into a number of equal parts Down Milling or Climb Milling Feeding the workpiece in the same direction as the...

Page 12: ...mend using extension cords but if you find it absolutely necessary Use at least a 16 gauge cord that does not exceed 50 feet in length The extension cord must have a ground wire and plug pin A qualifi...

Page 13: ...glasses dur ing the entire set up pro cess This machine presents serious injury hazards to untrained users Read through this entire manu al to become familiar with the controls and opera tions before...

Page 14: ...9mm 1 G Spanner Wrench 1 H Wrench 36mm 1 I Drill Chuck 1 2 B16 1 J Spare Fuse 5 Amp 1 K Collet MT 3 x 3 8 1 L Collet MT 3 x 1 2 1 M Chuck Key 1 N T Nuts M10 1 5 1 O Oil Bottle 1 P Handwheel Handles 2...

Page 15: ...G8689 Mini Mill Mfg 8 06 13 Hardware Recognition Chart...

Page 16: ...Considerations Figure 6 Working clearances 20 20 The unpainted surfaces are coated with a waxy oil to prevent corrosion during shipment Remove this protective coating with a solvent cleaner or degrea...

Page 17: ...This will allow unrestricted handwheel operation 2 Mark your hole locations using the mounting holes in the base as a guide 3 Drill the holes needed in the workbench 4 Place a precision level on the...

Page 18: ...ole on the side of the head Rotate the chuck by hand until the pin falls into the notch on the spindle shaft preventing the spindle from turning see Figure 7 NOTICE DO NOT completely unscrew the drawb...

Page 19: ...fore WE STRONGLY REC OMMEND that you read books trade maga zines or get formal training before begin ning any projects Regardless of the con tent in this section Grizzly Industrial will not be held li...

Page 20: ...rst rotate the spindle by hand while holding light pressure on the lever When the gears engage the lever will fall into place 4 Turn the SPINDLE ON RPM CONTROL KNOB ON and let the mill run for a minim...

Page 21: ...opening the switch cover This is done by pushing in and up on the button and allowing the inner button to release Rapid Micro Downfeed Controls The Model G8689 spindle height is controlled by two meth...

Page 22: ...is used Table Travel The mill table can be moved in the X and Y axis Longitudinal Feed The longitudinal feed or X axis is moved by a handwheel at the end of the table The handwheel will move the table...

Page 23: ...el to move the table in the intended direction 3 The exact moment the lead screw catches and the table begins to move backlash has been eliminated and the graduated dial can be zeroed Note You will no...

Page 24: ...cult and causes damage to the drawbar threads collet and the spindle taper Keep in mind the taper keeps the collet and tool in place The drawbar simply aids in seating the taper MT 3 Collets To remove...

Page 25: ...ol Diameter RPM Cutting Speeds for High Speed Steel HSS Cutting Tools Workpiece Material Cutting Speed sfm Aluminum alloys 300 Brass Bronze 150 Copper 100 Cast Iron soft 80 Cast Iron hard 50 Mild Stee...

Page 26: ...ng Tapping Fluid H1413 16 oz Cutting Tapping Fluid H1414 1 Gallon Cutting Tapping Fluid This cutting and tapping fluid is non ozone deplet ing and is safe for ferrous and non ferrous met als with an e...

Page 27: ...us that moves at right angles to the dial face H3022 Measurement Tool Set Includes magnetic base 1 dial indicator 001 and 6 dial caliper 001 The extremely low price has made this a very popular seller...

Page 28: ...collet system with ultra precision These spring collets are hardened and ground to exacting tolerances and offer incredible holding power This set includes an MT 3 arbor and nut spanner wrench plasti...

Page 29: ...res moisture does not remain on bare metal surfaces Keep tables rust free with regular applications of products like G96 Gun Treatment SLIPIT or Boeshield T 9 see SECTION 5 ACCESSORIES on Page 24 for...

Page 30: ...d Saddle B At the Column Pivot C Column Ways Apply a light weight lithium based grease directly to these points once a month or more frequently as needed D Longitudinal Leadscrew E Cross Feed Leadscre...

Page 31: ...r circulation through the motor restricted 3 Motor brushes are wearing 1 Reduce load on motor 2 Clean out motor to provide normal air circulation 3 Inspect motor brushes replace if necessary Motor sta...

Page 32: ...ng the slides to bind The gibs are pre adjusted at the factory and should not need further adjustment until many hours of machine use If the movement seems too tight at first make sure the locks are f...

Page 33: ...the fuse cap Figure 35 Fuse replacement Head Counterbalance Spring The head counterbalance spring helps keep the mill head in position This spring has been set and adjusted at the factory and needs n...

Page 34: ...utton System ON Switch Caution Light ON RPM Switch Cooling Fan Transformer Figure 38 G8689 Wiring diagram Figure 36 G8689 Electrical box System Light Cooling Fan Transformer Printed Circuit Board Figu...

Page 35: ...9 Mini Mill Mfg 8 06 33 Parts Breakdown 31 21 19 24 9 25 12 28 29 30 38 34 33 32 37 35 23 16 22 28 29 18 20 42 92 14 15 15 3 17 13 4 36 1 2 26 27 4 5 15 14 15 8 7 6 92 11 10 9 12 3 30 G8689 Table Asse...

Page 36: ...C BOX 22 PSS01M SET SCREW M6 1 X 10 70 P8689070 LOCK NUT M24 3 23 P8689023 Y AXIS SCREW NUT 71 P8689071 SPECIAL WASHER 24 P8689024 HOLDING PLATE 72 P8689072 CONNECTING STRUT 25 P8689025 DUST GUARD COV...

Page 37: ...84 86 85 86 88 95 89 91 90 94 93 92 101 100 98 99 124 49 119 118 120 78 79 140 117 109 108 107 142143 141 145 104 105 106 114 113 139 115 80 116 123 122 121 125 52 51 50 132 138 139 8183 29 43 60 63 6...

Page 38: ...165 PS12M PHLP HD SCR M3 5 X 6 121 PSB03M CAP SCREW M5 8 X 8 166 PWR810 WRENCH 8 X 10 122 P8689122 BEARING COVER 167 PWR1417 WRENCH 14 X 17 123 P8689123 BALL BEARING 80206 168 PWR1719 WRENCH 17 X 19...

Page 39: ...63 162 159 155 156 161 132 154 153 152 67 68 70 72 17 45 44 43 41 40 42 39 185 183 184 186 65 30 66 47 46 151 103 165 164 150 110 69 102 71 176 181 179 169 173 170 171 180 178 177 174 175 166 167 168...

Page 40: ...38 G8689 Mini Mill Mfg 8 06...

Page 41: ...a woodworker metalworker ____ 0 2 Years ____ 2 8 Years ____ 8 20 Years ____20 Years 6 How many of your machines or tools are Grizzly ____ 0 2 ____ 3 5 ____ 6 9 ____10 7 Do you think your machine repr...

Page 42: ...LINE FOLD ALONG DOTTED LINE GRIZZLY INDUSTRIAL INC P O BOX 2069 BELLINGHAM WA 98227 2069 Place Stamp Here Name_______________________________ Street_______________________________ City______________S...

Page 43: ...tried in the State of Washington County of Whatcom We shall in no event be liable for death injuries to persons or property or for incidental contingent special or consequential damages arising from...

Page 44: ......

Reviews: