


-12-
24" & 27" Resaw Bandsaws
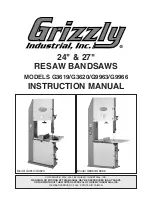
Figure 6.
Dust port installed.
Dust Port
To install the dust port:
1.
Place the dust port on the saw and install it
with the included Phillips head screws as
shown in
Figure 6
.
Fence
Figure 5.
Fence mounted on rail.
To mount the fence:
1.
Loosen the lock knob and slide the fence
onto the rail.
2.
Slide the fence beyond the center of the
table so the blade can be installed without
blocking the fence as shown in
Figure 5
.
3.
Slip the blade through the slot in the table
and onto the bandsaw wheels, similar to how
the blade was installed before you removed
it. Make sure the blade teeth face downward
during installation.
4.
Tension the blade enough to keep it on the
saw so it does not spring off during the rest
of the assembly process.
Summary of Contents for G3619
Page 30: ......
Page 31: ......
Page 32: ... 30 24 27 Resaw Bandsaws ...
Page 33: ...24 27 Resaw Bandsaws 31 ...
Page 36: ... 34 24 27 Resaw Bandsaws G3619 G3620 ...
Page 37: ...24 27 Resaw Bandsaws 35 G3619 G3620 ...
Page 38: ... 36 24 27 Resaw Bandsaws G3619 G3620 ...
Page 39: ...24 27 Resaw Bandsaws 37 G3619 G3620 ...
Page 40: ... 38 24 27 Resaw Bandsaws G3619 G3620 ...
Page 44: ... 42 24 27 Resaw Bandsaws G9963 G9966 ...
Page 46: ... 44 24 27 Resaw Bandsaws G9963 G9966 ...
Page 47: ...24 27 Resaw Bandsaws 45 189 G9963 G9966 ...
Page 55: ......
Page 56: ......


