background image

Model g0621 (Mfg. since 10/06)

-15-

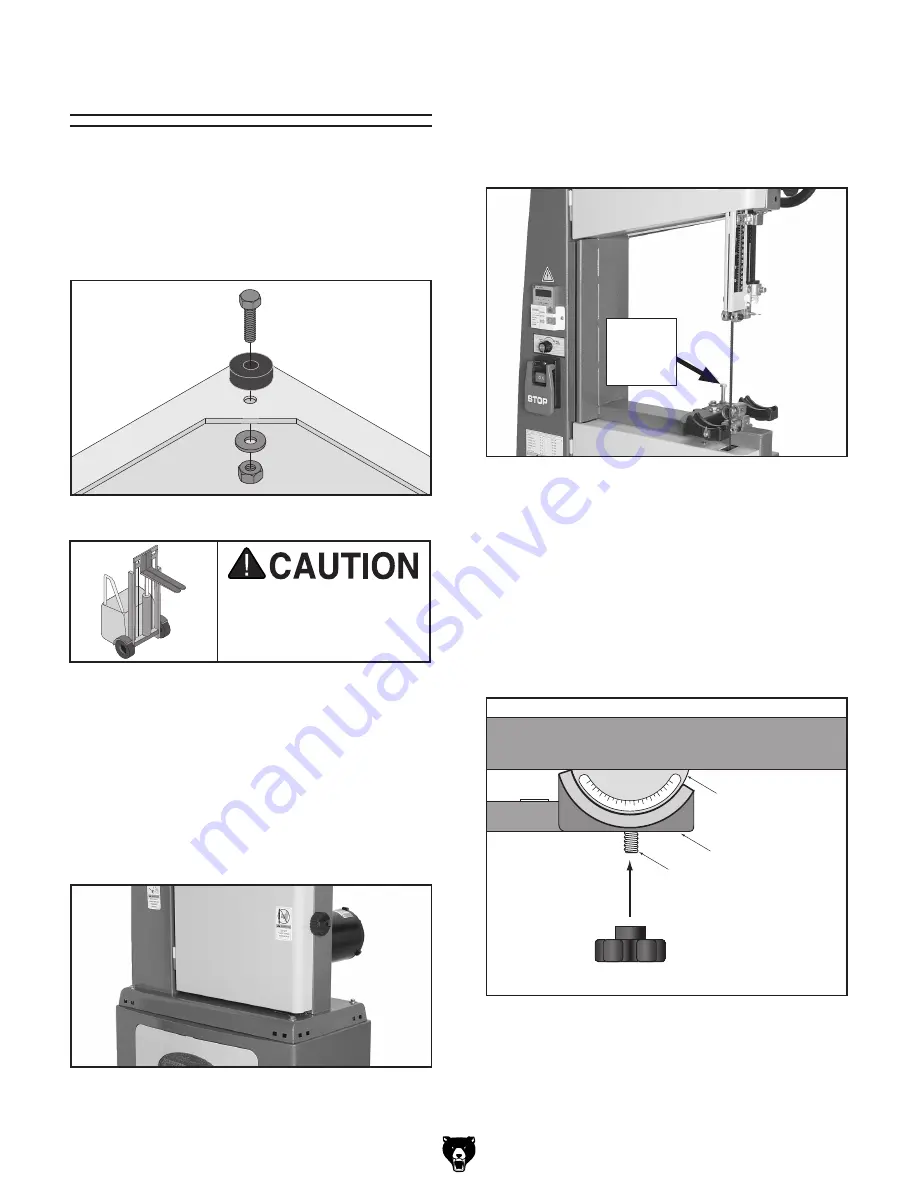
figure 6. Bandsaw mounted to stand.

The  bandsaw  is  heavy 

and awkward to lift. use a 

forklift or other powered 

lifting aid.

figure 7. positive stop bolt installed.

positive

stop

Bolt

Assembly

5.  thread a 

3

8

"-16 hex nut half way up the posi-

tive stop bolt (hex Bolt 

3

8

"-16 x 3

1

2

").

6.  thread the positive stop bolt into the trunnion 

base so it is installed as shown in 

figure 7.

To assemble the bandsaw:

1.  install the rubber feet into the bottom of the 

cabinet stand, as shown in 

figure 5, with the 

four 

5

16

"-18 x 1" hex bolts, four 

5

16

" flat wash-

ers, and four 

5

16

"-18 hex nuts.

Foot

Hex Bolt

Hex Nut

Flat
Washer

figure 5. rubber foot order of installation.

2.  Using  a  forklift  or  other  powered  lifting  aid, 

place the bandsaw on top of the stand.

3.  Align  the  mounting  holes  on  the  bandsaw 

base with those in the stand.

4.  secure  the  bandsaw  to  the  stand  with  the 

four 

5

16

"-18 x 3" hex bolts, eight 

5

16

 flat wash-

ers, and four 

5

16

"-18 hex nuts (

figure 6).

7.  remove the table pin from the table.

8.  Fit  the  table  around  the  blade  and  rest  the 

table trunnions on the trunnion base, making 
sure  the  trunnion  bolts  extend  through  the 
bottom of the trunnion base.

9.  thread the two table trunnion knobs onto the 

trunnion bolts, as illustrated in 

figure 8.

Table Trunnion

Table

Trunnion Base

Trunnion Bolt

Trunnion Knob

figure 8. table installation on trunnion base.

Summary of Contents for G0621

Page 1: ...pyright FEBRUARY 2007 By Grizzly Industrial Inc REVISED MAY 2009 TR Warning No portion of this manual may be reproduced in any shape Or form without the written approval of Grizzly Industrial inc for machines mfg since 10 06 TR8986 printed in TAIWAN ...

Page 2: ... personal protective equipment The manufacturer will not be held liable for injury or property damage from negligence improper training machine modifications or misuse Some dust created by power sanding sawing grinding drilling and other construction activities contains chemicals known to the State of California to cause cancer birth defects or other reproductive harm Some examples of these chemic...

Page 3: ...N 4 OPERATIONS 25 Operation Safety 25 Basic Controls 25 Workpiece Inspection Wood 26 Overview 26 Table Tilt 27 Guide Post 27 Ripping 28 Crosscutting 28 Resawing 29 Cutting Curves 30 Stacked Cuts 30 Blade Selection Wood Cutting 31 Blade Selection Metal Cutting 33 Blade Changes 34 Scale Calibration 35 SECTION 5 ACCESSORIES 36 SECTION 6 MAINTENANCE 37 Schedule 37 Cleaning 37 Lubricating 37 Redressing...

Page 4: ...cations drawings and photographs of the machine we used when writ ing this manual However sometimes errors do happen and we apologize for them Also owing to our policy of continuous improve ment your machine may not exactly match the manual If you find this to be the case and the dif ference between the manual and machine leaves you in doubt check our website for the latest manual update or call t...

Page 5: ...dle Cord Length 6 ft Cord Gauge 16 gauge Recommended Circuit Size 15 amp Plug Included No Recommended Plug 6 15 Motor Horsepower 1 25 HP Voltage 220V Phase 3 Phase Cycle 60 Hz Type Induction Amps 4 8 Speed 1725 RPM Bearings Sealed and Lubricated Power Transfer Belt Drive Main Specifications Throat Capacity Left of Blade 131 2 Maximum Resaw Height 10 Blade Speeds Variable 150 3000 FPM Blade Length ...

Page 6: ... Iron Fence Aluminum Base Steel Body Steel Paint Powder Coated Other Specifications Compatible Shop Fox Mobile Base Available from Grizzly G7315 Country Of Origin Taiwan Sound Rating 74 dB Warranty 1 Year Serial Number Location ID Label on Center of Upper Wheel Cover Approximate Assembly Setup Time 1 5 Hours Model G0621 Page 2 of 2 ...

Page 7: ...evation Lock Knob G Motor Switch H Speed Dial I Power Switch J Fence K Upper Blade Guide Assembly Identification G A D J M I S E Q K L N O H R B C F P T U L Miter Gauge M Table Tilt Lock Knob 1 of 2 N Rear Table Support Lock Knob O Lower Wheel Adjustment Hub P Lower Wheel Cover Q Motor R Belt Tension Lock Nut S Motor Junction Box T Dust Hose Access Hole U Blade Guard ...

Page 8: ...es of dust wood metal etc can cause severe respiratory illnesses For Your Own Safety Read Instruction Manual Before Operating this Machine The purpose of safety symbols is to attract your attention to possible hazardous conditions This manual uses a series of symbols and signal words intended to convey the level of importance of the safety messages The progression of symbols is described below Rem...

Page 9: ... GUARDS ARE IN PLACE AND WORK CORRECTLY BEFORE USING MACHINERY Safety Instructions for Machinery 16 REMOVE CHUCK KEYS OR ADJUSTING TOOLS Make a habit of never leaving chuck keys or other adjustment tools in on the machine especially near spindles 17 DAMAGED MACHINERY Check for bind ing or misaligned parts broken parts loose bolts other conditions that may impair machine operation Always repair or ...

Page 10: ...OFF and disconnected from the power source 11 BLADE CONTROL Do not attempt to stop or slow the blade with your hand or a workpiece Allow the blade to stop on its own 12 EXPERIENCING DIFFICULTIES If you experiencedifficultiesperformingtheintend ed operation stop using the machine and contact our Technical Support Department at 570 546 9663 1 BLADE CONDITION Do not operate with a dull cracked or bad...

Page 11: ... place the machine near a power source If you must use an extension cord Use at least a 14 gauge cord that does not exceed 50 feet in length The extension cord must also have a ground wire and plug pin A qualified electrician MUST size cords over 50 feet long to prevent motor damage Figure 1 NEMA 6 15 plug and receptacle SECTION 2 CIRCUIT REQUIREMENTS Serious personal injury could occur if you con...

Page 12: ...h your machine Description Qty Straightedge 1 Level 1 Another Person for Lifting Help 1 Square 1 Safety Glasses for each person 1 Dust Collection System 1 21 2 Dust Hose length as needed 1 21 2 Hose Clamp 1 Items Needed for Setup The Model G0621 was carefully packed when it left our warehouse If you discover the machine is damaged after you have signed for delivery please immediately call Customer...

Page 13: ...4 Flat Washers 5 16 Stand Bandsaw 8 Hex Nuts 5 16 18 Stand Bandsaw 4 Hex Bolt 3 8 16 x 31 2 Positive Stop 1 Hex Nut 3 8 16 Positive Stop 1 Cap Screws M6 1 x 16 Front Rail 2 Front Rail T Slot Nuts Front Rail 2 Cap Screws M6 1 x 16 Rear Rail 2 Guide Blocks Blade Guides 4 Thumbscrews 1 4 20 x 1 2 Blade Guides 4 Phlp Hd Screws 10 24 x 1 4 Dust Port 4 Hex Wrenches 3 5 8mm 1 each Flat Wrench 12 14mm 1 I...

Page 14: ... 12 Model G0621 Mfg since 10 06 Hardware Recognition Chart ...

Page 15: ...pe off the surfaces If your cleaner degreas er is effective the rust preventative will wipe off easily Note To clean off thick coats of rust preven tative on flat surfaces such as tables use a PLASTIC paint scraper to scrape off the majority of the coating before wiping it off with your rag Do not use a metal scraper or you may scratch your machine 4 Repeat Steps 2 3 as necessary until clean then ...

Page 16: ...nvironment The physical environment where your machine is operated is important for safe operation and the longevity of its components For best results operate this machine in a dry environment that is free from excessive moisture hazardous chemi cals airborne abrasives or extreme conditions Extreme conditions for this type of machinery are generally those where the ambient temperature range excee...

Page 17: ... 16 18 hex nuts Foot Hex Bolt Hex Nut Flat Washer Figure 5 Rubber foot order of installation 2 Using a forklift or other powered lifting aid place the bandsaw on top of the stand 3 Align the mounting holes on the bandsaw base with those in the stand 4 Secure the bandsaw to the stand with the four 5 16 18 x 3 hex bolts eight 5 16 flat wash ers and four 5 16 18 hex nuts Figure 6 7 Remove the table p...

Page 18: ...lush with the table top sur face 11 Insert the pin into the end of the table slot 12 Attach the rail brackets to the front of the table with the two M6 1 x 16 cap screws as shown in Figure 9 Figure 11 Rear fence rail attached to table Table Pin Rear Rail Figure 9 Rail brackets attached to table 13 Slide the front rail nuts into the T slot on the underside of the front rail Rail Brackets 16 Pull th...

Page 19: ...the 0 mark on the scale lines up with the pencil mark made in Step 22 Figure 15 Scale installed on front fence rail Figure 14 6 Handwheel installed Set Screw 21 Slide the fence against the blade 22 Use a sharp pencil to mark the fence rail where the fence scale indicator is pointing This mark will indicate where to align the 0 mark when you install the scale 23 Remove the fence from the front rail...

Page 20: ... located on the back of the bandsaw 5 Spin the upper wheel by hand at least three times and watch how the blade rides on the crown of the wheel Refer to Figure 19 for an illustration of this concept If the blade rides on the peak of the upper wheel crown then the bandsaw is already tracked properly and no additional adjust ments are needed Skip to Step 9 If the blade does not ride in the peak of t...

Page 21: ...nd read Basic Controls on Page 25 2 Connect the machine to the power source 3 Turn the speed dial counterclockwise as far as it will go 4 Lift the STOP paddle on the power switch and press the STOP button all the way in this resets the safety mechanism on the STOP switch 5 Turn the power ON by pressing the green ON button above the STOP paddle The digital display should light up If not make sure t...

Page 22: ...rn 6 Turn the bandsaw OFF and read the tension gauge Use the reading as a guide when ten sioning that blade in the future Note Do not rely on this measurement for long periods of time because the blade will stretch with use NOTICE To reduce blade stretching remove the ten sion from the blade when not in use NOTICE After blade tension and tracking are set cor rectly properly adjust the upper lower ...

Page 23: ...0 016 away from the bearing edge 10 To quickly gauge this setting fold a dollar bill in half twice when folded tightly four thicknesses of a dollar bill is approximately 0 016 Place the folded dollar bill between the support bearing and the blade as shown in Figure 23 11 Tighten the thumbscrew to lock the support bearing in place NOTICE Whenever changing a blade or adjusting ten sion and tracking ...

Page 24: ...ust behind the blade gullets as illustrated in Figure 25 6 Tighten the lateral adjustment thumbscrew 7 Loosen the blade guide thumbscrews 8 Fold a crisp dollar bill in half and place it over the blade between the blade guides and the blade as shown in Figure 26 Blade Gullets Blade Guide Figure 25 Lateral adjustment of blade guides NOTICE Make sure the blade teeth will not contact the blade guides ...

Page 25: ... Page 20 2 DISCONNECT BANDSAW FROM POWER 3 Loosen the two plastic knobs that secure the table to the trunnions 4 Loosen the hex nut that locks the positive stop bolt in place 5 Raise the upper blade guide assembly and place a 6 machinist s square or try square on the table next to the side of the blade as illustrated in Figure 27 Adjust the positive stop bolt to raise or lower the table until the ...

Page 26: ...s proce dure works best with a 3 4 blade To align the miter slot parallel to the bandsaw blade 1 Make sure the blade is tracking properly and that it is correctly tensioned 2 DISCONNECT BANDSAW FROM POWER 3 Loosen the trunnion bolts that secure the trunnions to the table 4 Place an accurate straightedge along the blade The straightedge should lightly touch both the front and back of the blade the ...

Page 27: ...for accidents caused by lack of training Motor Switch Starts and stops the motor Only works after the power switch has been reset and turned ON Speed Dial Adjusts the speed of the motor which is displayed in RPM on the digital display Power Switch Turns power ON OFF to the motor switch OFF button must be reset by pushing it all the way in before power will turn ON again Basic Controls Figure 28 Mo...

Page 28: ...nspection Wood Some wood workpieces are not safe to cut or may require modification before they are safe to cut Before cutting wood get in the habit of inspecting all workpieces for the following Foreign Objects Nails staples dirt rocks and other foreign objects are often embed ded in wood While cutting these objects can become dislodged and hit the operator or break the blade which might then fly...

Page 29: ...or down to be as close to the workpiece as possible In order to cut accurately and safely the bottom of the blade guide assembly must be no more than 1 from the workpiece at all times this positioning provides the greatest blade sup port and minimizes the amount of moving blade exposed to the operator Figure 31 Guide post controls Guide Post Guide Post Lock Knob Guide Post NOTICE The positive stop...

Page 30: ...ands or fingers may go into the blade ALWAYS use a push stick when ripping narrow pieces Failure to fol low these warnings may result in serious personal injury Crosscutting means cutting across the grain of wood For plywood or metal crosscutting simply means cutting across the width of the workpiece To make a 90 crosscut 1 Mark the workpiece on the edge where you want to begin the cut 2 Adjust th...

Page 31: ...ade lead can tear through the side of the workpiece exposing your hands to the blade teeth Always use push blocks when resawing and keep your hands clear of the blade To resaw a workpiece 1 Verify that the bandsaw is setup properly and that the table is perpendicular to the blade 2 Use the widest blade your bandsaw will accept Note The blade must also be sharp and clean 3 Adjust the fence to the d...

Page 32: ...ular to the out line of your intended shape in areas where changes in blade direction could cause the blade to bind 5 Cut the stack of pieces as though you were cutting a single piece Follow your layout line with the blade kerf on the waste side of your line as shown in Figure 36 When cutting curves simultaneously feed and turn the stock carefully so the blade follows the layout line without twist...

Page 33: ...t lines because they naturally wander blade lead Large blades excel at cutting straight lines and are less prone to wander Figure 37 Raker Skip Hook tooth styles Raker Skip Hook Blade Selection Wood Cutting Tooth Style When selecting blades another option to con sider is the shape gullet size teeth set and teeth angle otherwise known as Tooth Style Figure 37 illustrates the three main categories o...

Page 34: ...ting material with much more resistance than clean blades This extra resistance also causes unnecessary heat Grizzly sells resin pitch dissolving cleaners that are excellent for cleaning dirty blades Blade Breakage Many conditions may cause a bandsaw blade to break Blade breakage is unavoidable in some cases since it is the natural result of the peculiar stresses that bandsaw blades must endure Bl...

Page 35: ...ed chart Selecting the right blade for the job depends on a variety of factors such as the type of material being cut hardness of the material material shape machine capability and operator technique The chart below is a basic starting point for choos ing blade type based on teeth per inch TPI for variable tooth pitch blades and for standard raker type bi metal blades HSS blades However for exact ...

Page 36: ...e out 7 Slip the blade through the guides and mount it over the upper and lower wheels 8 Apply tension 9 Turn the tension knob until proper blade ten sion has been reached according to the blade thickness scale shown in Figure 39 Alwaysdisconnectpower to the machine when changing blades Failure to do this may result in serious personal injury All saw blades are dan gerous and may cause personalinj...

Page 37: ...f the scale is not producing accurate cuts Recalibrate the fence scale by adjusting the hairline indicator on the fence and testing your adjustment by cutting a piece of scrap wood To calibrate the scale 1 Set the fence anywhere along the scale and locate a piece of scrap wood with at least one straight edge Joint the edge with a jointer if needed to make the edge straight 2 Hold the straight edge...

Page 38: ... GAUGE H9736 1081 8 1 3 4 VP 0 032 H9737 1081 8 1 4 6 VP 0 032 H9738 1081 8 1 5 8 VP 0 032 H9739 1081 8 1 6 10 VP 0 032 H9740 1081 8 1 8 12 VP 0 032 H9741 1081 8 1 10 14 VP 0 032 H9956 108 1 8 14 Raker 0 025 H9957 108 1 8 18 Raker 0 025 H9958 108 3 16 4 Skip 0 025 H9959 108 3 16 10 Raker 0 025 H9960 108 3 16 14 Raker 0 025 H9961 108 1 4 4 Hook 0 025 H9962 108 1 4 6 Hook 0 025 H9963 108 1 4 10 Rake...

Page 39: ...formance from your machine fol low this maintenance schedule Daily Check correct loose mounting bolts Check correct damaged saw blade Check correct worn or damaged wires Correct any other unsafe condition Monthly Check for V belt tension damage or wear Remove blade and thoroughly clean all built up sawdust from the rubber tires on the wheels Clean vacuum dust buildup from inside cabi net and off m...

Page 40: ...r controller box replace if faulty 9 Test repair replace Machine stalls or is underpowered 1 Feed rate cutting speed too fast for task 2 Machine is undersized for the task 3 Blade is slipping on wheels 4 Motor connection is wired incorrectly 5 Plug receptacle is at fault 6 Pulley sprocket slipping on shaft 7 Motor is at fault 1 Decrease feed rate cutting speed 2 Use sharp blade with lower TPI redu...

Page 41: ...rflow from the shop vacuum 1 Clean out dust port 2 Three options Check dust hoses for leaks or clogs Connect saw to a more powerful shop vacuum Blade wanders or doesn t cut straight 1 Blade lead 2 Sawdust buildup on wheels 1 Refer to Blade Lead on Page 42 2 Clean all sawdust from rubber tires on wheels Cuts are not square vertically 1 Table tilt is not adjusted to 0 or positive stop has moved out ...

Page 42: ... POWER 2 Open the lower wheel cover 3 Remove the bandsaw blade 4 Remove the lower wheel by removing the hex bolt at the center of the wheel then sliding the wheel off the shaft The hex nut has left handed threads so you must turn it clockwise to loosen it 5 Take off the pulley cover plate by removing the six Phillips head screws You now have access to the V belts for inspection or service see Figu...

Page 43: ...motor V belt for correct tension Retension if necessary before continuing 10 When the belt tension is correct tighten the motor hinge bolt 11 Replace the pulley cover lower wheel and blade then close the lower wheel cover Figure 45 Motor mount bolts Motor Hinge Bolt Motor Adjustment Bolt Tensioning Replacing V Belts 1 Follow all previous instructions for Accessing V Belts 2 Loosen the motor mount ...

Page 44: ...e and the trunnion 5 Follow the Aligning Table instructions on Page 24 to complete this procedure Blade Lead means that the blade does not cut straight when using the fence or miter gauge see Figure 48 This is a common condition with all bandsaws Worn or damaged blades may cause lead and replacing them will fix the problem Still if your bandsaw is setup correctly and lead occurs compensate for it ...

Page 45: ...mounted on the saw NOTICE If the table is shifted the fence will be affected since it is attached 3 Clamp the board to the bandsaw table with out moving it Now slide the fence over to the board so it barely touches one end of the board 4 Loosen the two cap screws that mount the front rail to the table 5 Place shims between the front rail and the table as necessary to make the fence parallel to the...

Page 46: ... the top wheel is parallel with the bottom wheel 3 With the straightedge touching both points of the wheel that does not need to be adjusted measure the distance away from the incor rect wheel with a fine ruler see Figure 50 The distance measured with the ruler is the distance the wheel must be corrected Figure 50 Measuring wheel difference Figure 51 Coplanar diagram Adjusting Lower Wheel Only do ...

Page 47: ...k all wires disconnected or connected during any wiring task to ensure tight connections 4 WIRE COMPONENT DAMAGE Damaged wires or components increase the risk of serious personal injury fire or machine damage If you notice that any wires or components are damaged while performing a wiring task replace those wires or compo nents before completing the task 5 MODIFICATIONS Using aftermarket parts or ...

Page 48: ...G0621 Mfg since 10 06 Electrical Component Wiring Figure 57 Inverter controller box terminal blocks Figure 56 Variable speed dial Figure 54 Motor switch Figure 55 Power switch Figure 53 Motor junction box wiring ...

Page 49: ...M AM Y2 R S T U V W Y1 CME X4 X3 X2 X1 X6 CCM X5 REV COM FWD The motor wiring shown here is current at the time of printing however always use the diagram on the inside of junction box cover when rewiring your motor View this wiring diagram in color at www grizzly com Hot Hot Ground 6 15 Plug As Recommended 220V Single Phase Power 220 VAC G Bl Wt Gn 3 2 F A S T S L O W 1 Wiring Diagram REWIRE ...

Page 50: ...30 21 22 23 24 25 31 34 79 81 32 33 45 44 43 41 39 19 38 37 36 60 61 69 16 42 70 71 72 16 33 17 70 47 48 49 50 52 53 49 54 58 59 56 55 61 60 78 63 64 62 65 66 67 62 57 46 51 76 29 77 75 28 26 2 4 3 5 68 35 40 35 4 80 73 74 64 1 64 2 64 3 64 4 Main Parts Breakdown SECTION 9 PARTS ...

Page 51: ... PB35 HEX BOLT 3 8 16 X 2 1 2 21 PLW02 LOCK WASHER 1 4 64 P0621064 MOTOR 1 25HP 220V 3 PHASE 22 PB51 HEX BOLT 1 4 20 X 3 8 64 1 P0621064 1 JUNCTION BOX REAR COVER 23 P0621023 BLADE 0 65 T X 3 8 W X 108 64 2 P0621064 2 JUNCTION BOX FRONT COVER 24 P0621024 HINGE PIN 64 3 PS18 PHLP HD SCR 10 24 X 1 4 25 P0621025 UPPER WHEEL COVER 64 4 P0621064 4 3 CIRCUIT TERMINAL BLOCK 26 PLW07 LOCK WASHER 1 2 65 P0...

Page 52: ...15 125 126 127 128 124 123 118 129 130 102 131 132 133 138 122 121 103 101 139 133 140 141 142 134 135 143 144 145 146 147 148 149 145 127 126 125 153 170 151 150 152 136 137 137 157 156 155 154 169 165 128 129 118 160 159 158 161 103 162 159 164 163 102 147 166 167 141 2 141 3 141 4 141 5 141 1 Table Blade Guides Parts Breakdown ...

Page 53: ...18 THUMB SCREW 1 4 20 X 1 2 151 P0621151 TABLE TILT POINTER 119 P0621119 KNOB 5 16 18 X 2 152 P0621152 TABLE TILT SCALE 120 P0621120 PINION GEAR 153 P0621153 LOWER GUIDE BRACKET 121 P0621121 BLADE GUARD 154 P0621154 FRONT FENCE RAIL 122 P0621122 THUMB SCREW 1 4 20 X 3 4 155 P0621155 KNOB 5 16 18 X 5 8 123 PSB05 CAP SCREW 1 4 20 X 3 4 156 P0621156 RAIL BRACKET 124 P0621124 UPPER GUIDE BRACKET 157 P...

Page 54: ...5 16 18 X 3 209 PB03 HEX BOLT 5 16 18 X 1 202 PW07 FLAT WASHER 5 16 210 PN05 HEX NUT 1 4 20 203 P0621203 STAND GUARD 211 PLW02 LOCK WASHER 1 4 204 P0621204 KNOB 5 16 18 X 3 4 212 PW06 FLAT WASHER 1 4 205 PLN03 LOCK NUT 5 16 18 213 P0621213 STAND INSET PLATE 206 PN02 HEX NUT 5 16 18 214 P0621214 CABINET BOTTOM PLATE 207 P0621207 STAND 215 PFB15 FLANGE BOLT 1 4 20 X 3 4 208 P0621208 FOOT ...

Page 55: ...21301 FENCE BODY 310 PSB01M CAP SCREW M6 1 X 16 302 P0621302 BUTTON HD CAP SCR M10 1 5 X 16 311 P0621311 FENCE POINTER 303 PS09M PHLP HD SCR M5 8 X 10 312 P0621312 PLATE 304 P0621304 FENCE BASE 313 P0621313 PIN 305 PSS03 SET SCREW 1 4 20 X 3 8 314 P0621314 LOCK MECHANISM 306 P0621306 ECCENTRIC SHAFT 315 PN03M HEX NUT M8 1 25 307 P6200 BALL BEARING 6200ZZ 316 P0621316 FENCE HANDLE M8 1 25 308 PR45M...

Page 56: ...ain Contact Grizzly at 800 523 4777 or www grizzly com to order new labels REF PART DESCRIPTION REF PART DESCRIPTION 401 P0621401 MACHINE ID LABEL 408 P0621408 MOTOR SWITCH ON OFF LABEL 402 P0621402 G0621 MODEL LABEL 409 P0621409 SPEED DIAL LABEL 403 P0621403 DOOR CLOSED LABEL 410 P0621410 CUTTING CHART LABEL 404 P0621404 BLADE TENSION LABEL 411 PPAINT 1 GRIZZLY GREEN TOUCH UP PAINT 405 P0621405 G...

Page 57: ... 0 2 Years ____ 2 8 Years ____ 8 20 Years ____20 Years 6 How many of your machines or tools are Grizzly ____ 0 2 ____ 3 5 ____ 6 9 ____10 7 Do you think your machine represents a good value _____Yes _____No 8 Would you recommend Grizzly Industrial to a friend _____Yes _____No 9 Would you allow us to use your name as a reference for Grizzly customers in your area Note We never use names more than 3...

Page 58: ...D LINE FOLD ALONG DOTTED LINE GRIZZLY INDUSTRIAL INC P O BOX 2069 BELLINGHAM WA 98227 2069 Place Stamp Here Name_______________________________ Street_______________________________ City______________State______Zip______ Send a Grizzly Catalog to a friend ...

Page 59: ...e tried in the State of Washington County of Whatcom We shall in no event be liable for death injuries to persons or property or for incidental contingent special or consequential damages arising from the use of our products To take advantage of this warranty contact us by mail or phone and give us all the details We will then issue you a Return Number which must be clearly posted on the outside a...

Page 60: ...Buy Direct and Save with Grizzly Trusted Proven and a Great Value Since 1983 ORDER 24 HOURS A DAY 1 800 523 4777 Visit Our Website Today For Current Specials ...

Reviews: