background image

Model G0594 (Mfg. Since 7/11)

-9-

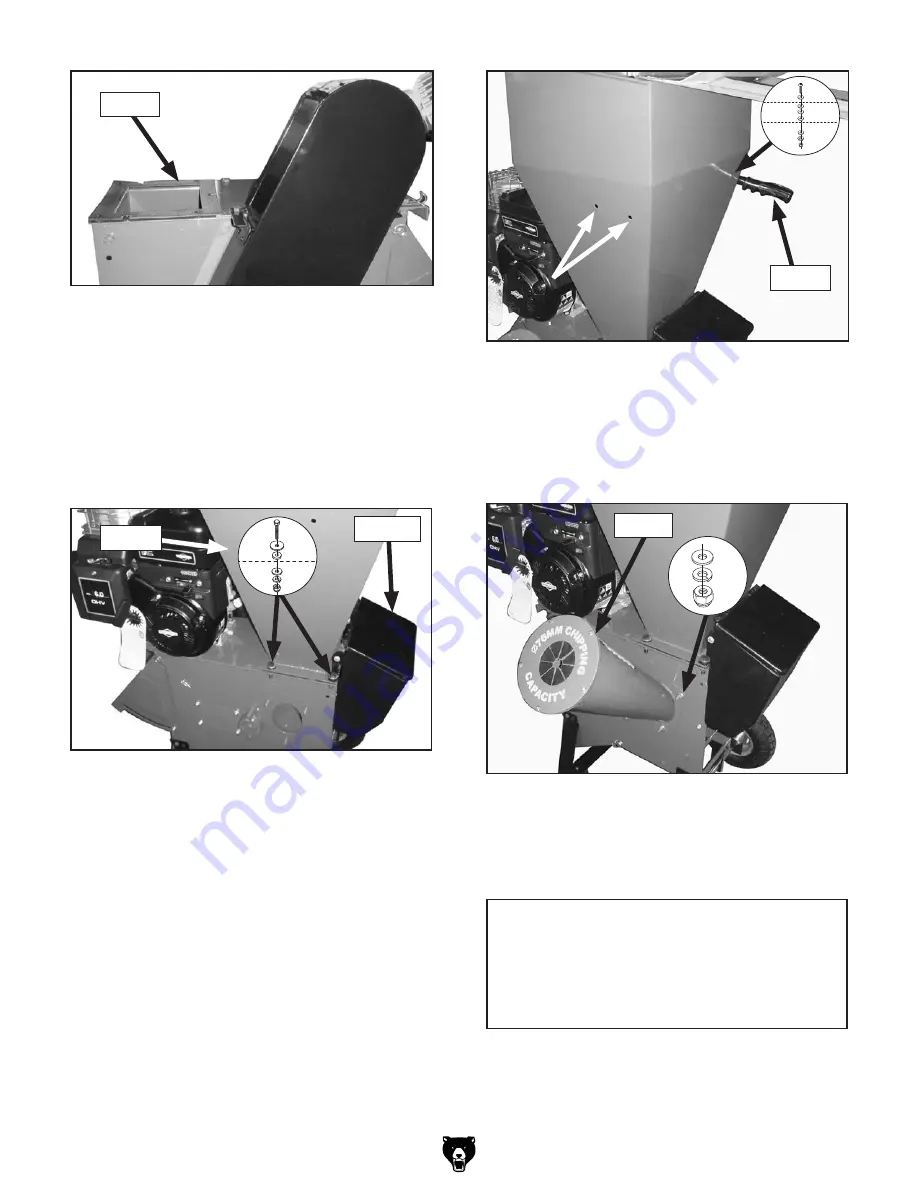
figure 5. hopper gasket positioned.

4.  place  the  hopper  on  top  of  the  gasket  and 

line  up  all  of  the  holes.  place  two  rubber 
grommets  and  8mm  fender  washers  on  two 
M8-1.25 x 35 hex bolts, thread them through 
the  holes  nearest  the  motor,  then  secure 
them  with  two  8mm  flat  washers,  8mm  lock 
washers, and M8-1.25 lock nuts (see 

figure 

6).

figure 7. location to install the handles.

7.  place  the  funnel  over  the  studs  in  the  side 

of  the  chipper/shredder  and  secure  it  with 
the  remaining  8mm  flat  washers,  8mm  lock 
washers, and M8-1.25 lock nuts (see 

figure 

8).

gasket

figure 8. Funnel installed.

8.  Before  operating,  fill  the  motor  with  oil  and 

gas according to the instructions in the Briggs 
& stratton manual.

NOtICE

this chipper/shredder does not have oil 

in the motor when shipped. Add oil before 

operating the chipper/shredder, or the 

motor will seize.

Funnel

figure 6. hopper and toolbox attached.

hopper

toolbox

handle

6.  insert  an  M8-1.25  x  35  phillips  head  screw 

with  an  8mm  flat  washer  through  each  hole 
in the handles. place three 8mm flat washers 
on each of the screws and insert the handle 
assembly  into  the  holes  in  the  hopper  (see 
figure 7). secure the handles with one 8mm 
flat  washer,  8mm  lock  washer,  and  M8-1.25 
lock nut on each screw.

5.  line  up  the  holes  in  the  toolbox  with  the 

remaining  holes  in  the  hopper  and  secure 
them with the same combination of hex bolts, 
washers,  and  lock  nuts  as  used  in 

Step 4 

(see 

figure 6).

x 4

x 4

x 3

Summary of Contents for G0594

Page 1: ...ight NOVEMBER 2005 By Grizzly Industrial Inc revised AUGUST 2011 BL Warning No portion of this manual may be reproduced in any shape Or form without the written approval of Grizzly Industrial inc For...

Page 2: ...g grinding tool integrity and the usage of personal protective equipment The manufacturer will not be held liable for injury or property damage from negligence improper training machine modifications...

Page 3: ...ION 2 SETUP 7 Unpacking 7 Site Considerations 7 Items Needed for Setup 7 Inventory 8 Assembly 8 SECTION 3 OPERATIONS 10 Operation Safety 10 Chipping Shredding 10 SECTION 4 MAINTENANCE 12 Visual Inspec...

Page 4: ...o our policy of continuous improve ment your machine may not exactly match the manual If you find this to be the case and the difference between the manual and machine leaves you in doubt immediately...

Page 5: ...ntification Machine Identification Figures 1 2 A Hopper B Motor C Chip Outlet D Chipper Funnel E Choke F Gas Cap G Throttle H ON OFF Switch I Pull Start Handle J Gas Shut Off Valve K Exhaust Identific...

Page 6: ...of DANGEROUS ENVIRONMENTS Do not use machinery in areas that are wet cluttered or have poor lighting Operating machinery in these areas greatly increases the risk of accidents and injury MENTAL ALERTN...

Page 7: ...ing parts or flying debris Make sure they are properly installed undamaged and working correctly FORCING MAChINERY Do not force machine It will do the job safer and better at the rate for which it was...

Page 8: ...ots to maintain secure footing JAMS AND CLOGGING Turn the chipper shred der OFF allow all moving parts to come to a complete stop and disconnect the spark plug wire before attempting to free a jam or...

Page 9: ...of the discharge area Make sure all bystanders children pets or objects that you do not want damaged or covered in chips are clear of the discharge area Site Considerations Your machine was carefully...

Page 10: ...O NOT attempt to start this machine until all assembly has been completed Serious personal injury and damage to the machine could occur To assemble the chipper shredder 1 Tip the chipper shredder over...

Page 11: ...g fill the motor with oil and gas according to the instructions in the Briggs Stratton manual NOTICE This chipper shredder does not have oil in the motor when shipped Add oil before operating the chip...

Page 12: ...shredder for chipping construction debris plastic paper products rope or twine or any material that may contain metal Note Remove any nails rope twine or rocks that may be imbedded in roots before in...

Page 13: ...to the idle position or turn the chipper shredder OFF when not actively shredding or chipping 3 Turn OFF the machine see the Briggs Stratton motor manual for instructions allow all moving parts to com...

Page 14: ...ipped it may leak oil and gas DO NOT store the chipper shredder near an ignition source such as a wood stove gas or electric heater or an appliance or heater with a pilot light Store the chipper shred...

Page 15: ...n 2 Air filter is dirty 3 Stale fuel water or dirt in fuel blocked fuel line 1 Move the choke to the RUN position 2 Clean the air filter 3 Drain the fuel tank clean out the fuel line and fill the tank...

Page 16: ...the side cover plate photo inset in Figure 11 to expose the blades Replace or tighten the V belt if you notice the motor running and the chipper blades are not spinning Tools Needed Qty Adjustable Wr...

Page 17: ...9 21 20 76 74 75 46 47 45 35 25 23 24 28 29 39 27 43 17 63 43 41 40 36 38 31 30 49 66 68 67 70 69 65 64 61 60 48 50 52 53 6 6 6 6 6 8 8 8 51 55 54 2 1 32 33 34 37 26 57 57 79 100 50 6 1 3 15 80 84 85...

Page 18: ...0594071 WIRE CIRCLIP 25MM 21 P0594021 SPACER 3 72 P0594072 SPACER 22 P0594022 HAMMER 73 P0594073 PULLEY 23 P0594023 SPACER 4 74 P0594074 BEARING WASHER LEFT 25MM 24 PRP39M ROLL PIN 4 X 20 75 P0594075...

Page 19: ...equential damages arising from the use of our products To take advantage of this warranty contact us by mail or phone and give us all the details We will then issue you a Return Number which must be c...

Page 20: ......

Page 21: ...metalworker ____ 0 2 Years ____ 2 8 Years ____ 8 20 Years ____20 Years 6 How many of your machines or tools are Grizzly ____ 0 2 ____ 3 5 ____ 6 9 ____10 7 Do you think your machine represents a good...

Page 22: ...LINE FOLD ALONG DOTTED LINE GRIZZLY INDUSTRIAL INC P O BOX 2069 BELLINGHAM WA 98227 2069 Place Stamp Here Name_______________________________ Street_______________________________ City______________S...

Page 23: ......

Page 24: ......

Reviews: