background image

GB

63

•  Always keep the grass ejection 

hole clean and clear. Remove 

cut material only when the 

equipment is stopped. 

•  Do not leave the equipment un

-

attended in the workplace.

•  Do not work with equipment 

that is damaged, incomplete, or 

has been modified without the 

authorisation of the manufac

-

turer. Do not use the equipment 

with damaged safety devices or 

screens or with missing safety 

equipment such as deflection 

and/or grass collection devices.

•  Do not overload the equipment. 

Work only within the speci

-

fied power range and do not 

change the regulator settings 

on the motor. Do not use low-

powered machines for heavy 

work. Do not use your equip

-

ment for purposes other than 

those for which it is designed.

•  Do not use the equipment near 

inflammable liquids or gases. 

Non-observance will result in a 

risk of fire or explosion.

•  Do not lift or carry the equipment 

when the motor is running.

•  Turn off the appliance, unplug it 

from the mains and check that 

all moving parts are at rest: 

- Whenever you leave the ma

-

chine, 

- Before cleaning the ejection 

hole or removing blockages, 

- When the equipment is out of 

use, 

- Before checking, cleaning or 

working on the equipment,

- If the power cable is dam

-

aged or frayed,

- If the equipment has hit a 

foreign object or if strange 

vibrations occur during work. 

In this case, check the equip

-

ment for damage and have it 

repaired if applicable.

•  Do not place feet or hands near 

or under rotating parts. Do not 

stand in front of the grass ejec-

tion hole during sickle mowing.

Maintenance and Storage:

•  When servicing the blades, 

ensure that the blades can 

be moved, even if the power 

source is switched off.

•  Ensure that all nuts, bolts and 

screws are tightened firmly and 

the equipment is in safe work

-

ing condition.

•  Check the mower for any dam

-

ages.

•  Repair damaged parts as ap

-

propriate.

•  Do not attempt to repair the 

equipment yourself unless you 

have been trained to do so. 

Any work not specified in these 

instructions is to be carried out 

only by customer service cen

-

tres that we have authorised. 

•  Keep the equipment in a dry 

location and out of reach of 

children.

•  Handle the equipment with 

care. Keep tools sharp and 

clean, in order to facilitate bet

-

ter and safer work. Follow the 

maintenance instructions.

•  Wear protective gloves when 

changing the cutting device.

•  Regularly check the grass col

-

lection device for wear and 

Summary of Contents for ERM 1600-34 L

Page 1: ...vacia kosačka so vzduchovým vankúšom Originalbetriebsanleitung Traduction de la notice d utilisation originale Vertaling van de originele gebruiksaanwijzing Traduzione delle istruzioni per l uso in originale Translation of the original instructions for use Tłumaczenie oryginalnej instrukcji obsługi Překlad originálního návodu k obsluze Vertimas iš originalių eksploatavimo instrukcijoje Traducción ...

Page 2: ...1 3 2 4 5 7 6 9 10 11 13 14 15 12 8 15 2 2 4 3 3 4 7 2 ...

Page 3: ...1 12 14 11 11 2 18 17 16 5 16 19 3 3 1 3 ...

Page 4: ...3 13 15 4 ...

Page 5: ...uzioni per l uso in originale 45 Translation of the original instructions for use 58 Tłumaczenie oryginalnej instrukcji obsługi 70 Překlad originálního návodu k obsluze 83 Vertimas iš originalių eksploatavimo instrukcijoje 94 Traducción del manual de instrucciones original 106 Preklad originálneho návodu na obsluhu 119 DE IT FR NL GB PL CZ LT ES SK ...

Page 6: ...en Gefahren verstehen Kinder dürfen nicht mit dem Gerät spielen Lieferumfang Nehmen Sie das Gerät vorsichtig aus der Packung und prüfen Sie ob die nachfol genden Teile vollständig sind Art 72050071 ERM 1600 34 L Rasenmäher und Bügelgriff mit Gerätekabel Unterer Holm 2 Mittelstreben Montagematerial Bügelgriff 2 Kabelhalter 3 Abstandshalter für Schnitthöhenverstellung Messer Schraubenschlüssel für M...

Page 7: ... leichtgängige Laufrollen Die Funktion der Bedienteile entnehmen Sie bitte den nachfolgenden Beschreibungen Die Abbildungen für die Bedienung des Gerätes finden Sie auf den Sei ten 2 4 Übersicht 1 Bügelgriff 2 Mittelstrebe 3 Flügelmutter 4 Unterer Holm 5 Schraubenschlüssel für Messer 6 Schnitthöheneinstellung nicht sichtbar 7 Luftkissenkufe 8 Laufrollen 9 Gerätegehäuse 10 Gerätekabel 11 2 Kabelhal...

Page 8: ...es zwar eingeschaltet ist aber ohne Belas tung läuft Sicherheitshinweise Dieser Abschnitt behandelt die grundlegenden Sicherheitsvor schriften bei der Arbeit mit dem Elektro Rasenmäher Bildzeichen auf dem Gerät Achtung Lesen Sie die Betriebsanlei tung aufmerksam durch Tragen Sie Gehör und Augenschutz Setzen Sie das Gerät nicht der Feuchtigkeit aus Arbei ten Sie nicht bei Regen und schneiden Sie ke...

Page 9: ...von ernsthaften oder tödlichen Verletzungen zu verringern empfehlen wir Personen mit medizinischen Implantaten ihren Arzt und den Hersteller vom medizini schen Implantat zu konsul tieren bevor die Maschine bedient wird Vorbereitung Erlauben Sie niemals Kindern oder anderen Personen die die Bedienungsanleitung nicht kennen das Gerät zu benutzen Örtliche Bestimmungen können das Mindestalter der Bedi...

Page 10: ...Füße und Hände beim Arbeiten nicht in die Nähe oder unter rotierende Teile Es besteht Verlet zungsgefahr Beachten Sie den Lärm schutz und örtliche Vor schriften Schalten Sie den Motor nach Anweisung ein und nur dann wenn Ihre Füße in sicherem Abstand von den Schneidwerk zeugen sind Benutzen Sie das Gerät nicht bei Regen bei schlechter Wit terung in feuchter Umgebung oder an nassem Rasen Arbei ten ...

Page 11: ... Ablenk und oder Grasfangeinrichtungen Überlasten Sie Ihr Gerät nicht Arbeiten Sie nur im angegebe nen Leistungsbereich und än dern Sie nicht die Reglereinstel lungen am Motor Verwenden Sie keine leistungsschwachen Maschinen für schwere Arbei ten Benutzen Sie Ihr Gerät nicht für Zwecke für die es nicht bestimmt ist Benutzen Sie das Gerät nicht in der Nähe von entzündbaren Flüssigkeiten oder Gasen ...

Page 12: ...eiß und Verformungen Ersetzen Sie aus Sicherheits gründen verschlissene oder beschädigte Teile Seien Sie beim Einstellen der Messer besonders vorsichtig damit Ihre Finger nicht zwischen den rotierenden Messern und fest stehenden Teilen der Maschine eingeklemmt werden Überprüfen Sie dass nur Er satzschneidwerkzeuge verwen det werden die vom Hersteller zugelassen sind Elektrische Sicherheit Achten S...

Page 13: ...Luftkis senkufe 7 ein 2 Befestigen Sie den unteren Holm 4 mit den beiliegenden Schrauben 3 Befestigen Sie die Mittelstre ben 2 mit den beiliegenden Schrauben den großen Unter legscheiben und den Flügel muttern 3 rechts und links am unteren Holm 4 4 Befestigen Sie den Bügel griff 1 mit den beiliegenden Schrauben den Unterlegschei ben und den Flügelmuttern 3 rechts und links an den Mittel streben 2 ...

Page 14: ...is an der Anlaufstelle da sich das Luftkissen erst nach erfolgtem Start aufbaut 6 Zum Einschalten drücken Sie zuerst den Entriegelungsknopf 13 am Bügelgriff und drü cken dann den Starthebel 15 Lassen Sie den Entriegelungs knopf 13 los 7 Zum Ausschalten lassen Sie den Starthebel 15 los Nach dem Ausschalten des Ge rätes dreht sich das Messer noch für einige Sekunden Berühren Sie das laufende Messer ...

Page 15: ...n werden Ist das Messer beschädigt oder zeigt eine Unwucht so muss es ausgewechselt wer den siehe Ersatzteile Zubehör Stellen Sie die Schnitthöhe so ein dass das Gerät nicht über lastet wird Andernfalls kann der Motor beschädigt werden Arbeiten Sie an Hängen immer quer zum Hang Seien Sie be sonders vorsichtig beim Rück wärtsgehen und Ziehen des Gerätes Reinigen Sie das Gerät nach jedem Einsatz wie...

Page 16: ...en Umhüllen Sie das Gerät nicht mit Ny lonsäcken da sich Feuchtigkeit bilden könnte Wir haften nicht für durch unsere Geräte hervorgerufene Schäden sofern diese durch unsachgemäße Reparatur oder den Einsatz von Nicht Originalteilen bzw durch nicht bestimmungsgemäßen Ge brauch verursacht werden Entsorgung Umweltschutz Führen Sie Gerät Zubehör und Verpa ckung einer umweltgerechten Wiederver wertung ...

Page 17: ...en unentgeltlich durch Ersatzlieferung oder Reparatur beseitigt Vorausset zung ist dass das Gerät unzerlegt und mit Kauf und Garantienachweis an den Händler zurückgegeben wird Reparatur Service Sie können Reparaturen die nicht der Garantie unterliegen gegen Berech nung von unserem Service Center durchführen lassen Unser Service Center erstellt Ihnen gerne einen Kos tenvoranschlag Wir können nur Ge...

Page 18: ...höhe ein stellen Messer stumpf Messer schleifen lassen oder austauschen Messerbereich verstopft Gerät reinigen Messer falsch montiert Messer korrekt einbauen Messer rotiert nicht Messer durch Gras blockiert Gras entfernen Messerschraube locker Messerschraube festziehen Abnorme Geräusche Klappern oder Vibratio nen Messerschraube locker Messerschraube festziehen Messer beschädigt Messer austauschen ...

Page 19: ...elles aient com pris les dangers en résultant Les enfants ne doivent pas jouer avec l appareil Volume de la livraison Retirez l appareil prudemment de l embal lage et vérifiez si les parties suivantes sont complètes Art 72050071 ERM 1600 34 L Tondeuse à gazon et poignée en arceau avec câble d appareil Longeron inférieur 2 Traverses centrales Matériel de montage de l étrier 2 dispositifs de retenue...

Page 20: ...sant d un robuste boîtier en matière plastique et d un inter rupteur de sécurité L appareil a quatre positions de réglage en hauteur et des rouleaux maniables Les descriptions suivantes vous indiquent le fonctionnement des dispositifs de com mande Vous trouverez les illustrations de l appareil sur les pages 2 4 Vue d ensemble 1 Poignée en arceau 2 Traverse centrale 3 Écrou à ailettes 4 Longeron in...

Page 21: ...es parties constituantes du cycle de fonctionnement telles que les temps d arrêt de l outil et de fonc tionnement au repos en plus du temps de déclenchement Consignes de sécurité Cette section traite des principales normes de sécurité en cas de travail avec la tondeuse à gazon électrique Pictogrammes sur l appareil Attention Lisez attentivement le mode d emploi Portez un casque anti bruit et des l...

Page 22: ...vement les consignes de sé curité suivantes connaissez parfaitement les dispositifs de commande Avertissement Pendant son fonctionnement cet outil électrique génère un champ électromagnétique Ce champ peut dans cer taines circonstances nuire aux implants médicaux actifs ou passifs Pour ré duire le risque de blessures graves voire mortelles nous recommandons aux per sonnes porteuses d implants médi...

Page 23: ...es qui ont été fournis et sont recommandés par le fabricant L utilisation de pièces étrangères entraîne une annu lation immédiate du droit de garantie Avant toute utilisation toujours vérifier si le cordon d alimen tation et la rallonge présentent des signes de détérioration ou d usure Si le cordon est en dommagé en cours d utilisation il faut immédiatement le débran cher du secteur Ne touchez pas...

Page 24: ...s Risque de blessure L appareil ne doit pas être soulevé ou être transporté tant que le moteur fonctionne Mettez l appareil hors tension s il doit être basculé afin d être transporté afin de traverser des surfaces autre que gazon nées pour le déplacer jusqu à d autres emplacements à tondre Conservez toujours propre et libre d accès l ouverture d éjec tion de l herbe Retirez les déchets de coupe un...

Page 25: ... de l herbe Maintenance et stockage En cas de travaux de mainte nance sur les lames de coupe faites bien attention à ce que les lames de coupe peuvent bouger même si la source de tension est déconnectée Faites en sorte que tous les écrous les boulons et les vis soient solidement serrés et que l appareil soit en état de travail ler en sécurité N essayez pas de réparer vous même l appareil à moins q...

Page 26: ...ntenez le câble de prolon gation à distance de la lame de coupe Les lames de coupe peuvent endommager le câble de prolongation et venir au contact de pièces sous tension Dirigez le câble de prolongation toujours derrière l utilisateur N utilisez pas le câble de pro longation pour tirer sur la fiche de la prise de courant Proté gez le câble de prolongation de la chaleur de l huile et de tout contac...

Page 27: ...isez de rondelles d écartement plus la hauteur de coupe sera basse 4 Retirez la lame 17 Enfoncez les rondelles d écartement nécessaires dans les orifices prévus à cet effet sur la lame 5 Posez la lame 17 avec les rondelles d écartement 18 montées à l avant sur la roue pneumatique 19 et fixez le tout avec la vis de lame 16 Serrez avec la clé 5 Pour la première coupe en début de saison nous conseill...

Page 28: ...r de démar rage 15 Relâchez le bouton de déverrouillage 13 6 Pour mettre hors tension relâ chez le levier de démarrage 15 Après la mise hors tension de l appareil la lame tourne encore pendant quelques secondes Ne touchez pas la lame en rotation Vous pourriez vous blesser Travailler avec la tondeuse à gazon Faites attention à la protection contre le bruit et aux instructions locales Un fauchage à ...

Page 29: ...é Si la lame est endommagée ou présente un déséquilibre elle doit être échangée voir le chapitre des pièces de rechange 1 Retournez l appareil 2 Utilisez des gants épais et mainte nez solidement la lame 17 Des serrez la vis de lame 16 avec la clé 5 fournie à la livraison 3 Montez une nouvelle lame en sens inverse Faites attention à ce que la lame soit positionnée correctement et que la vis soit so...

Page 30: ...ts de garantie sont valables à condition que les intervalles d entretien indiqués dans le mode d emploi et les consignes de net toyage et d entretien aient été respec tés Les dommages dus à un défaut de matériel ou à un vice de fabrication seront éliminés gratuitement soit par un remplacement soit par une répa ration La condition préalable est de rapporter au détaillant l appareil dans son intégri...

Page 31: ...ne pas correctement Hauteur de coupe trop basse Régler la hauteur de coupe Lame émoussée Faire aiguiser la lame ou la chan ger Zone autour de la lame bouchée Nettoyer l appareil Lame mal montée Monter la lame correctement La lame ne tourne pas Lame bloquée par de l herbe Retirer l herbe Vis de la lame desserrée Serrer à fond la vis de la lame de coupe Bruits anormaux Bruits de ferraille ou vibrati...

Page 32: ...ruit resulterende geva ren bewust zijn Kinderen mogen niet met het apparaat spelen Omvang van de levering Neem het apparaat voorzichtig uit de ver pakking en kijk na of de hierna volgende onderdelen volledig zijn Art 72050071 ERM 1600 34 L Grasmaaier en beugelhandgreep met netsnoer Onderste stang 2 centrale stangen Montagemateriaal beugelgreep 2 kabelhouders 3 afstandshouders voor de instelling va...

Page 33: ...n robuuste behui zing van kunststof en een veiligheids schakelaar Het apparaat is ook 4 keer in de hoogte verstelbaar en heeft soepel lopende wielen Gelieve voor de werking van de bedie ningsonderdelen de hierna volgende be schrijvingen te raadplegen De afbeeldingen voor de bediening en het onderhoud vindt u op de zijde 2 4 Overzicht 1 Beugelhandgreep 2 Centrale stang 3 Vleugelmoer 4 Onderste stan...

Page 34: ...len van de bedrijfscyclus rekening gehouden worden zo bijvoorbeeld met tijden tijdens dewelke het elektrische gereedschap uitgeschakeld is en tijden tijdens dewelke het welis waar ingeschakeld is maar zonder belasting functioneert Veiligheidsinstructies Deze paragraaf behandelt de fun damentele veiligheidsinstructies bij het werk met de elektrische grasmaaier Symbolen op het apparaat Opgelet Neem ...

Page 35: ... Waarschuwing Dit elek trische gereedschap pro duceert tijdens de werking een elektromagnetisch veld Dit veld kan in bepaalde omstandigheden actieve of passieve medische im plantaten in negatieve zin beïnvloeden Om het gevaar voor ernstige of dodelijke verwondingen te verminde ren adviseren wij personen met medische implantaten hun arts en de fabrikant van het medische implantaat te raadplegen voo...

Page 36: ...t stroomnet verbroken worden Raak het snoer niet aan voor dat het van het stroomnet ver broken is Gebruik het apparaat niet wanneer het snoer versle ten of beschadigd is Werken met het apparaat Breng voeten en handen bij het werken niet in de nabij heid van of onder roterende onderdelen Er bestaat ge vaar voor verwondingen Neem de bescherming te gen lawaaihinder en lokale voorschriften in acht Sch...

Page 37: ...fabrikant om gebouwd apparaat Gebruik het apparaat nooit met beschadig de beschermingsinrichtingen afschermingen of ontbrekende veiligheidsmechanismen zoals richtingwijzigende of grasvang inrichtingen Overbelast uw apparaat niet Werk uitsluitend in het aange geven vermogensgebied en wijzig de regelaarinstellingen aan de motor niet Gebruik geen machines meteen laag prestatievermogen voor zware werk...

Page 38: ...nd schoenen wanneer u de snoei inrichting wisselt Controleer de grasvanginrich ting regelmatig op slijtage en vervormingen Vervang omwille van de veiligheid versleten of beschadigde onderdelen Wees bij de instelling van de messen uiterst voorzichtig opdat uw vingers niet tussen de rote rende messen en vaststaande onderdelen van de machine gekneld worden Controleer dat er uitsluitend re servesnoeiw...

Page 39: ...ats de onderste stang 4 in de aansluiting van het luchtkus senglijvlak 7 2 Bevestig de onderste stang 3 met de bijgeleverde schroeven 3 Schroef de centrale stangen 2 met behulp van de bijgevoegde schroeven de grote afsluitrin gen en de vleugelmoeren 3 rechts en links op de onderste stang 4 vast 4 Schroef de beugelgreep 1 met behulp van de bijgevoegde schroeven de afsluitringen en de vleugelmoeren ...

Page 40: ... beugelgreep en dan drukt u op de starthendel 15 Laat de ontgrendelknop 13 los 7 Om uit te schakelen laat u de starthefboom 15 los Na het uitschakelen van het ap paraat draait het mes nog enkele seconden lang Raak het draai ende mes niet aan Er bestaat gevaar voor lichamelijke letsels Werken met de grasmaaier Neem de bescherming tegen lawaai hinder en lokale voorschriften in acht Het regelmatige m...

Page 41: ...geleverde schroefsleutel 5 3 Monteer het nieuwe mes weer in omgekeerde volgorde Let erop dat het mes correct geposi tioneerd en dat de schroef vast aangedraaid is zichtig wanneer u achteruitstapt en het apparaat voorttrekt Reinig het apparaat telkens na gebruik zoals in hoofdstuk Reiniging onderhoud opslag beschreven Schakel na het werk en voor het transport het apparaat uit trek de netstekker uit...

Page 42: ...hadi gingen voor zover deze door een onoor deelkundige reparatie of door het gebruik van niet originele onderdelen c q door een niet doelmatig gebruik veroorzaakt worden Berging en milieu Breng het apparaat de toebehoren en de verpakking naar een geschikt recyclage punt Machines horen niet thuis in het huisafval De kunststoffen en metalen onderde len kunnen volgens soort gescheiden worden en zijn ...

Page 43: ...ling is wel dat het apparaat intact en met koop en garantiebewijs aan ons servicecenter wordt overhan digd Reparatieservice U kunt reparaties die niet onder de garantie vallen tegen betaling laten uitvoeren door ons servicecenter Zij brengen graag eerst een offerte uit Wij bewerken alleen apparaten die voldoende zijn verpakt en voldoende gefrankeerd worden opgestuurd Wij kunnen apparaten slechts b...

Page 44: ...jderen Werkresultaat niet bevredigend of motor werkt moeilijk Snoeihoogte te laag Snoeihoogte instellen Mes stomp Mes laten slijpen of uitwisselen Mesbereik verstopt Apparaat reinigen Mes foutief gemonteerd Mes correct monteren Mes roteert niet Mes door gras geblok keerd Gras verwijderen Messchroef los Messchroef vast aandraaien Abnormale geluiden gerammel of trillingen Messchroef los Messchroef v...

Page 45: ...vono giocare con l apparecchio La pulizia e la manutenzione da parte dell utilizzatore non devono essere eseguite da bambini senza sorveglianza Volume di fornitura Rimuovere delicatamente l apparecchio dall imballaggio e controllare se i seguenti componenti sono completi Art 72050071 ERM 1600 34 L Tagliaerba con impugnatura ad archetto e conduttura di collegamento Asta inferiore 2 barre centrali M...

Page 46: ...l livello di taglio Dotato di un motore elettrico potente un resistente alloggia mento in plastica e un interruttore di sicu rezza Inoltre l apparecchio è regolabile in altezza su 4 livelli e dispone di rotelle molto scorrevoli Il funzionamento dei componenti è riporta to nelle seguenti descrizioni Le figure relative al comando dell apparecchio si trovano nelle pagine 2 4 Vista d insieme 1 Impugna...

Page 47: ...condizioni d esercizio effettivo a tale proposito devono essere con siderati tutti gli elementi del ciclo d esercizio come per esempio i tempi in cui l elettrodomestico è spento e quelli in cui l elettrodome stico è acceso ma funziona senza sollecitazione Norme di sicurezza Questa sezione tratta le indica zioni di sicurezza fondamentali durante il lavoro con il tagliaerba elettrico Simboli scritte...

Page 48: ...i com ponenti di comando Avvertenza Questo utensile elettrico genera un campo magnetico durante il fun zionamento In determinate condizioni questo campo può compromettere gli im pianti medici attivi o passivi Per ridurre il pericolo di lesioni gravi o letali con sigliamo alle persone con impianti medici di consulta re il medico e il produttore dell impianto medico prima di azionare la macchina Pre...

Page 49: ...tamente staccata dalla rete Non tocca re la conduttura prima di averla staccata Non usare l apparec chio se la conduttura è consu mata o danneggiata Lavorare con l apparecchio Non tenere i piedi e le mani vicino o sotto alle parti ro tanti durante il lavoro Peri colo di lesioni Osservare la protezione antirumore e le disposizioni locali Accendere il motore secondo le istruzioni e solo quando i pie...

Page 50: ...eggiato incompleto o trasformato senza il consenso del produttore Non usare mai l apparecchio con dispositivi di sicurezza o schermature danneggiati oppure senza i dispositivi di sicurezza come i dispositivi di deviazione e o di raccolta dell erba Non sovraccaricare l apparec chio Lavorare solo nel campo di potenza specificato e non modificare le impostazioni di regolazione del motore Non usare ap...

Page 51: ...tire con dizioni di lavoro migliori e più sicure Seguire le disposizioni di manutenzione Indossare guanti di protezione quando si sostituisce il disposi tivo da taglio Controllare regolarmente il dispositivo raccoglierba per verificare l eventuale presenza di usura e deformazioni Per motivi di sicurezza sostituire le parti usurate o danneggiate Prestare particolare attenzione durante la regolazion...

Page 52: ...danni a persone Montaggio impugnatura ad archetto 1 Inserire l asta inferiore 4 nell alloggiamento del pattino a cuscino d aria 7 2 Fissare l asta inferiore 4 con le viti in dotazione 3 Fissare le barre centrali 2 con le viti fornite le rondelle grandi e i dadi a galletto 3 sul lato destro e sinistro della barra infe riore 4 4 Fissare l impugnatura ad arco 1 con le viti in dotazione le rondelle e ...

Page 53: ...ll avviamento 6 Per l attivazione premere dapprima il pulsante di sbloccaggio 13 sulla maniglia a staffa quindi la leva di avvia mento 15 Rilasciare il pulsan te di sbloccaggio 13 6 Per spegnere l apparecchio rilasciare la leva di avviamento 15 Dopo lo spegnimento dell appa recchio la lama continua a girare per alcuni secondi Non toccare la lama in movimento Rischio di danni a persone Lavorare con...

Page 54: ...re sostituita 1 Capovolgere l apparecchio 2 Usare guanti resistenti e tenere ferma la lama 17 Allentare la vite di fissaggio lama 16 con la chiave inglese in dotazione 5 3 Usare guanti resistenti e tenere ferma la lama Svitare la vite ticolare attenzione durante le manovre di retromarcia e quan do si tira l apparecchio Pulire l apparecchio dopo ogni impiego come descritto nel ca pitolo Pulizia man...

Page 55: ...no dovuti ad una riparazione non conforme o dall impiego di ricambi non originali o da un uso improprio dell appa recchio Smaltimento Tutela dell ambiente Effettuare lo smaltimento dell apparec chio degli accessori e della confezione nel rispetto dell ambiente presso un punto di raccolta per riciclaggio Le apparecchiature non devono essere smaltite insieme ai rifiuti do mestici Consegnare l appare...

Page 56: ...alla prova d ac quisto e al tagliando di garanzia Servizio di riparazione Riparazioni non soggette a garanzia possono essere effettuate dal nostro centro di assistenza pagando in base al calcolo di quest ultimo Il nostro centro d assistenza stilerà volentieri un preventivo per i nostri clienti Possia mo trattare solo apparecchi che siano ben imballati e che siano inviati con un affrancatura suffic...

Page 57: ...n è soddisfacente oppure il motore è lento Altezza di taglio troppo bassa Impostare un altezza di ta glio superiore Lama smussata Fare arrotare o sostituire la lama Zona lama intasata Pulire l apparecchio Lama montata in modo errato Montare correttamente la lama La lama non ruota Lama bloccata dall erba Rimuovere l erba Vite della lama allentata Stringere la vite della lama Rumori anormali battito...

Page 58: ...s involved Children shall not play with the appliance Cleaning and user maintenance shall not be made by children without supervision Scope of Delivery Carefully remove the equipment from the packaging and check whether the follow ing parts are complete Art 72050071 ERM 1600 34 L Lawnmower and curved handle with connection cable Bottom bar 2 central struts Mounting material bow type handle 2 cable...

Page 59: ...obust plastic housing and a safety switch The machine is 4 step height adjustable and has smooth running rollers For the function of the operating parts please refer to the descriptions below The illustration how to handle the appliance can be found on the pages 2 4 Summary 1 Curved handle 2 Central strut 3 Wing nut 4 Lower bar 5 Spanner for blade bolt 6 Cutting height adjustment not visible 7 Air...

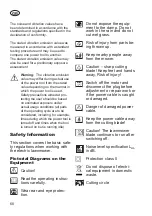
Page 60: ...ng which the power tool is turned off and times when the tool is turned on but is running idle Safety Information This section covers the basic safe ty regulations when working with the electric lawnmower Pictorial Diagrams on the Equipment Caution Read the operating instruc tions carefully Wear ear and eye protec tion Do not expose the equip ment to the damp Do not work in the rain and do not cut...

Page 61: ...with medical implants consult their doctor and the manu facturer of their medical implant before operating the machine Preparation Do not allow the use of this equipment by children or others who are unfamiliar with these operating instructions Local regulations may specify the minimum age of the operator Do not use the equipment when people and particularly children or pets are nearby The operato...

Page 62: ...the influence of alcohol or drugs Always take breaks in good time Take a sensible approach to the work When working ensure a firm stance particularly on slopes Always work across the slope never upwards or downwards Take particular care when changing the direction of travel on the slope Do not work on excessively steep slopes Run the equipment only at a walking pace Take particular care when turni...

Page 63: ...s When the equipment is out of use Before checking cleaning or working on the equipment If the power cable is dam aged or frayed If the equipment has hit a foreign object or if strange vibrations occur during work In this case check the equip ment for damage and have it repaired if applicable Do not place feet or hands near or under rotating parts Do not stand in front of the grass ejec tion hole ...

Page 64: ...ay damage the power cable and result in contact with live parts Always run the power ca ble behind the operator Do not use the power cable to pull the plug from the socket Protect the power cable from heat oil and sharp edges Switch off the equipment and disconnect the plug from the socket if the power cable is damaged If the power cable is damaged it must be replaced by the manufacturer the cus t...

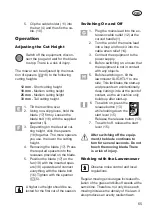
Page 65: ...cted for the first cut of the season Switching On and Off 1 Plug the mains lead into the ex tension cable outlet 12 at the curved handle 1 2 Turn the end of the mains lead into a loop and hook it into the cable strain relief 14 3 Connect the equipment to the power supply 4 Before switching on ensure that the equipment is not in contact with any objects 5 Before switching on tilt the lawnmower SLIG...

Page 66: ...ese instructions carried out by a customer service centre that we have authorised Use only original parts Wear gloves when handling the blade Switch off the equipment before all maintenance and cleaning work disconnect the plug and wait until the blade stops General Cleaning and Maintenance Work Do not hose down the lawnmower with water This would result in the danger of an electric shock Always k...

Page 67: ...rectly and the screw tightened firmly Storage Clean the equipment before putting it away see General Cleaning and Mainte nance Work In order to save space loosen the wing nuts 3 and fold the central struts 2 downwards and place the handle 1 on them Make sure that the cable of the device 10 is not pinched Keep the equipment dry and out of reach of children Allow the motor to cool before storing the...

Page 68: ... or manufacturing faults will be made good free of charge by replacement delivery or repair This requires that the appliance is returned to the merchant undismantled and with proof of purchase and guarantee Repair Service Repairs which are not covered by the guarantee can be carried out for charge by our service center Our ser vice center will be glad to provide you with a cost estimate We can onl...

Page 69: ...labours Cut height too low Set a higher cut height Blade blunt Have the blade sharpened or replace it Blade area blocked Clean the equipment Blade assembled incor rectly Install the blade correctly Blade fails to turn Blade blocked by grass Remove the grass Blade screw loose Tighten the blade screw Strange noises rattling or vibrations Blade screw loose Tighten the blade screw Blade damaged Replac...

Page 70: ...ěti si s přístrojem nesmí hrát Zakres dostawy Proszę ostrożnie wyciągnąć urządzenie z opakowania i sprawdzić czy dostarczone zostały wszystkie poniższe części Art 72050071 ERM 1600 34 L kosiarka do trawy i uchwyt pałąkowy z przewodem przyłączowym Trzonek dolny 2 rozpórki środkowe Materiały do montażu rączki prowadzenia 2 uchwyty kablowe 3 przekładka dystansowa do regulacji wysokości koszenia Nóż K...

Page 71: ...posażony w mocny silnik elektryczny solidną obudo wę z tworzywa sztucznego i wyłącznik bezpieczeństwa Dodatkowo urządzenie posiada 4 stopniową regulację wysokości i lekko pracujące kółka Sposób działania części obsługi proszę zaczerpnąć z poniższych opisów Ilustracje sposobu obsługi i konser wacji znajdziesz na stronie 2 4 Przegląd 1 Uchwyt pałąkowy 2 Rozpórka środkowa 3 Nakrętka motylkowa 4 Trzon...

Page 72: ...lędnić wszystkie części cyklu roboczego na przy kład okresy czasu w których urzą dzenie elektryczne jest wyłączone bądź jest włączone ale pracuje bez obciążenia Wskazówki bezpieczeństwa W niniejszym ustępie zajęto się podstawowymi przepisami bezpie czeństwa w trakcie pracy przy uży ciu elektrycznej kosiarki do trawy Symbole na urządzeniu Uwaga Proszę uważnie przeczytać niniejszą instrukcję obsługi...

Page 73: ...ć następujących wskazówek bezpieczeństwa ię dobrze zaznajomić ze wszystkimi częściami obsługi Ostrzeżenie To urządzenie elektryczne wytwarza w czasie pracy pole elektro magnetyczne Pole to może w określonych warunkach wpływać na aktywne lub pasywne implantaty me dyczne Aby zmniejszyć niebezpieczeństwo doznania poważnych lub śmiertelnych obrażeń zalecamy osobom posiadającym implantaty me dyczne sko...

Page 74: ...ód zasilający oraz przedłużacz pod kątem widocznych oznak uszkodzenia lub zużycia W przypadku uszko dzenia przewodu podczas pracy należy go natychmiast odłączyć od sieci Nie dotykać przewodu przed jego odłączeniem Nie uży wać urządzenia z uszkodzonym lub zużytym kablem Praca przy użyciu urządzenia Proszę w trakcie pracy nie przystawiać nóg i rąk w po bliże obracających się czę ści lub pod te częśc...

Page 75: ...ia transportu przekroczenia powierzchni innych niż trawa lub w przy padku gdy urządzenie jest umieszczane lub odbierane z powierzchni przeznaczonych do koszenia Otwór wylotowy trawy musi być stale czysty i wolny Ścięty materiał należy usuwać jedynie przy zatrzymanym urządzeniu Nigdy nie zostawiać urządzenia w miejscu pracy bez nadzoru Nie należy pracować przy użyciu urządzenia które jest uszkodzon...

Page 76: ...nia urządzenia we własnym zakresie chyba że posiadają Państwo w tym zakresie wykształcenie zawo dowe Wszystkie prace które nie są podane w niniejsze in strukcji mogą być wykonywane wyłącznie przez upoważnione przez nas placówki serwisowe Urządzenie należy przechowy wać w suchym miejscu poza zasięgiem dzieci Z urządzeniem należy ob chodzić się z należytą troską Narzędzia należy utrzymywać tak aby b...

Page 77: ...zed wysoką temperaturą olejem i ostrymi krawędziami Jeżeli przewód łączący jest uszkodzony urządzenie należy wyłączyć i wtyczkę sieciową wyciągnąć z gniazdka wtyko wego Jeżeli kabel sieciowy zo stanie uszkodzony to musi on w celu uniknięcia uszkodzeń zostać wymieniony przez pro ducenta lub przez jego serwis albo też przez wykwalifikowaną osobę Proszę nie podłączać uszko dzonego kabla sieciowego do...

Page 78: ...ne 19 i zamoco wać wszystko śrubą mocującą nóż 16 Dokręcić kluczem pła skim 5 W przypadku pierwszego koszenia w sezonie należy wybrać większą wysokość koszenia Włączenie i wyłączenie 1 Włożyć wtyczkę kabla siecio wego w gniazdo wtykowe 12 znajdujące się przy uchwycie pałąkowym 2 W celu odciążenia kabla należy z końcówki kabla sieciowego uformować pętlę i zawiesić na uchwycie kablowym odciążają cym...

Page 79: ...trycznym bezpieczeństwo doznania szkód osobowych Praca przy użyciu kosiarki do trawy Przestrzegać przepisów ochrony przed hałasem i przepisów lokal nych Regularnie koszenie trawy pobudza trawę do silniejszego tworzenia liści przyczynia się jednocześnie do obumierania chwa stów Dlatego też po każdym koszeniu trawy trawa uzyskuje większą gęstość i jednocześnie można ją równomiernie obciążać Pierwsze...

Page 80: ...iał Części zamienne 1 Proszę obrócić urządzenie 2 Używać odpornych rękawic ochronnych i przytrzymać nóż 17 Odkręcić śrubę mocującą nóż 16 za pomocą klucza płaskiego 5 dołączonego do urządzenia 3 Zamontować nowy nóż w od wrotnej kolejności Zwrócić uwa gę na to aby nóż był ustawiony w prawidłowej pozycji i aby śru ba była dobrze dokręcona Przechowywanie Przed umieszczeniem urządzenia w miejscu przec...

Page 81: ... oczyszczania i konserwacji urządze nia Szkody wywołane wadami materiało wymi lub produkcyjnymi zostaną bez płatnie usunięte przez dostarczenie zastępczego urządzenia bądź przez naprawę Warunkiem skorzystania ze świadcze nia gwarancyjnego jest przekazanie nierozmontowanego urządzenia wraz z dowodem zakupu i gwarancji nasze mu Centrum Serwisowemu Serwis naprawczy Naprawy nie objęte gwarancją można ...

Page 82: ...ia jest za mała Ustawić mniejszą wysokość koszenia Nóż jest tępy Zlecić naostrzenie noża lub go wymienić Komora noża jest zatkana Wyczyścić urządzenie Nóż jest zamontowany w nieprawidłowy sposób Zamontować nóż w prawi dłowy sposób Nóż nie obraca się Nóż jest zablokowany przez trawę Usunąć trawę Śruba noża jest poluzowana Dokręcić śrubę noża Nienormalne odgłosy stu kanie lub wibracje Śruba noża jes...

Page 83: ...eré z toho vyplývají Děti si s přístro jem nesmí hrát Děti nesmí vyko návat čistění a údržbu bez dozoru Objem dodávky Vybalte nástroj a zkontrolujte je li kom pletní Obalový materiál řádně zlikvidujte Obalový materiál řádně zlikvidujte Art 72050071 ERM 1600 34 L Sekačky na trávu s kabelem a rámová rukojeť Spodní držadlo 2 střední příčky Držadlo sběrný koš 2 kabelový držák 3 Rozpěrka pro nastavení ...

Page 84: ...ojeť 2 střední příčky 3 křídlatá matice 4 Spodní držadlo 5 Klíč na šroub nože 6 Nastavení výšky sečení není viditelné 7 Vana na vzduchový polštář 8 Otočná kolečka 9 Kryt přístroje 10 Přístrojový kabel 11 2 Kabelový držák 12 Zásuvka zařízení 13 Odblokovací tlačítko 14 Indikace naplnění 15 Startovací páčka 16 Šroub nože 17 Nůž 18 Vymezovací podložky 19 Větrné kolo Technické údaje Mulčovač na vzducho...

Page 85: ...i Varování Přečtěte si návod k obsluze Nasaďte si prostředky pro ochranu zraku a sluchu Přístroj nevystavujte vlh kosti Nepracujte při dešti a nesekejte mokrou trávu Nebezpečí poranění odmrš těnými částmi Zabraňte přístupu okolo sto jících osob k přístroji Opatrně ostré nože Nohy a ruce musí být v dostateč né vzdálenosti od přístroje Nebezpečí poranění Před nastavováním nebo čištěním po zamotání č...

Page 86: ...i poškození jiných lidí nebo jejich vlastnictví Zkontrolujte terén kde budete přístroj používat odstraňte ka meny klacky dráty nebo jiná cizí tělesa která by mohl pří stroj zachytit a odmrštit Noste vhodný pracovní oděv jako jsou pevná obuv s ne klouzavou podrážkou a pevné dlouhé kalhoty Přístroj nepo užívejte jste li naboso nebo v otevřených sandálech Při práci nenoste volný oděv nebo oděv s dlou...

Page 87: ...daže je toto potřebné při rozběhu ve vysoké trávě V tomto případě mírně nakloňte přístroj přes rukojeť na stranu Vždy zkontrolujte zda se obě ruce nachází v pracovní poloze dříve než přístroj zase položíte zpět na zem Pozor nebezpečí Nůž dobíhá Hrozí nebezpečí poranění Přístroj byste neměli zvedat nebo přepravovat pokud běží motor Přístroj vypněte pokud musí být kvůli přepravě nakloněn křížíte li ...

Page 88: ...že jste k tomu kompetentní na základě vašeho vzdělání Veškeré prá ce které nejsou uvedeny v tom to návodu mohou provádět jen námi autorizované zákaznické servisy Přístroj uchovávejte na suchém místě a mimo dosah dětí O váš přístroj se řádně starejte K zajištění optimální a bezpečné práce musí být nástroje čisté a ostré Řiďte se předpisy o údrž bě Měníte li řezací zařízení na vlékněte si ochranné r...

Page 89: ...montujte tyčové ústrojí rukojeti Montáž spodní rukojeti 1 Nasaďte spodní držadlo 4 do držáku vany vzduchového polš táře 7 2 Upevněte spodní držadlo 4 pomocí dodávaných šroubů 3 Upevněte střední příčky 2 po mocí dodaných šroubů velkých podložek a křídlatých matic 3 vpravo a vlevo na spodním dr žadle 4 4 Upevněte rukojeť 1 pomocí dodaných šroubů podložek a křídlatých matic 3 vpravo a vlevo na středn...

Page 90: ... vteřin otáčí Nedotýkejte se pohybujícího se nože Hrozí nebezpečí poranění Práce se sekačkou Pravidelné sekání aktivuje traviny k zesí lené tvorbě listů a zároveň odumírá plevel Proto je trávník po každém sekání hustější a vzniká stejnoměrně zatížitelný trávník Při mulčovacím sečení je tráva v jediném pracovním postupu posekána nasekána na malé kousky a rozprášena po trávníku Po sečená tráva slouž...

Page 91: ...ou a čištěním přístroj vypněte vytáhněte síťovou zástrčku a počkejte až se nůž za staví Je li nůž tupý tak by jej měl nabrousit odborný servis Je li nůž poškozený nebo se zdá nevyvážený tak musí být vyměněn viz kapitolu Náhradní díly 1 Otočte přístroj 2 Použijte pevné rukavice a při držte nůž 17 Uvolněte šroub nože 16 pomocí přibaleného klíče na šrouby 5 3 Při montáži nového nože postu pujte zase ...

Page 92: ...eré byly způsobeny přirozeným opotřebením přetížením anebo neodbor nou obsluhou jsou ze záruky vyloučeny Určité konstrukční části podléhají jejich běžnému opotřebení a jsou proto ze zá ruky vyloučeny Patří k nim především Náhradní nůž Předpokladem pro poskytnutí záručního plnění je kromě toho že byly dodrženy pokyny pro čištění a údržbu Škody které vznikly v důsledku závad materiálu anebo chyb výr...

Page 93: ...těleso AVýsledek práce není uspokojivý nebo motor těžce pracuje Příliš nízká výška řezu Nastavte menší výšku řezu Nůž tupý Nože lze brousit nebo vyměnit Oblast nože ucpaná čistící stroje Nůž špatně namontován Nůž správně namontujte Nůž se netočí Nůž zablokován trávou Odstraňte trávu Šroub nože volný Utáhněte šroub nože Abnormální hluk chrastit nebo vibrační Šroub nože volný Utáhněte šroub nože Def...

Page 94: ...us pavojus Žaisti su įrenginiu vaikams drau džiama Pristatomas komplektas Prietaisą atsargiai išimkite iš pakuotės ir patikrinkite ar yra visos toliau nurodytos dalys Art 72050071 ERM 1600 34 L Vejapjovė ir lenkta rankena su prijungimo laidu Apatinė rankenos dalis 2 per vidurį tvirtinamos sijos Lanko formos rankenos montavimo medžiaga 2 laidų laikikliai 3 Pjovimo aukščio reguliatoriaus laiki klis ...

Page 95: ...entų veiki mą rasite tolesniuose aprašymuose Prietaiso valdymą vaizduojančius paveikslėlius rasite 2 4 puslapiuose Apžvalga 1 Lenkta rankena 2 Per vidurį tvirtinama sija 3 Sparnuotoji veržlė 4 Apatinė rankenos dalis 5 Peilio atsuktuvas 6 Pjovimo aukščio nustatymo įtai sas nematomas 7 Oro pagalvės šliaužiklis 8 Ratukai 9 Vejapjovės korpusas 10 Prietaiso kabelis 11 2 Kabelio laikiklis 12 Įrenginio k...

Page 96: ...os potvarkiai kurių reikia laikytis dirbant su elektrine vejapjo ve Paveikslėliai ant prietaiso Įspėjimas Perskaityti naudojimo ins trukciją Dėvėkite akių ir klausos or ganų apsaugą Prietaiso negalima naudoti drėgmėje Nedirbkite lyjant lietui ir nepjaukite drėgnos žolės Pavojus susižeisti dėl išsvie džiamų dalių Aplink veikiantį prietaisą ne gali būti asmenų Pavojus susižaloti dėl aštrių peilių Ne...

Page 97: ...perskaičiusiems eksploa tavimo instrukcijos neleiskite naudoti prietaiso Kai kuriose šalyse gali galioti taisyklės dėl mažiausio leistino amžiaus kurio turi būti sulaukęs prietaisą naudojantis asmuo Niekada nenaudokite įrenginio kai netoliese yra asmenų ypač vaikų ir naminių gyvūnų Prietaisą valdantis arba nau dojantis asmuo yra atsakingas už nelaimingus atsitikimus arba žmonėms ir jų nuosavybei p...

Page 98: ...ugiu atstumu nuo pjovimo įrankių Nenaudokite prietaiso lyjant lie tui esant prastam orui drėgno je aplinkoje ir nepjaukite drė gnos vejos Dirbkite tik dienos šviesoje arba įjungę tinkamą dirbtinį apšvietimą Niekada nedirbkite prietaisu jei esate pavargęs arba negalite susikoncentruoti vartojote alko holio arba medikamentų Visa da laiku padarykite pertraukėlę Dirbkite vadovaudamiesi protu Prisimink...

Page 99: ...traukite tinklo kištuką ir įsitikinkite kad visos judančios dalys visiškai sustojo visada kai paliekate prietai są be priežiūros ir jis nenau dojamas prieš iš išmetimo kanalo iš imdami blokuojančius daiktus ar kitus kamščius jei tinklo kabelis pažeistas arba susipainiojęs prieš tikrindami valydami arba dirbami prie prietaiso jei į prietaisą pateko svetim kūnis Patikrinkite ar prietai sas nepažeist...

Page 100: ...okite tik leistinus H05VV F arba H05RN F serijos il ginamuosius kabelius kurių didžiausias ilgis yra 75 m ir jie pritaikyti naudoti lauke Ilgina mojo kabelio laido skerspjūvis turi būti mažiausiai 2 5 mm2 Prieš pradėdami naudoti išvy niokite visą kabelio būgną Pati krinkite ar kabelis nepažeistas Ilginamąjį kabelį tvirtinkite tik prie jam skirtos kabelio paka bos Dirbdami ilginamąjį kabelį laiky k...

Page 101: ...mo aukštis 33 mm didelis pjovimo aukštis 1 Apsukite prietaisą 2 Naudokite pirštinę ir tvirtai laiky kite peilį 17 Komplektacijoje esančiu atsuktuvu 5 atlaisvin kite peilio varžtą 16 3 Priklausomai nuo pjovimo aukš čio skečiamąsias poveržles 18 sukabinkite Kuo daugiau skečiamųjų diskų naudojate tuo mažesnis tampa pjovimo aukš tis 4 Nuimkite peilį 17 Įspauskite reikalingus skečiamuosius dis kus į ta...

Page 102: ...os turėtų persidengti kelis centimetrus Nustatykite tokį pjovimo aukštį kad prietaisas nebūtų per daug apkrautas Antraip galite pažeis ti variklį Pjaudami šlaitus visada stovėki te skersai Būkite labai atsargūs eidami atgal ir traukdami prietai są Po kiekvieno naudojimo nuva lykite prietaisą kaip aprašyta skyriuje Valymas techninė priežiūra laikymas Išjungus prietaisą peiliai kelias sekundes dar s...

Page 103: ...rius ją nuvežkite į komposta vimo vietą arba kaip trąšas paskirstyki te po krūmais ir medžiais Jei mums atsiųsite savo sugedusį prie taisą mes jį utilizuosime nemokamai mediniu arba plastikiniu daiktu Nenaudokite kietų arba aštrių daiktų nes jie gali pažeisti prie taisą Retkarčiais sutepkite alyva ratu kus Prieš kiekvieną naudojimą patikrinkite ar nesimato aiškių vejapjovės trūkumų pavyzdžiui ar d...

Page 104: ...r garantijos patvirtinimu Remonto tarnyba Remonto darbus kuriems nesuteikia ma garantija už tam tikrą atlygį galite pavesti atlikti mūsų techninės priežiū ros centro darbuotojams Mūsų techni nės priežiūros centro darbuotojai Jums mielai pateiks darbų sąmatą Mes galime remontuoti tik tuos prietai sus kurie buvo atsiųsti tinkamai supa kuoti ir apmokėti Dėmesio jei turite pretenzijų dėl prie taiso ar...

Page 105: ...as arba variklis veikia sunkiai Per mažas pjovimo aukštis Nustatykite didesnį pjovimo aukštį Atbuko peilis Pagaląskite arba pakeiskite peilį Užsikišo peilio sritis Nuvalykite prietaisą Netinkamai sumontuotas peilis Tinkamai įmontuokite peilį Peilis nesisuka Peilį blokuoja žolė Išvalykite žolę Atsilaisvino peilio varžtas Priveržkite peilio varžtą Neįprasti garsai tarškėjimas arba vibracija Atsilais...

Page 106: ...as del uso seguro del aparato y de los peligros que del mismo se derivan No está permitido que los niños jueguen con el aparato Volumen de suministro Saque el aparato del embalaje con cui dado y revise que disponga de todas las piezas siguientes Art 72050071 ERM 1600 34 L Cortacésped y empuñadura de puente con cable del aparato Barra inferior Cesta para la hierba Material de montaje de la empuñadu...

Page 107: ...puede regular en 4 niveles y tiene rodillos que giran con suavidad El funcionamiento de los elementos de mando se describe en las siguientes pá ginas Encontrará ilustraciones en las pá ginas 2 a 4 Vista general 1 Empuñadura de puente 2 Travesaño intermedio 3 Tuercas de mariposa 4 Barra inferior 5 Destornillador para la cuchilla 6 Ajuste de la altura de corte no visible 7 Patín con colchón de aire ...

Page 108: ...a Indicaciones de seguridad En este apartado se presentan las normas de seguridad básicas para trabajar con el cortacésped eléctrico Símbolos gráficos sobre el aparato Atención Lea atentamente las instruc ciones de uso Póngase protección ocular y auditiva No exponga el aparato a la humedad No trabaje cuan do esté lloviendo ni corte hierba mojada Peligro de lesiones por pie zas que pueden salir dis...

Page 109: ...esiones graves o mortales recomendamos a las personas que tengan implantes médicos que consulten a su médico y al fabricante de los implantes médicos antes de utilizar la máquina Preparación No permita nunca que niños u otras personas que no hayan leído el manual de operación utilicen el aparato En las dis posiciones locales puede estar establecida la edad mínima del usuario Nunca utilice el apara...

Page 110: ...posi ciones locales Encienda el motor siguiendo las instrucciones y solo cuando sus pies se encuentran a una distan cia de seguridad con respecto a las herramientas de corte No utilice el aparato cuando llueva con mal tiempo en un entorno húmedo o con la hierba mojada Trabaje solo a la luz del día o con buena iluminación No trabaje con el aparato si está cansado o no está concen trado o si ha inge...

Page 111: ...utilice el aparato con los dispositivos de protección o escudos dañados o sin los dispositivos de seguri dad como deflectores y o dispo sitivos de recogida de hierba No sobrecargue el aparato Tra baje únicamente con el rango de potencia indicado y no modi fique los ajustes de regulación del motor No utilice máquinas de poco rendimiento para traba jos pesados No utilice el apara to para fines no pr...

Page 112: ...ecauciones al ajustar las cuchillas para que sus dedos no queden atrapados entre las cuchillas giratorias y las piezas estacionarias de la máquina Asegúrese de que solo se em plean herramientas de corte de repuesto autorizadas por el fabri cante Seguridad eléctrica Asegúrese de que la tensión de la red se corresponda con las indicaciones de la placa indica dora de tipo Conecte el aparato a un en c...

Page 113: ...inferior 4 4 Fije la empuñadura de puente 1 con los tornillos suministra dos las arandelas y las tuercas de mariposa 3 a la derecha e izquierda en el travesaño inter medio 2 Hay dos posiciones posibles 5 Enganche los soportes del ca ble 11 en la barra inferior 4 y en la empuñadura de puente 1 fijando así el cable del aparato 10 Manejo Ajustar la altura de corte Apague el aparato extraiga el enchuf...

Page 114: ...e arranque 15 Suelte el botón de desblo queo 13 7 Para apagar el aparato suelte la palanca de arranque 15 Tras apagar el aparato la cuchilla sigue girando durante unos se gundos No toque la cuchilla en marcha Existe el peligro de lesio narse Trabajar con el cortacésped Respete el control de la emisión de ruido y las disposiciones loca les Cortar con regularidad el césped estimu la la formación de ...

Page 115: ...eberá sustituir véase Pie zas de repuesto accesorios 1 Dele la vuelta al aparato 2 Utilice guantes resistentes y su jete firmemente la cuchilla 18 Suelte el tornillo de la cuchilla 17 con el destornillador 4 especial cuidado cuando vaya hacia atrás y tire del aparato Limpie el aparato tras cada uso tal y como se describe en el ca pítulo Limpieza mantenimien to almacenamiento Tras apagar el aparato...

Page 116: ... originados por nuestros aparatos si tales daños se deben a una reparación indebida o al uso de piezas no originales o si se deben a un uso no con forme al previsto Eliminación protección del medio ambiente Lleve el aparato los accesorios y el em balaje a un lugar para que procedan a reciclarlo respetando el medio ambiente Los aparatos eléctricos no se tiran a la basura doméstica Entregue el apara...

Page 117: ... de compra y garantía al distribuidor En caso de reclamación justificada de la garantía póngase en contacto por teléfono con nuestro centro de servicio Le facilitarán toda la información nece saria para realizar la reclamación Servicio de reparación También puede encargar a nuestro centro de servicio reparaciones que no están cubiertas por la garantía servicio no gratuito Nuestro centro de servici...

Page 118: ...emasia do pequeña Ajustar una altura de corte más grande Cuchilla sin filo Dejar afilar la cuchilla o sustituirla Zona de la cuchilla obstruida Limpiar el cortacésped Cuchilla mal montada Montar correctamente la cuchilla La cuchilla no gira Cuchilla bloqueada por la hierba Quitar la hierba Tornillo de la cuchilla aflo jado Apretar a fondo el tornillo de la cuchilla Ruidos traqueteo o vibra ciones ...

Page 119: ...zariadenia a z toho vyplývajúceho nebezpečen stva Deti sa nesmú hrať so zaria dením Rozsah dodávky Vyberte prístroj opatrne z obalu a skontro lujte či sú nasledovné diely kompletné Art 72050071 ERM 1600 34 L Kosačka na trávu a oblúkové držadlo s káblom prístroja Spodné držadlo Zberný kôš na trávu Montážny materiál oblúkového držadla 2 držiaky kábla 3 dištančné držiaky na nastavenie výšky kosenia N...

Page 120: ...rázky nájdete na stranách 2 až 4 Prehľad 1 Oblúkové držadlo 2 Stredná výstuha 3 Krídlová matica 4 Spodné držadlo 5 Kľúč na skrutku noža 6 Nastavenie výšky kosenia nie je vidieť 7 Rám vzduchového vankúša 8 Kolieska 9 Kryt prístroja 10 Kábel prístroja 11 2 držiaky kábla 12 Zásuvka prístroja 13 Uvoľňovacie tlačidlo 14 Výstupok pre kábel 15 Štartovacia páka 16 Skrutka noža 17 Nôž 18 Dištančné podložky...

Page 121: ...uvedené zák ladné bezpečnostné predpisy pre prácu s elektrickou kosačkou na trávu Piktogramy na prístroji Pozor Pozorne si prečítajte návod na obsluhu Noste ochranu očí a sluchu Prístroj nevystavujte vlh kosti Nepracujte v daždi a nekoste mokrú trávu Nebezpečenstvo poranenia v dôsledku vymrštených die lov Okolostojace osoby držte mimo dosahu kosačky Pozor Ostré rezacie nože Nohy a ruky držte mimo ...

Page 122: ...kdy nedovoľte deťom alebo iným osobám ktoré nepoznajú návod na používanie aby pou žívali prístroj Miestne predpisy môžu stanoviť najnižší vek pou žívateľa Nikdy nepoužívajte prístroj zatiaľ čo sú osoby zvlášť deti a domáce zvieratá v blízkosti Obsluhujúci alebo používateľ je zodpovedný za zranenia iných ľudí alebo poškodenia ich ma jetku Skontrolujte terén na ktorom sa používa prístroj a odstráňte...

Page 123: ...áci Pri práci rozmýš ľajte Pri práci dávajte pozor na bez pečný postoj zvlášť na sva hoch Pracujte vždy priečne k svahu nikdy nie nahor alebo nadol Buďte zvlášť opatrní keď meníte na svahu smer jazdy Nepracujte na nadmerne str mých svahoch Prístroj veďte iba v krokovej rýchlosti Buďte zvlášť opatrní keď prístroj otáčate priťahujete ho k sebe alebo idete dozadu Prístroj zapnite s opatrnosťou podľa ...

Page 124: ... skôr ako vyčistíte vyhadzo vací otvor alebo odstránite blokovania keď sa prístroj nepoužíva predtým než prístroj skontro lujete čistíte alebo na ňom pracujete keď je sieťový kábel poško dený alebo zamotaný keď prístroj pri práci zasiahne cudzie teleso alebo keď sa vyskytnú neobyčajné vibrá cie V tomto prípade okamži te skontrolujte či prístroj nie je poškodený a nechajte ho opraviť Nikdy nedávajt...

Page 125: ...nenie sieťového kábla použite na to určený záves kábla Pri práci držte sieťový kábel mimo dosahu rezacieho nástro ja Rezacie nože môžu poškodiť sieťový kábel a viest ku kontak tu s dielmi pod napätím Sieťový kábel veďte zásadne za obslu hujúcou osobou Nepoužívajte sieťový kábel na vytiahnutie zástrčky zo zásuvky Sieťový kábel chráňte pred ho rúčavou olejom a ostrými hra nami Ak je sieťový kábel po...

Page 126: ...4 Vyberte nôž 17 Zatlačte po trebné dištančné podložky do príslušných vybraní v noži 5 Najskôr vložte nôž 17 s vlože nými dištančnými podložkami 18 na vzduchové koleso 19 a všetko zafixujte skrutkou noža 16 Dotiahnite s kľúčom na skrutky 5 Pre prvé kosenie v sezóne by sa mala zvoliť veľká výška kosenia Zapnutie a vypnutie 1 Zastrčte zástrčku sieťového kábla do zásuvky prístroja 12 na oblúkovom drž...

Page 127: ...Po vypnutí prístroja sa nôž otáča ešte niekoľko sekúnd Nedotýkaj te sa otáčajúceho sa noža Hrozí nebezpečenstvo zranenia osôb Čistenie údržba skladovanie Práce ktoré nie sú uvedené v tomto návode nechajte vykonať nami autorizovaným zákazníckym servisom Používajte len originálne náhradné diely Pri zaobchádzaní s nožom noste rukavice Pred všetkými údržbárskymi a čistiacimi prácami vypnite prístroj v...

Page 128: ...lušenstvo Náhradné diely a príslušenstvo dostanete na www grizzlytools service eu Pri ďalších otázkach sa obráťte na Servi ce Center pozri Service Center Skontrolujte kryty a ochranné zariadenia vzhľadom na po škodenia a správne osadenie Prípadne tieto vymeňte Výmena noža Pred všetkými údržbárskymi a čistiacimi prácami vypnite prístroj vytiahnite sieťovú zástrčku a vyč kajte dokiaľ sa nôž nezastav...

Page 129: ...e demontovanom stave a s dokladom o zakúpení a záruke V prípade oprávnenej reklamácie sa prosím kontaktujte telefonicky s na ším servisným centrom Tu obdržíte informácie o vybavení reklamácie Opravný servis Opravy ktoré nepodliehajú záruke môžete nechať vykonať v našom servisnom centre oproti vyúčtovaniu Naše servisné centrum vám ochotne vypracuje predbežný návrh nákladov Môžeme spracovať iba prís...

Page 130: ...výška nastavte väčšiu výšku ko senia tupý nôž nôž nechajte nabrúsiť alebo ho vymeňte upchatý priestor v okolí noža prístroj vyčistite nôž je nesprávne namon tovaný nôž namontujte správne Nôž sa neotáča nôž je blokovaný trávou odstráňte trávu uvoľnená skrutka na upev nenie noža dotiahnite skrutku na upev nenie noža Nezvyčajné zvuky hrko tanie alebo vibrácie uvoľnená skrutka na upev nenie noža dotia...

Page 131: ...131 ...

Page 132: ...EG bestätigt Schallleistungspegel Garantiert 96 dB A Gemessen 94 3 dB A Angewendetes Konformitätsbewertungs verfahren entsprechend Anh VI 2000 14 EG Benannte Stelle TÜV Süd NB 0036 We additionally confirm the following in accordance with the 2000 14 EC emissi ons guideline Sound power level guaranteed 96 dB A measured 94 3 dB A Compliance evaluation process carried out in accordance with Appendix ...

Page 133: ...6 dB A mesuré 94 3 dB A Procédé utilisé pour l évaluation de la conformité en fonction de l annexe VI 2000 14 EC Bureau declaré TÜV SÜD NB 0036 Si dichiara inoltre in conformità alla direttiva 2000 14 EC sull emissione acustica ambi entale Livello di potenza sonora garantita 96 dB A misurata 94 3 dB A Procedura della valutazione della conformità applicata come da allegato VI 2000 14 EC Autorità re...

Page 134: ...zmierzony 94 3 dB A Zastosowana procedura oceny zgodności odpowiada załącznikowi VI 2000 14 EC Placówka zgłoszenia TÜV SÜD NB 0036 Bovendien wordt in overeenstemming met de geluidsemissierichtlijn 2000 14 EC be vestigd Akoestisch niveau gegarandeerd 96 dB A gemeten 94 3 dB A Toegepaste conformiteitbeoordelingspro cedure in overeenstemming met Annex VI 2000 14 EC Aangemeld bij TÜV Süd NB 0036 Wyłąc...

Page 135: ... zaručená 96 dB A měřená 94 3 dB A Použitý způsob postupu pro ohodnocení konformity dle dodatku VI 2000 14 EC Místo hlášení TÜV SÜD NB 0036 Remiantis 2000 14 EB dėl valstybių narių įstatymų reglamentuojančių lauko sąly gomis naudojamos įrangos į aplinką sklei džiamą triukšmą suderinimo papildomai patvirtinama Garso galingumo lygis Numatyta 96 dB A Išmatuota 94 3 dB A Taikyta atitikties vertinimo p...

Page 136: ... 77 2010 EN 62233 2008 EN IEC 63000 2018 Además se confirma en conformidad con la Directriz de emisión de ruidos 2000 14 CE Nivel de potencia acústica garantizado 96 dB A medido 94 3 dB A Procedimiento de evaluación de conformidad aplicado según indicación en anexo VI 2000 14 CE Entidad de registro TÜV Süd NB 0036 El fabricante es el único responsable de expedir esta Declaración de Conformidad Gri...

Page 137: ...60335 2 77 2010 EN 62233 2008 EN IEC 63000 2018 Okrem toho sa v súlade so smernicou o emisiách hluku 2000 14 EC potvrdzuje Hladina akustického výkonu zaručená 96 dB A nameraná 94 3 dB A Použitý postup hodnotenia zhody v súlade s dodatkom VI 2000 14 EC Certifikačný orgán TÜV Süd NB 0036 Jediný zodpovedný za vystavenie tohto vyhlásenia o zhode je výrobca Grizzly Tools GmbH Co KG Stockstädter Straße ...

Page 138: ...losietekening Vue éclatée Vista esplosa Rysunek samorozwijający Výkres sestavení Trimatis vaizdas Plano de explosión Výkres náhradných dielov informativ informativo pouczający informatif informatief informační informative informatyvus informativo informatívny ...

Page 139: ...italia it Krysiak Sp z o o ul Rolna 6 62 081 Baranowo Tel 061 650 75 30 Fax 061 650 75 32 e mail krysiak krysiak pl Homepage www krysiak pl HECHT MOTORS s r o U Mototechny 131 251 62 Mukařov Tehovec Tel 323 661 347 linka 27 Fax 323 661 348 e mail prijemoprav hecht cz Homepage www hecht cz www grizzlybaltic com SA V03 ZA de la verrerie 03210 Souvigny Tel 04 70 48 13 20 Fax 0972436396 e mail contact...

Page 140: ......
Reviews: