


115 & 250 Series Coffee Grinders
Page 2
Installation Instructions
For Models 115A, 115AB, 250, 250A, 250AB, & 250-3A:
1.
Please read this manual before operating the grinder.
2.
Carefully remove grinder from carton.
3.
Place grinder in position on shelf, counter or flat surface.
4.
Plug grinder into 120V, 15A, grounded, electrical outlet. Do not use an extension cord.
5.
Grind a small amount of whole bean coffee following operating instructions as described in this manual.
6.
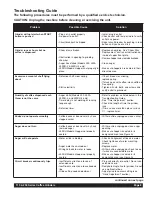
If there is any problem, consult the
Troubleshooting Guide
in this manual and also on the back of your grinder.
7.
If you still cannot correct a problem, call Grindmaster Corporation’s Technical Service Department for help,
(502) 425-4776
or
(800) 695-4500
(USA & Canada only) 8 AM - 6 PM EST.
For Models 250RH-2 & 250RH-3:
1.
Please read this manual before operating the grinder.
2.
Remove the flat cardboard insert. Remove the cardboard insert on top of the
grinder. Next, remove the small box next to the grinder (hopper enclosed).
Next, remove corner supports and then remove the grinder. Lastly, remove the
second hopper.
3.
Place grinder in position on shelf, counter or flat surface.
4.
Plug grinder into 120V, 15A, grounded, electrical outlet. Do not use an
extension cord.
5.
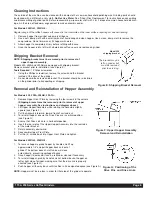
Fill hoppers with whole bean coffee and place on grinder. Make sure the base
of each hopper is seated in its designated area (see Figure A). See
“Removal and Reinstallation of Hopper Assembly” section on page 6 for
detailed instructions.
6.
Grind a small amount of whole bean coffee following operating instructions as
described in this manual.
7.
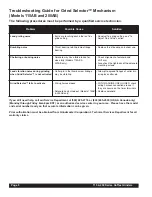
If there is any problem, consult the
Troubleshooting Guide
in this manual and
also on the back of your grinder.
8.
If you still cannot correct a problem, call Grindmaster Corporation’s Technical
Service Department for help:
(502) 425-4776
or
(800) 695-4500
(USA & Canada only) 8 AM - 6 PM EST.
Instructions
Your new coffee grinder is easy to operate and maintain. Before you place it in service, please have all personnel
familiarize themselves with these instructions; then keep this manual in a convenient place for ready reference.
Set-up Procedures
1.
You, the user, must determine the quantity of coffee you want to dispense as various types of coffee and
brewing equipment require different quantities to obtain a quality cup of fresh ground, fresh brewed coffee.
Note:
Because of the inherent properties of some decaffeinated coffee, it may be necessary to dispense a slightly greater
amount to achieve the desired level of flavor extraction as in regular coffee. This should be evaluated based on the coffee
you use as well as the brewing equipment used.
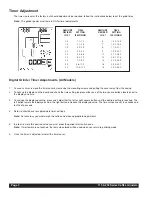
2.
Adjust the timer inside the grinder if necessary, to dispense the desired weight of ground coffee (see Timer Adjustment
Section on page 3). All grinders are factory set to deliver approximately 2 ounces of ground coffee. This weight is
approximate, as the density of all coffee beans is not the same. The only way to ensure the desired portion is being
dispensed is to weigh the coffee after it has been ground.
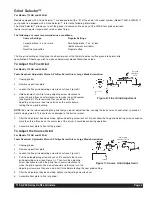
3.
The grind texture can be adjusted, if necessary, to a finer or coarser grind (see “Grind Adjustment” section on page 5).
The grind is factory set to deliver a standard autodrip grind.
How to Operate
1.
Fill the hopper with the appropriate amount of whole bean coffee.
250RH Models:
Place full hoppers on machine making sure the base of each hopper is seated in designated area.
(Refer to Figure A)
2.
Place the brew basket with coffee filter on rails (or basket arms).
3.
Choose the type of coffee you wish to grind by pressing the rocker selection switch.
4.
Push the start button on the front of the grinder.
5.
When grinder stops, remove the brew basket.
Figure A
correct
incorrect
Summary of Contents for 115
Page 2: ......
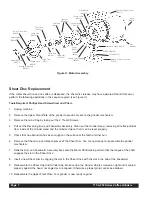
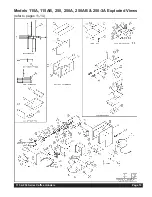
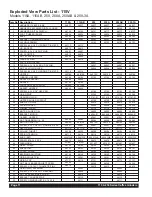
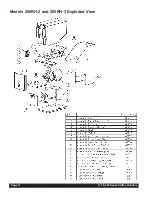
Page 16: ...Page 15 115 250 Series Coffee Grinders Models 250RH 2 and 250RH 3 Exploded View ...
Page 20: ...Models 250RH 2 and 250RH 3 Wiring Diagram Page 19 115 250 Series Coffee Grinders ...
Page 21: ...115 250 Series Coffee Grinders Page 20 115A 115AB 250 Series Wiring Diagram 115V ...
Page 22: ...115A 115AB 120V Wiring Diagram Page 21 115 250 Series Coffee Grinders ...
Page 23: ...115 250 Series Coffee Grinders Page 22 115A 115AB 120V Wiring Diagram ...


