


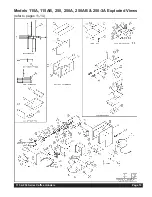
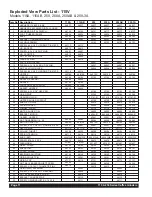


Exploded View Parts List - 230V
Models 115A, 115AB, 250, 250A, 250AB & 250-3A
Item No. Description
115A
115AB
250
250A
250AB
250-3A
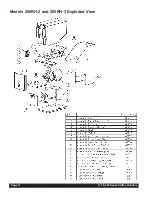
1
HARNESS, 115/250 A & AB
86037
86037
86037
86037
86037
86037
2
HARNESS, 250 SERIES DIGITAL AUGER
86125
86125
86125
86125
3
HARNESS, DIGITAL SWITCH
86122
86122
86121
86117
86117
86117
4
FOOT, RUBBER 100/250
86034
86034
86034
86034
86034
86034
5
BASE
86309
86309
86309
86309
86309
86309
6
ANGLE BRACKET, GRINDER BASE
88862
88862
88862
88862
88862
88862
7
250 LID ASSEMBLY
89103
89103
89103
89103
8
SCREW, #8 X 3/8 PH PN SMS T/B 410 SS
89113
89113
9
LID, BACK SS
86013
86013
10
SCREW, 6-32 X 1/4 PH PN HD
86801
86801
86801
86801
86801
86801
11
LID, FRONT SS
86014
86014
12
NUT, 6-32 ACORN LOCK
86848
86848
86848
86848
86848
86848
13
HINGE, PLATED
86316
86316
14
PARTITION, HOPPER
86041
86041
86041
86041
15
SCREW, 8-32 1/2 SL BD HD NYLON
86087
86087
86087
86087
16
NUT, 8-32 NYLON LOCK
86086
86086
86086
86086
17
SCREW, #8 X 3/8 PH PN SMS T/B 410 SS
89114
89114
18
HOPPER
86010K
86010K
86010K
86010K
86010K
86010K
19
WINDOW, HOPPER
86102
86102
83152
83152
83152
83152
20
HOPPER, SUPPORT
86008
86008
21
HOPPER
86192
86192
22
FRONT HOPPER SUPPORT
86196K
86196K
23
GASKET, HOPPER
71419
71419
24
SCREW, 8-32 X 3/8" HEX PEM
83143
83143
83143
83143
25
LINK, DRIVE
83368
83368
83368
83368
26
WASHER, NYLON
83141-01
83141-01
83141-01
83141-01
27
HOPPER, AUGER W/ SPOUT
83150
83150
83150
83150
28
ADAPTER, DRIVE
80019
80019
80019
80019
29
SPRING, AUGER
86046
86046
86046
86046
30
FUNNEL, AUGER
83134
83134
83134
83134
31
MOTOR, AUGER 230V
86000
86000
86000
86000
32
BRACKET, MOTOR
86042-01
86042-01
86042-01
86042-01
33
GASKET, HOPPER
83081
83081
83081
83081
34
NUT, TINNERMAN 1/4 - 20
86864
86864
86864
86864
86864
86864
35
MOTOR, 1/2HP 230V 50 HZ
86421
86421
86421
86421
86421
86421
36
SCREW, 8-32 X 3/8 PH TR HD M/S 410 SS
82097
82097
82097
82097
82097
82097
37
HEAD, GRIND
84171S
84171S
84171S
84171S
84171S
84171S
38
COLLAR, THRUST
86304
86304
86304
86304
86304
86304
39
SPRING, TENSION
86118
86118
86118
86118
86118
86118
40
BURR (SET)
85281W
85281W
85281W
85281W
85281W
85281W
41
SCREW, #10-32 X 5/16
86812
86812
86812
86812
86812
86812
42
FEEDWORM
85185T
85185T
85185T
85185T
85185T
85185T
43
DRIVE, SHEAR
86154
86154
86154
86154
86154
86154
44
SHEAR DISC
86123
86123
86123
86123
86123
86123
45
COVER, SHEAR
86355
86355
86355
86355
86355
86355
46
BEARING, ADJUSTING
86140
86140
86140
86140
47
GRIND, ADJUST PIN
86341
86110
86341
86341
86110
86341
48
GRIND, CAP
87131
86112
87131
87131
86112
87131
49
NUT, 5/8-18 BRASS ADJUST SCREW
86340
86340
86340
86340
86340
86340
50
SCREW, 5/16-18 X 1 THUMB T/S ZINC
86819
86819
86819
86819
86819
86819
51
GRIND SHIFT ASSEMBLY 230VAC
89005
89005
52
SCREW, 8-32 X 5/8 PH TR M/S ZINC
61305
61305
53
NUT, 8-32 KEPS ZINC PLATED
86810
86810
54
BRACKET, COARSE STOP
86115
86115
55
SCREW, GRIND ADJUST 5/8-18 X 3/8
86111
86111
Page 13
115 & 250 Series Coffee Grinders
Summary of Contents for 115
Page 2: ......
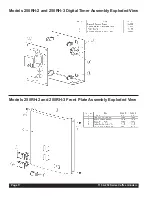
Page 16: ...Page 15 115 250 Series Coffee Grinders Models 250RH 2 and 250RH 3 Exploded View ...
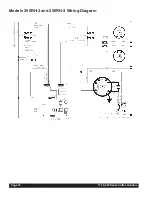
Page 20: ...Models 250RH 2 and 250RH 3 Wiring Diagram Page 19 115 250 Series Coffee Grinders ...
Page 21: ...115 250 Series Coffee Grinders Page 20 115A 115AB 250 Series Wiring Diagram 115V ...
Page 22: ...115A 115AB 120V Wiring Diagram Page 21 115 250 Series Coffee Grinders ...
Page 23: ...115 250 Series Coffee Grinders Page 22 115A 115AB 120V Wiring Diagram ...


