


•
Use rakes and brooms to clear the unwanted material
before you blow.
•
Make the surfaces wet before you clear the unwanted
material in dusty conditions.
•
Look out for children, pets, open windows, and cleaned
cars during operation.
•
Clean the machine.
•
Discard the unwanted material when you complete work.
12
MAINTENANCE
CAUTION
Do not let brake fluids, gasoline, petroleum-based materials
touch the plastic parts. Chemicals can cause damage to the
plastic, and make the plastic unserviceable.
CAUTION
Do not use strong solvents or detergents on the plastic
housing or components.
WARNING
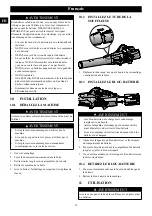
Remove the battery pack from the machine before
maintenance.
12.1 CLEAN THE MACHINE
CAUTION
The machine must be dry. Humidity can cause risks of
electrical shocks.
•
Clear the unwanted material out of the air vent with a
vacuum cleaner.
•
Do not spray the air vent or put the air vent in solvents.
•
Clean the housing and the plastic components with a
moist and soft cloth.
13
TRANSPORTATION AND
STORAGE
WARNING
Remove the battery pack from the machine before
tranportation and storage.
13.1 STORE THE MACHINE
•
Clean the machine before storage.
•
Make sure that the motor is not hot when you store the
machine.
•
Make sure that the machine does not have loose or
damaged parts. If it is necessary, do these steps/
instructions:
•
Replace the damaged parts.
•
Tighten the bolts.
•
Speak to a person of an approved service center.
•
Store the machine in a dry area.
•
Make sure that children cannot come near the machine.
14
TROUBLESHOOTING
PROBLEM
POSSIBLE
CAUSE
SOLUTION
The motor does
not start when
you pull the trig-
ger.
The battery pack is
not installed tight-
ly.
Make sure that
you tighlty install
the battery pack in
the machine.
The battery pack is
out of power.
Charge the battery
pack.
The machine does
not start.
The power switch
is defective.
Replace the defec-
tive parts by an ap-
proved service
center.
The motor is defec-
tive.
The PCB board is
defective.
The air does not
flow through the
tube when you
start the machine.
The air inlet or
tube outlet has a
blockage.
Remove the block-
age.
15
TECHNICAL DATA
Voltage
82 V
Air volume
640 CFM
Air speed
120 MPH (193 Km/h)
Weight (without
battery pack)
5.42 lbs. (2.46 kg)
Battery model
GL 400, GL 400BT and other GL/
GLW series
Charger model
GC 400 and other GC series
The recommended ambient temperature range:
Item
Temperature
Blower storage temperature
range
-4°F (-20°C) - 158°F (70°C)
Blower operation tempera-
ture range
-4°F (-20°C) - 104°F (40°C)
Battery charging temperature
range
39°F (4°C) - 104°F (40°C)
Charger operation tempera-
ture range
39°F (4°C) - 113°F (45°C)
8
English
EN