background image

8

Operation

Unit Power

Press the Power Button to turn the unit ON or OFF. 
 

Fan Speed 

(Manual Mode)

Press the Fan Speed Button (FAN) to cycle through the 5 fan speeds 

(Low, Med-Low, Medium, Med-High, High).


Auto Mode

Press the Auto Mode Button (AUTO) to put the unit into Auto Mode. During 

Auto Mode your unit will adjust fan speed based upon the air quality 

while showing a notification of the current air quality level.


Air Quality - Displayed During Operation

· 

Good (Green) 


· 

Fair (Yellow)   


· 

Poor (Red)

NOTE: The Air Quality Sensor takes 15 minutes to fully calibrate after turning the unit on. If 
you need to quickly take care of an air issue, we recommend starting the unit in Manual 
Mode on your desired Fan Speed.

Summary of Contents for pureAIr Active HEPA Plus

Page 1: ...Owner s Manual Pro and Room Models ...

Page 2: ...ation Unplug unit before any cleaning or maintenance This unit is not intended for outdoor use NOTE Read this manual and all important safety instructions before using the unit Important Safety Information 2 Product Contents 3 Initial Setup 3 Diagrams 4 5 Controls 6 Greentech Connect 7 Operation 8 9 Cleaning Maintenance 10 Part Replacement 11 13 Specifications 14 Warranty Information 15 ...

Page 3: ...ive wrap and place the filter back into the unit before operation Install the Power Cord into the plug on the bottom of the unit under the sliding panel Locate a suitable location to place your unit Ideal location is an area of the room with good circulation away from the wall and your air return or near the source of pollution Connect your unit to WiFi via Greentech Connect Mobile Application See...

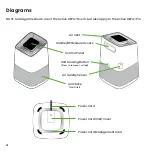
Page 4: ...er Cord Inlet Cover Power Cord Management Area Control Panel Air Vent NOTE All diagrams shown are of the Active HEPA Room but also apply to the Active HEPA Pro Handle BPI Module Access Unit Housing Button Press to remove unit top Air Quality Sensor ...

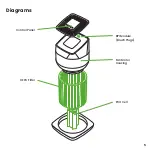
Page 5: ...5 Diagrams HEPA Filter Control Panel PCO Cell BPI Module Brush Plugs Fan Motor Housing ...

Page 6: ...6 Controls GOOD Component Status Display Active Display Information Unit Power Fan Speed Manual Mode Auto Mode Sleep Mode Information Environment Components WiFi Status Indicator ...

Page 7: ...y holding the Power Button down until the WiFi symbol begins to blink In Greentech Connect press the button in the top right corner and add a new device Your device should automatically show up while in discovery mode After your device has been added select the unit and enter its control screen Make mode fan and lighting adjustments or view the quality of your air part life and more For more Green...

Page 8: ...the unit into Auto Mode During Auto Mode your unit will adjust fan speed based upon the air quality while showing a notification of the current air quality level Air Quality Displayed During Operation Good Green Fair Yellow Poor Red NOTE The Air Quality Sensor takes 15 minutes to fully calibrate after turning the unit on If you need to quickly take care of an air issue we recommend starting the un...

Page 9: ...can be adjusted in the mobile app Greentech Connect Information Pressing the information button will cycle through real time unit and room information The actively displayed information will be highlighted in the Component Status or Active Display Information sections on the control panel This information is also available in the GreenTech Connect Mobile App Temperature Current Room Temperature Hu...

Page 10: ...ly refer to your Warranty Information for coverage and replacement instructions HEPA Filter Life Filter life is determined by operating time but is affected by the level of pollutants in the space being cleaned Filters should be replaced at least once a year to ensure the highest quality purification or more frequently in locations with higher levels of pollutants PCO Cell and BPI Module Life The ...

Page 11: ...sed through Greentech Environmental or a Greentech Environmental retailer 5 Reset the Filter Life by navigating the information menu to the Filter Life screen and holding the information button until the life remaining changes to 100 Note To reset the Filter Life using Greentech Connect navigate to the unit control screen select the Filter section and reset the life remaining 1 2 3 4 ...

Page 12: ...lide it down until fully seated 4 Replace the top 1 2 3 4 5 Reset the PCO Cell Life by navigating the information menu on the control panel to the PCO Cell Life screen and holding the information button until the life remaining changes to 100 Note To reset the PCO Cell life using Greentech Connect navigate to the unit control screen select the PCO Cell section and reset the life remaining ...

Page 13: ...or coordinated outlets until they are fully seated 5 Replace the handle cover and screws Part Replacement BPI Module Brushes 1 2 3 4 5 6 Reset the BPI Module Life by navigating the information menu to the BPI Module screen and holding the information button until the life remaining changes to 100 Note To reset the BPI Module Life using Greentech Connect navigate to the unit control screen select t...

Page 14: ...eight 11 5 lb 5 2kg Electrical Input 120VAC 50 60Hz Power Consumption 36W Decibel Level 26 53dB Unit Warranty 10 Years Need information on something you can t find in this manual Use this QR Code to view our troubleshooting guide pureAir Active HEPA PRO Model 1X5826 Unit Dimensions 11 3 11 3 24 0 28 7cm 28 7cm 60 9cm Unit Weight 14 5 lb 6 6kg Electrical Input 120VAC 50 60Hz Power Consumption 62W D...

Page 15: ...n charges on parts or units submitted under this Warranty shall be borne by the purchaser Unless this Warranty is expressly renewed or extended by Greentech Environmental any repaired or replaced part of unit shall be warranted to the original purchaser only for the length of the unexpired portion of the original warranty Further Limitations and Exclusions Are as Follows Any warranty that may be i...

Page 16: ...Lifestyle IMG FRESH AIR STARTS HERE Greentech pureAir Active HEPA Plus Owners Manual v3 220301 ...

Reviews: