


CUAP32GL Pressing Tool
Greenlee Textron / Subsidiary of Textron Inc.
6
4455 Boeing Dr. • Rockford, IL 61109-2988 USA • 815/397-7070
Operation
Electric shock hazard:
This tool is not insulated. When
using this unit on or near energized
electrical lines, use proper personal
protective equipment.
Failure to observe this warning can
result in severe injury or death.
Wear eye protection when operating
or servicing this tool.
Failure to wear eye protection can
result in serious eye injury from
flying debris or hydraulic oil.
Skin injection hazard:
Do not use hands to check for oil
leaks. Oil under pressure easily
punctures skin. If injured, seek
medical attention immediately to
remove oil.
Failure to observe this warning can
result in serious injury, gangrene, or
death.
Keep hands away from the pressing
tool head when pressing.
Failure to observe this warning can
result in severe injury or death.
• Do not operate the tool without dies. Damage to
the ram or tool head can result.
• This tool is not designed for continuous use.
After 30 to 40 pressing cycles, allow the pressing
tool to cool for 15 minutes.
• Do not place the tool in a vise. The pressing tool
is designed for hand-held operation.
• Ensure that all bystanders are away from the
work area when operating the tool.
• Ensure that the work area is clean, dry,
uncluttered, and well-lit.
• Use this tool for the manufacturer’s intended
purpose only.
Failure to observe these precautions can result in
injury or property damage.
Installing Pressing Dies
Note: Purchase dies from the connector manufacturer.
1.
Select the proper die according to the connector
manufacturer’s instructions.
2.
Press the ram retract button.
3.
Open the pressing head and slide the die into the
pressing head until it “snaps” into place. Install the
second die.
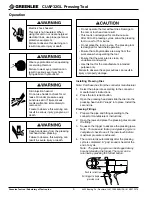
Pressing Fittings
1.
Prepare the pipe and fitting according to the
connector manufacturer’s instructions.
2.
Open the jaws and place the pressing dies around
the fitting.
3.
Squeeze the trigger to advance the pressing jaws.
Note: To make sure that a good pressing cycle is
completed, check to see if the jaws touch before
maximum pressure is achieved.
4.
The ram returns automatically after the pressing
cycle is completed. A “pop” sound is heard at the
end of a cycle.
Note: The pressing cycle can be stopped at any
time by releasing the trigger. The ram can be
returned by pressing the retract button.
Pull trigger to begin
pressing cycle
Push to retract ram


