5
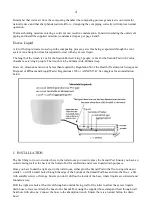
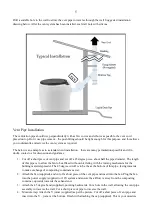
Drill a suitable hole in the wall to allow the vent pipe to traverse through the wall. Suggested installation
drawing below. After the vent system has been installed, seal wall hole with silicone.
Vent Pipe Installation
The ventilation pipe should rise perpendicularly with as few curves and elbows as possible, the vent cowl
placed on top. Don’t use pipe cement – the push fittings should be tight enough for this purpose, and this allows
you to dismantle and service the vent system as required.
The below is an example as to a standard vent installation – there are many permutations possible and if in
doubt, contact us for discussion and guidance:
1.
Cut off a short piece of vent pipe and cut off a 45 degree piece, about half the pipe diameter. The length
of this pipe is to allow the fan to be affixed without interfering with the turning mechanism for the
bulking material spreader. The 45 degree cut off is to be the at the bottom of this pipe, facing inwards,
to make exchange of composting containers easier.
2.
Attach the fan (supplied), and cut off a short piece of the vent pipe and insert into the fan. Plug the fan
into the power supply (supplied) or 12V system and ensure the airflow is away from the composting
container, upwards towards the exhaust end.
3.
Attach the 45 degree bend (supplied), pointing backwards. Cut a hole in the wall, allowing the vent pipe
assembly to traverse the wall. Cut a short piece of pipe to traverse the wall.
4.
Moisture trap: Attach the Y joiner (supplied) as per the picture. Cut off a short piece of vent pipe and
insert into the Y – joiner at the bottom. Finish with attaching the cap (supplied). This is your moisture


