3
INSTALLATION PLANNING
It's all in the planning!
For proper operation of the toilet you should consider a number of issues.
The design of the site and building needs to allow for:
• An elevated starting point for liquid to flow by gravity from the toilet down into a liquid absorption trench
which is to be dug outside the toilet. The whole toilet needs to sit on level ground, IF ANYTHING SLOPING
SLIGHTLY BACKWARDS.
• Space for the toilet and a firm, dry and sheltered base for it to sit.
• Adequate access to service and maintain the toilet, i.e. remove the full container and replace it with an empty
one.
• Good ventilation to provide oxygen and evaporate liquids
• Electrical supply (240VAC or 12VDC) to the fan location
The Scandi-Pod is supplied as a kit containing most of the components required and can be installed using basic
building tools and materials available at plumbing suppliers or hardware shops
Installation of the Scandi Pod involves:
1.
Preparing a flat, level and firm base for the composting container to sit
2.
Installing the ventilation pipe-work, including fan and vent cowl
3.
Connecting the ventilation pipe work, electrical connection and excess liquids pipe
4.
Preparing the excess liquids dispersal trench
5.
Final checks before use
Space Required
There is no ideal set of measurements which will suit all applications but you do need to provide enough space
to locate and install the toilet, enough space to fit and maintain the air vent piping and fan and enough space to
access and exchange the containers, so allow space to remove and store the bins.
•
Don't plan to install a light directly over the pedestal/waste chute as this will attract flying insects.
•
Don’t use your toilet fan. It’s suction works against the suction of the fan of the Scandi – Pod.
Most Scandi-Pods are installed indoors and are usually screwed or glued to the floor.
Vent System
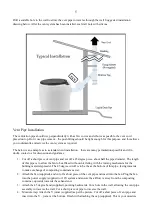
The Scandi-Pod airflow requirement is provided by 75mm pipe and incorporates a continuous running fan
(supplied). Consider how the fan will be powered (240VAC or 12VDC) and ensure the fan housing is
accessible for maintenance. Ensure correct airflow of the fan
away from the toilet.


