23
Rooftop Packaged
Service Manual
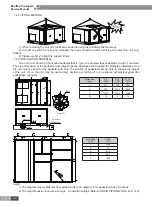
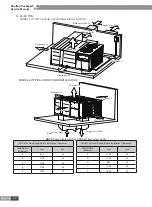
1.2.4 DUCTWORK
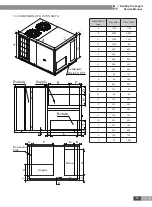
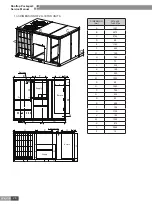
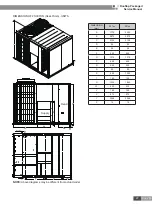
1) The Bottom duct openings are covered when they leave the factory ready to be used for a side supply /
side return application.
2) If a bottom supply / bottom return application is applied, you can simply remove the two covers from
the bottom of the unit and place them in the side supply / side return duct openings. What is stated above is
only applicable to the unit with the cooling capacity of 15 Ton or lower. As for all other units, the side supply air
outlet is factory defaulted. Meanwhile, the button supply air outlet is reserved; however, the seal plate should be
prepared by the user.
CAUTION:
The design and installation of air ducts must be in conformity with the relevant local engineering criteria.
Ductwork is to be constructed in a manner that limits restrictions and maintains suitable air velocity.
The air supply duct, the air intake duct must be covered with a layer of thermal insulation, so as to avoid
thermal leakage and condensation.
The air supply ducts and the air intake ducts shall be fixed by the prefabricated boards of the ceiling by
using iron supports. The joints of the ducts must be sealed by glue so as to avoid leakage.
The edge of the air intake duct must be at least 150mm away from the wall.
Silencing and shock absorption shall be considered in the design and installation of the air ducts.
Additionally, the noise source must be far away from where people stay. The air intake shall not be located
above the place where users stay (offices and rest places,etc.).
Do not terminate the air return duct in an area that can introduce toxic or objectionable fumes/odors into
the ductwork.
Each installation must include a return air filter. This filtering may be performed at the unit or externally
such as a return air filter grille.
Building condition and maintenance convenience should be taken into consideration when selecting the
installation method.
1.2.5 ADJUST THE TIGHTNESS OF THE BELT (ONLY 5 TON ABOVE)
The rotation of the fan is achieved by the transmission of the belt. The velocity and stability of the fan is
associated with the tightness of the belt and the tightness should be adjusted after a period of time.
For a new belt, the tightness should be adjusted for at least twice within 24 hours. After one week
running, the tightness of the belt should be adjusted again, we should routinely check it every 1-2 months; also
ensure the test results complying with the following table.
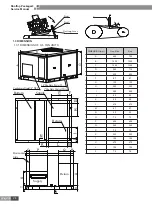
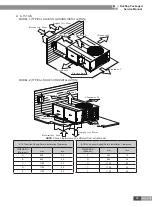
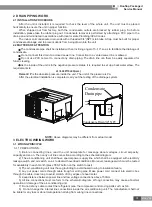
The adjustment of the tightness of the belt is shown in the following figure. Loosen screws fixing motor
on the base, move motor along the direction of arrow as shown in the picture, then fix the screw again.
The tightness level of belt is tested by densitometer as shown in the following figure, when
△
reaches
the deviation length, read the value on the meter, the value should be in the category specified in the following
table .
Section area
of the belt
Diameter of the
small wheel
(mm)
Diameter of
the big wheel
(mm)
The total length
of the belt
(mm)
Deviation
Length
(mm)
Tension(N)
Min.
Max.
SPA
80
160
1250
6.93
18
26
100
160
1282
6.96
18
26
Summary of Contents for EJ51000061
Page 1: ...ROOFTOP PACKAGED SERVICE MANUAL T3 R22 50 60Hz GC201205...
Page 3: ...1 Rooftop Packaged Service Manual PRODUCT PRODUCT...
Page 22: ...20 Rooftop Packaged Service Manual INSTALLATION...
Page 38: ...36 Rooftop Packaged Service Manual MAINTENANCE...
Page 44: ...42 Rooftop Packaged Service Manual 3 WIRING DIAGRAM Model GK C03TC1AD EJ51000160 COMP...
Page 45: ...43 Rooftop Packaged Service Manual Model GK C03TC1AD EJ51000161...
Page 46: ...44 Rooftop Packaged Service Manual Model GK C04TC1AD...
Page 47: ...45 Rooftop Packaged Service Manual Model GK C04TC1AF...
Page 48: ...46 Rooftop Packaged Service Manual Model GK C05TC1AF EJ51000190...
Page 49: ...47 Rooftop Packaged Service Manual Model GK C05TC1AF EJ510001901...
Page 50: ...48 Rooftop Packaged Service Manual Model GK C08TC1AF GK C10TC1AF P P...
Page 51: ...49 Rooftop Packaged Service Manual Model GK C13TC1AF RD BU RD BU BK BK BK BK P P...
Page 52: ...50 Rooftop Packaged Service Manual Model GK C15TC1AF EJ51000180 P P...
Page 53: ...51 Rooftop Packaged Service Manual Model GK C15TC1AF EJ51000181 P P...
Page 54: ...52 Rooftop Packaged Service Manual Model GK C20TC1AF GK C25TC1AF P P...
Page 55: ...53 Rooftop Packaged Service Manual Model GK C03TC1AK COMP...
Page 56: ...54 Rooftop Packaged Service Manual Model GK C04TC1AM...
Page 57: ...55 Rooftop Packaged Service Manual Model GK C05TC1AM...
Page 58: ...56 Rooftop Packaged Service Manual Model GK H05TC1AM...
Page 59: ...57 Rooftop Packaged Service Manual Model GK C08TC1AM P P...
Page 60: ...58 Rooftop Packaged Service Manual Model GK H08TC1AM XT1 N XT1 N...
Page 61: ...59 Rooftop Packaged Service Manual Model GK C10TC1AM EJ51000242 P P...
Page 62: ...60 Rooftop Packaged Service Manual Model GK C10TC1AM EJ51000240 P P...
Page 63: ...61 Rooftop Packaged Service Manual Model GK H10TC1AM XT1 N...
Page 64: ...62 Rooftop Packaged Service Manual Model GK C15TC1AM BU P P...
Page 65: ...63 Rooftop Packaged Service Manual Model GK H15TC1AM XT1 N...
Page 66: ...64 Rooftop Packaged Service Manual Model GK H20TC1AM XT1 N...
Page 67: ...65 Rooftop Packaged Service Manual Model GK C20TC1AM GK C25TC1AM RD BU RD BK BK BK BK BK...
Page 68: ...66 Rooftop Packaged Service Manual Model GK H25TH1AM XT1 N...
Page 69: ...67 Rooftop Packaged Service Manual Model GK H30TH1AM XT1 N...
Page 70: ...68 Rooftop Packaged Service Manual Model GK C30TC1AM P P...
Page 88: ...86 Rooftop Packaged Service Manual 2 GK C03TC1AD Unit exploded views...
Page 90: ...88 Rooftop Packaged Service Manual GK C04TC1AF Unit exploded views...
Page 92: ...90 Rooftop Packaged Service Manual 3 GK C05TC1AF exploded views parts list Unit exploded views...
Page 94: ...92 Rooftop Packaged Service Manual GK C05TC1AF Unit exploded views...
Page 110: ...108 Rooftop Packaged Service Manual Model GK C15TC1AM views parts list Unit exploded views 9 6...
Page 132: ...JF00300689...


