Greatneck 80159 Owner'S Manual Download Page 1

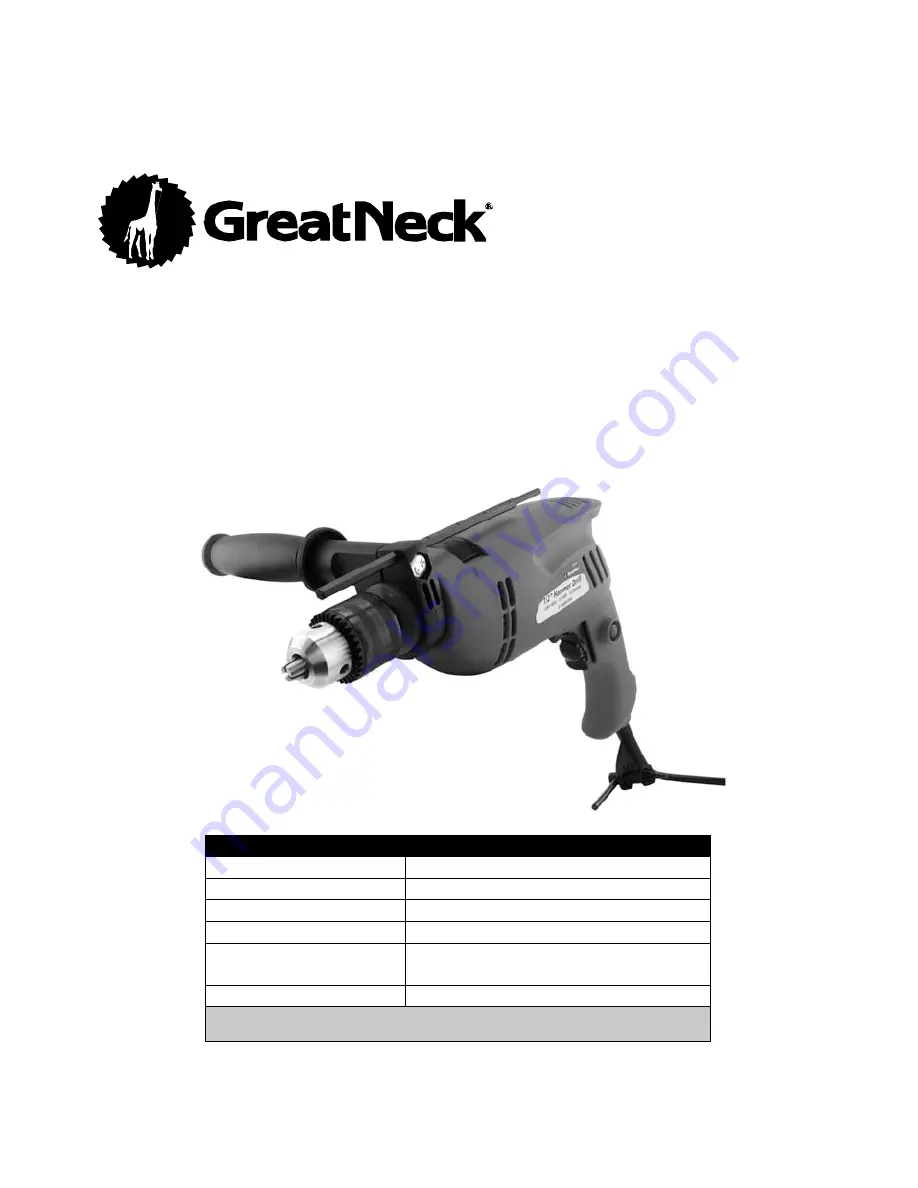
PRODUCT SPECIFICATIONS 

Rating: 

120 V, 60 Hz, AC 

Amperes: 

6.3 Amp 

Motor speed: 

0–2800 RPM (no load) 

Chuck: 

1/2” Keyed 

Maximum drilling 
capacity in metal: 

3/8” (10 mm) 

Beats per minute: 

0–44800 

TOLL FREE HELPLINE 1-800-458-2472 


Owner’s Manual 
  

1/2" Hammer Drill 

80159 


Summary of Contents for 80159

Page 1: ...ting 120 V 60 Hz AC Amperes 6 3 Amp Motor speed 0 2800 RPM no load Chuck 1 2 Keyed Maximum drilling capacity in metal 3 8 10 mm Beats per minute 0 44800 TOLL FREE HELPLINE 1 800 458 2472 Owner s Manua...

Page 2: ...ion cord safety 8 Symbols 9 Know your impact drill 10 Accessories and carton contents 11 Assembly and operation 12 20 Forward reverse switch 12 Variable speed trigger switch 12 Trigger switch lock 13...

Page 3: ...use permanent eye damage Prescription eyeglasses ARE NOT a replacement for proper eye protection WARNING Non compliant eyewear can cause serious injury if broken during operation of a power tool SAVE...

Page 4: ...reated by power sanding sawing grinding drilling and other construction activities contains chemicals known to cause cancer birth defects or other reproductive harm Some examples of these chemicals ar...

Page 5: ...and grounded power supply system Avoid body contact with grounded surfaces such as pipes radiators ranges and refrigerators There is increased risk of electric shock if your body is grounded Do not ex...

Page 6: ...h is dangerous and must be repaired Disconnect the plug from the power source before making any adjustments changing accessories or storing the tool Such preventive safety measures reduce the risk of...

Page 7: ...cause your hand to move into the path of the drill bit Secure workpiece Use clamps or a vice to hold the work when practical It is safer than using your hand and it frees both hands to operate the too...

Page 8: ...ur extension cord is properly wired and in good condition Always replace a damaged extension cord or have it repaired by a qualified electrician before using it Protect your extension cord from sharp...

Page 9: ...ash proof construction watertight construction protective earthing at earthing terminal Class I tools revolutions or reciprocations per minute diameter off position arrow warning symbol WARNING Some o...

Page 10: ...WARNING If any part is missing or damaged do not plug the tool into the power source until the missing or damaged part is replaced Carefully unpack the drill Compare against the IMPACT DRILL COMPONENT...

Page 11: ...11 DRILL COMPONENTS KEY DESCRIPTION QTY A Drill 1 B Chuck key 1 C Auxillary handle 1 D Auxillary handle collar 1 E Depth rod 1 Owner s manual 1 CARTON CONTENTS D C A E B...

Page 12: ...rigger switch will NOT function with the forward reverse switch in the middle position VARIABLE SPEED TRIGGER SWITCH This drill is equipped with a variable speed ON OFF trigger switch 1 Clockwise turn...

Page 13: ...ontinue to run To release the trigger switch lock button pull trigger switch back and then release the trigger DRILL IMPACT SWITCH The drill impact switch 4 changes the drilling mode between conventio...

Page 14: ...osition NOTE The auxiliary handle must be horizontal when using the depth rod 4 Turn the auxiliary handle clockwise to tighten mounting collar onto the drill housing NOTE Do not over tighten the auxil...

Page 15: ...ten bits You may severely injure your hand 1 Remove drill plug from the power source 2 Rotate chuck collar 1 to open or close the jaws 2 to a point where the opening is slightly larger than the bit si...

Page 16: ...Rotate chuck key counter clockwise until the chuck jaws release the drill bit NOTE Do not use a wrench on the chuck key or you may damage the key or chuck 3 Remove the drill bit ASSEMBLY AND OPERATIO...

Page 17: ...uck and the forward reverse switch is in the forward position 2 Hold the drill firmly with both hands whenever possible Use one hand to grasp the handle and switch and the other to grasp the body of t...

Page 18: ...e drill bit to keep it from overheating The oil will prolong the life of the drill bit and improve the drill cutting action If the bit jams in the workpiece or if the drill stalls release the trigger...

Page 19: ...moval 4 Open chuck jaws and remove hex key 5 Open chuck jaws as far as possible using the chuck key 6 Remove the chuck screw using a 2 Philips screwdriver Fig 11 NOTE Turn screw CLOCKWISE to remove it...

Page 20: ...age DO NOT use solvents when cleaning plastic parts Plastics are susceptible to damage from various types of commercial solvents and may be damaged by their use Use a clean cloth to remove dirt dust o...

Page 21: ...PARTS DIAGRAM MODEL 80159 21...

Page 22: ...er Support 2 20 80159 20 Brush Holder 2 21 80159 21 Carbon Brush 2 22 80159 22 Bearing 607 1 23 80159 23 Stator 1 24 80159 24 Chuck Key 1 25 80159 25 Switch 1 26 80159 26 Cord Clamp 1 27 80159 27 Tapp...

Page 23: ...in material or workmanship through normal usage either return it to the place of purchase or send it to GreatNeck Tools LLC for repair or replacement at our discretion In order to obtain this service...

Reviews: