


3
5. You must correctly install all R/C and other components
so that the model operates correctly on the ground and in
the air.
6. You must check the operation of the model before every
fl ight to insure that all equipment is operating and that the
model has remained structurally sound. Be sure to check
pushrod connectors often and replace them if they show any
signs of wear or fatigue.
7. If you are not an experienced pilot or have not fl own
this type of model before, we recommend that you get the
assistance of an experienced pilot in your R/C club for
your fi rst fl ights. If you’re not a member of a club, your local
hobby shop has information about clubs in your area whose
membership includes experienced pilots.
8. While this kit has been fl ight tested to exceed normal use,
if the plane will be used for extremely high-stress fl ying, such
as racing, or if a motor larger than the one recommended
will be used, the modeler is responsible for taking steps to
reinforce the high-stress points and/or substituting hardware
more suitable for the increased stress.
We, as the kit manufacturer, provide you with a top quality,
thoroughly tested kit and instructions, but ultimately the
quality and fl yability of your fi nished model depends
on how you build it; therefore, we cannot in any way
guarantee the performance of your completed model,
and no representations are expressed or implied as to the
performance or safety of your completed model.
Remember: Take your time and follow the instructions to
end up with a well-built model that is straight and true.
ADDITIONAL ITEMS REQUIRED
Following is the list of hardware and accessories required to
fi nish the Seawind. Order numbers are provided in parentheses.
Adhesives
The list of accessories required to complete the Seawind is
rather straightforward–with the exception of adhesives which
deserve a quick discussion. Hardly any glue is used to build
the Seawind, but it must be the right kind. With the exception
of slow-drying glue such as epoxy or waterproof white glue
(which should be used for the horizontal stabilizer so there
will be time for alignment), the rest of the model could be
assembled with foam-safe CA. But it wouldn’t be economical
to purchase two different kinds of glue when so little of either
is used. So if you don’t have any glue at all, or if you already
have some waterproof white glue or epoxy, you could do all
the gluing with just that. But if you don’t want to wait for the
glue to dry on the rest of the parts you could also purchase
some foam-safe CA. Following are some suggestions for the
kinds of glue:
❏
J&Z Products R/C-56 waterproof white glue (JOZR5007)
❏
1 oz Great Planes Pro
™
Foam Safe CA+ Medium
Glue
(GPMR6069)
❏
4 oz. Great Planes Pro 6-minute epoxy (GPMR6042)
❏
CA accelerator (GPMR6035)
Hardware & Accessories
❏
4-channel mini receiver (Futaba
®
R114F – FUTL0442
low band or FUTL0443 high band)
❏
Matching Rx crystal (FUTL62** low band or FUTL63**
high
band)
❏
(3) Micro servos (Futaba S3114 – FUTM0414)
❏
6" [150mm] Servo extension wire (for connecting aileron
servo to receiver – FUTM4506)
❏
Great Planes RimFire
™
28-30-950kV Out-Runner
brushless motor (GPMG4560)
❏
Great Planes Silver Series 25 Amp Brushless
ESC
(GPMM1820)
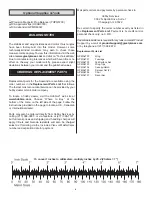
Motor Battery (see “Average Maximum Flight Time”
chart on page 15):
❏
Great Planes LiPo 11.1V 910mAh 20C Discharge
w/Balance
(GPMP0605)
-or-
❏
Great Planes LiPo 11.1V 1250mAh 20C Discharge
w/Balance
(GPMP0609)
-or-
❏
Great Planes LiPo 11.1V 1500mAh 20C Discharge
w/Balance
(GPMP0613)
❏
LiPo battery charger (Great Planes PolyCharge4
™
DC-Only – GPMM3015)
❏
One charge lead for each battery to be charged
simultaneously
(GPMM3148)
❏
12 Volt source for powering charger (Hobbico
®
12 Volt
Power Supply – HCAP0250)
Building Supplies
❏
Great Planes Pro
™
Threadlocker (GPMR6060)
❏
Common hobby tools (wire cutters, small Phillips
screwdrivers, hobby knife)
❏
Great Planes Segmented Lead Weights (GPMQ4485)
❏
RTV silicone cement or white glue
❏
Drill bits: 1/16" [1.6mm], #60 (.040") [1mm] to #52
(1/16") [1.6mm], #60 (.040") [1mm] to #58
(.042") [1.07mm]
❏
1.5mm Hex wrench
Note: The small drills are for drilling holes for the servo
mounting screws. If small drill bits are not available or if you
prefer not to purchase them, the small screw holes could
be made with a #11 hobby blade, but care must be taken
because it can be easy to oversize holes made this way.


