GREAT PLANES FlatOut Flatana Instruction Manual Download Page 10

their foam sheets. If using the gearbox included with this kit,
or any other type of “stick-mount” gearbox, cut out all four
sections from the fuselage parts. If using a firewall-
mounted, brushless outrunner motor, cut out only the
section from the lower vertical fuselage.

❏ 

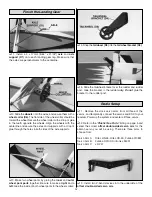
2. Glue the 5.5 x 115mm [7/32" x 4-17/32"] 

fuselage

tube doubler 

over the 3 x 679mm [1/8" x 26-47/64"]

fuselage tube

. One end should be flush. From now on, this

assembly will be referred to as the fuselage tube.

❏ 

3. Slide a 

fuselage joiner

, two 

fuselage servo mounts

(F3)

, and another fuselage joiner onto the fuselage tube.

With the tube doubler forward, and the servo mounts
hanging down, the front servo mount should have its flat
surface on the right, and the rear servo mount should have
its flat surface on the left.

❏ 

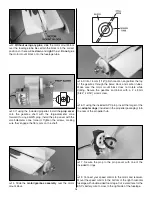
4. Position the servo mounts and fuselage joiners so that they

align with the precut slots in the upper vertical fuselage half.

❏ 

5. Glue the fuselage tube to the upper vertical fuselage half.

❏ 

6. Glue the left and right horizontal fuselage halves to the

fuselage tube. Make sure they are perpendicular to the
upper vertical fuselage.

❏ 

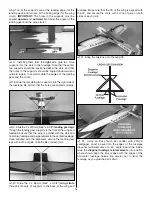
7. Glue the stabilizer into position with the leading edge

of the stab butted against the rear fuselage joiner. Align the
notches in the stab with the fuselage tube.

❏ 

8. Glue the wing into position with the leading edge of the

wing against the rear end of fuselage doubler tube. Align the
notches in the wing with the fuselage tube.

10

Summary of Contents for FlatOut Flatana

Page 1: ...dition to the place of purchase To make a warranty claim send the defective part or item to Hobby Services at the address below Hobby Services 3002 N Apollo Dr Suite 1 Champaign IL 61822 USA Include a...

Page 2: ...select the FlatOut Flatana ARF If there is new technical information or changes to this model a tech notice box will appear in the upper left corner of the page Attention The product you have purchase...

Page 3: ...ontrol throws exponentials for softening the throws near the center of the travel and various mixing functions such as rudder to elevator mixing for extended knife edge flight The FlatOut Flatana ARF...

Page 4: ...he recommended 640mAh pack the correct lead is GPMM3105 Rest assured the FlatOut Flatana ARF is capable of 3D flight with the included ElectriFly stick mount motor and gearbox combination But for pilo...

Page 5: ...ing Servo Mount 1 F3 Fuselage Servo Mount 2 F4 Fuselage Aileron Servo Mount 1 G1 Double Sided Offset Arm Size B 2 G2 Double Sided Arm Size B 2 G3 Single Sided Arm Size B 4 G4 Double Sided Arm Size A 2...

Page 6: ...ges will apply Illinois and Nevada residents will also be charged sales tax If ordering via fax include a Visa or MasterCard number and expiration date for payment Mail parts orders and payments by pe...

Page 7: ...gap Do not get any glue between the rings 5 Using the ExpertTip that follows permanently join the elevator halves by gluing in the elevator joiner tube C One at a time coat the sides of the rest of th...

Page 8: ...to remove small ridges of flashing not to make the hole larger B Snap the Z bend clevis into place HOW TO MAKE INSTALLING Z BEND CLEVISES EASIER Note You may want to protect your work surface from exc...

Page 9: ...horns Remove the tube once the CA has hardened 3 Glue a control surface brace E1 onto the roots of the ailerons 4 Slide four hinge retainer rings C3 onto the wing trailing edge tube Position the ring...

Page 10: ...ervo mounts hanging down the front servo mount should have its flat surface on the right and the rear servo mount should have its flat surface on the left 4 Position the servo mounts and fuselage join...

Page 11: ...to get glue between the rings 12 Glue the rudder post tube to the TE of the vertical fuselage 13 Snap the rudder onto the rudder post 14 Glue the 3 x 111mm 1 8 x 4 3 8 strut brace tube into the fusel...

Page 12: ...gh the landing gear supports in the front of the wing and fuselage Ensure that the wing is parallel with the stab and horizontal fuselage and perpendicular to the vertical fuselage Once satisfied with...

Page 13: ...inside of both wheel pants to the wheel collars 4 Snap the tailwheel D5 into the tailwheel bracket D4 5 Slide the tailwheel bracket over the rudder and rudder post Glue the bracket to the rudder only...

Page 14: ...rt a Z bend clevis into the outer hole of each arm Mount the servo arms so that they point straight down with the servos centered Cut a small hole in the fuselage to allow the elevator servo wire to p...

Page 15: ...the receiver Mount the receiver to the bottom of the left horizontal fuselage with double sided foam tape Make sure the receiver is far enough forward so that it does not interfere with aileron motio...

Page 16: ...motor mount block 5 Drill a 1 5mm 1 16 pilot hole at an angle from the top of the gearbox through the balsa block and carbon tubes Make sure the motor mount block does not rotate while drilling Secure...

Page 17: ...careful not to change the built in thrust angles 4 If installing an ElectriFly RimFire motor glue the included 3mm 1 8 plywood firewall to the nose so that the two pilot holes are centered on the hor...

Page 18: ...orm a quick check as described below to make sure the throws are set up correctly Note If your radio has the capability low rates will make it easier to perform precision aerobatics We recommend 40 en...

Page 19: ...ts Write this information on the bottom of the wing with a fine felt tip pen Follow the battery charging instructions that came with your radio control system to charge the batteries You should always...

Page 20: ...and address or AMA number on or in the model Note This does not apply to models while being flown indoors 7 I will not operate models with pyrotechnics any device that explodes burns or propels a pro...

Page 21: ...rottle management this airplane has enough power to climb straight up at full throttle so level flight is more comfortably achieved at about half throttle Avoid extremely high speed flight with the Fl...

Page 22: ...______________ Where Purchased _________________________ Date Construction Started __________________ Date Construction Finished _________________ Finished Weight __________________________ Date of Fi...

Page 23: ...23...

Page 24: ...ANGLE TEMPLATES...

Reviews: