❏
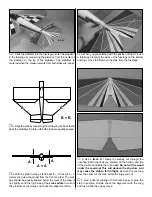
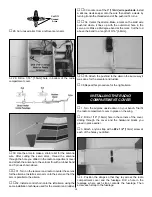
2. Slide the stabilizer into the fuselage. Center the stabilizer
in the fuselage by measuring the distance from the center of
the fuselage to the tip of the stabilizer. The stabilizer is
centered when the measurements from both sides are equal.
❏
3. Align the stab by measuring from the wing tip back to the
tip of the stabilizer. Do this until both sides are equally spaced.
❏
4.With the stab in place, stand back 8 – 10 feet [2.5 – 3
meters] and view the model from the front and rear. The stab
tips should be equally spaced below the level of the wing. If
not, lightly sand the high side of the stab saddle to correct
the problem. Work slowly and check the alignment often.
❏
5. When you are satisfied with the position of the stab, use
a felt-tip pen to mark the sides of the fuselage on the bottom
and top of the stab. Remove the stab from the fuselage.
❏
6. Use a fresh #11 blade to carefully cut through the
covering inside the lines you marked on the bottom and top
of the stab that indicate the fuse sides. Do not cut the wood
under the covering! This will weaken the structure and
may cause the stab to fail in flight. Remove the covering
from the center of the stab within the lines you cut.
❏
7. Use a liberal coating of 30-minute epoxy to glue the
stab in position. Double check the alignment with the wing
and fuse while the epoxy cures.
A
A
A = A
B
B
B = B
7


