GREADEN GR-3B31NA Instruction Manuals Download Page 35

35 


Tips for a Safe BBQ 

Before Using Propane and Natural Gas Fired Barbecues 


Purchase only approved barbecues--check for the label. 


Carefully follow the manufacturer's instructions when assembling a newly-purchased barbecue. If 
you have difficulty with the assembly, contact a qualified service person. Many stores which sell 
barbecues offer a free assembly service. Ask. 


Store the instruction manual for the barbecue in a safe place to have on hand for future 
reference. 


If the barbecue has not been used in a while or whenever the propane tank is changed or refilled, 
remove the sear plates to check that the burner holes and tubes connected to the burners are 
rust and debris free (orange does not mean rust on a burner, we are talking about missing pieces 
of metal). If it looks fine, fire up the barbecue and check for an even flame throughout the burner. 
If the flame is not even, replace the burner. 


Periodically, check all your barbecue connections and supply lines for leaks. Using ordinary 
dishwashing liquid mixed with water, spread the solution over all fittings. This means the cylinder 
valve on the hose, too. There is a leak if bubbles appear. NEVER use an open flame to test for 
leaks. After tightening or replacing the leaking hose or valve, retest for leaks. 

Lighting A Propane Barbecue. 


Open the lid BEFORE lighting the barbecue as a leaking or open valve may cause the accumulation 
of propane under the lid or in the basin. This could cause an explosion when lit. 


Have a match or barbecue lighter ready before the propane is turned on. If the barbecue does not 
ignite, turn the control valves off, then wait five minutes before trying again. KEEP THE LIGHTER 
AND MATCHES OUT OF THE REACH OF CHILDREN ! 

Using the Barbecue. 


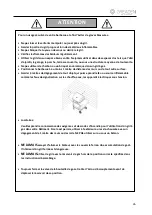
Never leave a lit barbecue unattended. 


Never move a lit barbecue. 


Use long-handled utensils and fire-resistant oven mitts. 


Wear short sleeves or tight-fitting clothing as loose clothing could catch fire. Never bbq with a tie. 


The barbecue should rest on a solid surface and be located away from shrubbery, foot traffic and 
overhangs. Remember, the barbecue stays hot even after being turned off and can burn someone 
if they bump into it. Stay by the bbq until it is cool. 


Ideally, the barbecue should be 3 meters (10 feet) away from the house or anything else that 
could catch fire. The area surrounding the barbecue needs to be free of any obstructions that 
could block airflow for ventilation and combustion. 


Never use the barbecue indoors or in a garage. 


Only open the propane tank a quarter to a one-half turn--the necessary gas required to operate 

the barbecue. This also makes it much easier to shut off should a problem arise. This doesn’t 

apply when using a clip-on regulator. 


A certain amount of fat does drip onto the heat source while cooking, causing flaring. Some 
flaring is fine as it adds to the barbecue flavor. Excessive flaring, however, is not acceptable. Food 
should be moved to another spot on the grill and/or the heat turned off. Trim fat from meat cuts 
to avoid excessive flaring and, every so often clean the fat tray and sear plates, fat fires are 
dangerous and can ruin the appliance 

Summary of Contents for GR-3B31NA

Page 1: ......

Page 2: ......

Page 3: ...3 CATALOGUE CATALOG GR 3B31NA LE MODE D EMPLOI DE BBQ FR INSTRUCTION MANUALS FOR BBQ EN 4 31 32 58...

Page 4: ...ANT D ASSEMBLER ET D UTILISER L APPAREIL CERTAINES PARTIES ACCESSIBLES DE L APPAREIL PEUVENT ETRE TRES CHAUDES ELOIGNEZ LES ENFANTS CONSERVEZ CE GUIDE DE L UTILISATEUR POUR TOUTE REFERENCE ULTERIEURE...

Page 5: ...gaz Butane Propane Butane Propane ou leur m lange Butane Propane ou leur m lange Butane Propane ou leur m lange Pression 28 30mbar 37mbar 30mbar 37 mbar 50mbar Entr e totale de chaleur kW 14 2 KW 14...

Page 6: ...ou moins peuvent tre plac es l int rieur du chariot en cas d utilisation Les bouteilles de gaz de plus de 7 kg doivent tre plac es l ext rieur du chariot pendant l utilisation La charge maximale suppo...

Page 7: ...arition de bulles Ne jamais utiliser une flamme pour faire le test de fuite de gaz Apr s avoir colmat les fuites ou remplac le tuyau ou la vanne retenter nouveau Allumage du barbecue au propane Soulev...

Page 8: ...e distance d au moins 200 m tres du r servoir et appeler lespompiers En cas de feu caus par la graisse laisser le couvercle du barbecue ouvert et teindre les br leurs si vous tes en mesure de le faire...

Page 9: ...ovoquer un incendie Soyez tr s prudent lorsque vous serrez le tuyau sur le barbecue car le filetage crois peut se d faire si l utilisateur est imprudent Le filetage crois peut provoquer des fuites de...

Page 10: ...par piq res p n tre profond ment dans la surface et ne peut pas tre ais ment enlev e Un polissage intense est alors n cessaire Entretien quotidien Apr s chaque utilisation laisser refroidir l appareil...

Page 11: ...nt d un d versement excessif de la cuisson de conditions environnementales s v res et de conditions de cuissons extr mes Il existe des nettoyants exclusifs en acier inoxydable qui sont con us pour de...

Page 12: ...u chariot 3 C t droit du chariot 13 Panneau avant gauche 21 Vis 60mm x2 4 Base du chariot 5 6 14 Etag re auxiliaire gauche 22 Rondelle d 8 4 23 Ecrou M8 x2 Bol graisse 7 Roue Support du bol 8 Roulette...

Page 13: ...APES D ASSEMBLAGE 1 Fixer les roulettes de verrouillage 8 sur le panneau gauche du chariot 3 les serrer avec une cl 27 2 Monter les roues 7 sur le chariot droit 2 fixer avec des crous et rondelles 20...

Page 14: ...14 3 Verrouiller la base du chariot 4 sur le chariot gauche et le panneau du chariot droit 2 et 3 avec des vis 21 4 Assembler le panneau arri re 9 au chariot avec des vis 21...

Page 15: ...15 5 Monter l accolade de porte 10 au chariot avec des vis 24 6 Monter les portes 11 et 12...

Page 16: ...ever et positionner le corps du br leur 1 dans le chariot Abaisser soigneusement le corps du br leur 1 sur le chariot Aligner les deux trous de chaque c t fixer avec quatre vis 24 8 Fixer le panneau a...

Page 17: ...17 9 Fixer le panneau avant gauche 13 l tag re gauche 14 l aide de vis 24 C t gauche C t droit...

Page 18: ...18 10 Montage de la jauge de temp rature 11 Placer les dompteurs de flammes 17...

Page 19: ...19 12 Placer les grilles 18 13 Placer la grille de r chauffement 19...

Page 20: ...endommag apr s plusieurs utilisation vous pouvez le remplacer en achetant un bol standard dans n importe quel supermarch Dimensions 147x122x50mm 15 Placer le br leur auxiliaire Il s agit d un ajustem...

Page 21: ...21 16 Brancher le fil d allumage 17 Fixer les crochets pour ustensiles 28 avec leurs crous 29 18 Comment utiliser le manche pour l allumage l allumette...

Page 22: ...ue apr s chaque utilisation pendant environ 15 minutes permettra de garder les r sidus alimentaires excessifs un minimum NE PAS FAIRE S appuyer sur l appareil lorsqu il est en marche Laisser cuire les...

Page 23: ...de d tendeur dans les 2 ans suivant la date de fabrication AVERTISSEMENT L utilisation d un mauvais d tendeur ou d un flexible n est pas s r toujours v rifier que vous avez les l ments appropri s ava...

Page 24: ...bouteille de gaz du d tendeur du br leur et des pi ces du br leur Les araign es et les insectes peuvent se nicher l int rieur et obstruer les tubes du br leur Un br leur bouch peut provoquer un d part...

Page 25: ...orrig e N essayez pas de la colmater consultez votre revendeur CONSIGNES DE SECURITE D ALLUMAGE DE VOTRE BARBECUE Ce barbecue est con u pour tre utilis en ext rieur loin de tous mat riaux inflammables...

Page 26: ...e Garder 3 m tres de d gagement de tout objet qui puisse prendre feu ou source inflammable comme les feux de signalisation sur les chauffe eaux les appareils lectriques sous tension Locataires Veuille...

Page 27: ...um s 7 Pour teindre le barbecue tourner la valve de la bouteille ou positionner le r gulateur sur OFF ensuite tourner les autres boutons de contr le de l appareil dans le sens horaire sur la position...

Page 28: ...graisse et de fum e avec de la peinture Les int rieurs des grils gaz ne sont pas peints l usine et ne devraient jamais tre peints Appliquer une forte solution de d tergent et d eau ou utiliser un nett...

Page 29: ...in du br leur l aide d un tournevis 4 Soulever avec pr caution chaque br leur l cart des ouvertures de soupape Insectes Fait quelques fois des araign es et autres insectes grimpent dans les tubes du g...

Page 30: ...souple ne pas utiliser une brosse m tallique en laiton ins rer la brosse travers chaque tube et br leur plusieurs fois C Portez une protection oculaire utilisez un tuyau d air pour forcer l air dans l...

Page 31: ...l apparence d une peinture caill e cela signifie que la cuisson la graisse s est transform e en carbone et a commenc l cailler Nettoyez soigneusement avec une solution d eau chaude savonneuse Rincer...

Page 32: ...D THE MANUAL CAREFULLY BEFORE ASSEMBLING AND OPERATING THE APPLIANCE ACCESSIBLE PARTS MAY BE VERY HOT PLEASE KEEP YOUNG CHILDREN AWAY PLEASE RETAIN THE MANUAL FOR FUTURE REFERENCE PLEASE REMOVE ANY TR...

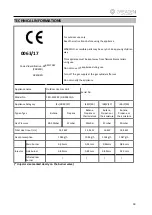
Page 33: ...use he appliance Appliance name Outdoor Use Gas Grill Serial No Model No CBD 310CBY GR 3B31NA Appliance Category I3 28 30 37 I3B P 30 I3B P 37 I3B P 50 Butane Butane Butane Type of gas Butane Propane...

Page 34: ...e BBQ for use should be stored outdoors and well away from the appliance This appliance is not intended to use on recreational vehicles or a marine environment Only gas cylinder 7kgs or under could be...

Page 35: ...on whenlit Have a match or barbecue lighter ready before the propane is turned on If the barbecue does not ignite turn the control valves off then wait five minutes before trying again KEEP THE LIGHTE...

Page 36: ...filled When transporting a propane tank make sure it remains in an upright position Milk cartons work well for this as they are just the right size to hug the tank securely The best place for the tank...

Page 37: ...ISCONNECTION THE GAS BOTTLE ALWAYS CARRY OUT A LEAK TEST PLEASE SEE LEAK TEST DETAILS IN USER MANUAL PLEASE MAKE SURE THAT THE SIDE BURNER IS CONNECTED AND TIGHTENED BEFORE USING THE BBQ FAILURE TO CO...

Page 38: ...esulting in small brown specs on the surface If scouring is required to remove stubborn cooking residues use a soft nylon pad non abrasive DO NOT USE ABRASIVE CLEANING COMPOUNDS use cream type If the...

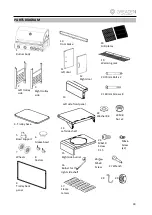
Page 39: ...ide 4 Trolley base 5 3 Right trolley side 13 Left side front panel 14 Left side shelf 21 60mm Screw x 8 22 Washer 8 4 23 M8 Nut x 2 Bowl support 6 Grease bowl 7 Wheels 8 Castors 15 Right side burner 2...

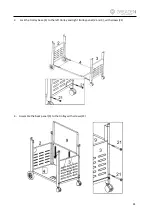
Page 40: ...0 ASSEMBLY INSTRUCTIONS 1 Attach locking castors 8 to the trolley panel 3 tighten them with a spanner 27 2 Assemble the wheels 7 to the right trolley panel 2 secure with screws nuts and washer 20 22 2...

Page 41: ...41 3 Lock the trolley base 4 to the left trolley and right trolley panel 2 and 3 with screws 21 4 Assemble the back panel 9 to the trolley with screws 21...

Page 42: ...42 5 Assemble the door brace 10 to the trolley with screws 24 6 Assemble the doors...

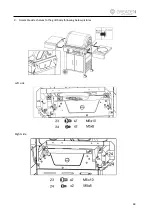
Page 43: ...lift and position the head unit 1 into the cart Carefully lower the burner body 1 onto the trolley Align the two holes on each side secure with four screws 24 8 Attach the left side front panel 13 to...

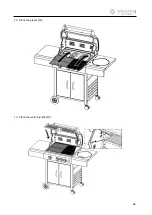
Page 44: ...44 9 Assemble side shelves to the grill body following belowpictures Left side Right side...

Page 45: ...45 10 Place the thermometer 11 Place the flame tamers 17...

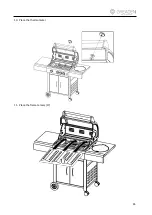
Page 46: ...46 12 Place the grates 18 13 Place the warming rack 19...

Page 47: ...removable and renewable If it is damaged after several uses a replacement can be purchased from mostsupermarkets Dimensions 147x122x50mm 15 Assemble the side burner this is a loose fit but make sure t...

Page 48: ...48 16 Connect the ignition lead 17 Attach the two hooks 28 with the two nuts 29 18 How to use the manual match...

Page 49: ...ery use for approx 15 minutes will keep excessive food residue to a minimum DO NOT Lean over appliance when lighting Leave cooking food unattended Store combustible material gasoline or flammable liqu...

Page 50: ...The length of the hose must be 0 7 meters minimum and 1 5 meters maximum Worn or damaged hose must be replaced Ensure that the hose is not obstructed kinked or in contact with any part of the barbecue...

Page 51: ...a spanner to tighten it onto the connection thread If the hose is replaced it must be secured to the appliance and regulator connections with hose clips Disconnect the regulator from the cylinder acco...

Page 52: ...r gas dealer LIGHTING YOUR BARBECUE This barbecue is designed for use outdoors away from any flammable materials It is important that there are no overhead obstructions and that there is a minimum dis...

Page 53: ...ft clearance to objects that can catch fire or sources of ignition such as pilot lights on water heaters live electrical appliances etc Apartment dwellers Check with management to learn the requiremen...

Page 54: ...e burners are lit 7 To turner the barbecue OFF turn the cylinder valve or regulator switch to the OFF position and then turn all of the control knobs on the appliance clockwise to the OFF position If...

Page 55: ...NOT mistake brown or black accumulation of grease and smoke for paint Interiors of gas grills are not painted at the factory and should NEVER be painted Apply a strong solution of detergent and water...

Page 56: ...er for any damage cracks or holes If damage is found replace with a new burner Reinstall the burner check to ensure that the Gas valve orifices are correctly positioned and secured inside the burner i...

Page 57: ...ube and out the air ports Check each port to make sure air comes out each hole 5 Wire brush entire outer surface of burner to remove food residue anddirt 6 Clean any blocked ports with a stiff wire su...

Page 58: ...lean thoroughly with strong hot soapy water solution Rinse with water and allow to completely dry NEVER USE OVEN CLEANER Interior of Barbecue bottom Remove residue using brush scraper and or cleaning...

Page 59: ......

Reviews: