


32
Installing a New Module
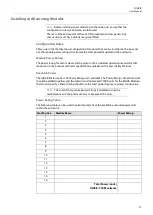
Before installing a new module, consult the Power Rating Table on the previous page to ensure
there is adequate power available.
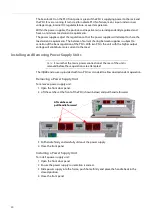
To install a new module:
1 Open the front panel.
2 Remove the module retaining bar.
3 Choose an empty slot position for the module.
4 At the rear of the enclosure remove the screws securing the blanking plate associated with
the chosen slot position. Store the blanking plate in a safe place for future use.
5 Ensuring correct orientation, fit the rear connecting panel (supplied with the new module)
to the rear of the enclosure in the vacant aperture and secure with the fixing screws
provided.
6 At the front of the enclosure, (ensuring correct orientation) carefully slide in the new
module until it fully mates with the rear connector panel.
7 Refit the module retaining bar.
8 Close the front panel.
9 Update the Power Rating table on the previous page.
Removing a Module
To remove a module:
1 Open the front panel.
2 Remove the module retaining bar.
3 Carefully slide out the desired module.
If a different type of module is to be installed in this position, proceed as in Installing a New
Module.
If the slot is to be left vacant, proceed as follows:
4 Refit the module securing bar.
5 Close and secure the front panel.
6 At the rear of the enclosure, fit the blanking plate in the appropriate position using two
screws.
7 Update the Power Rating table.
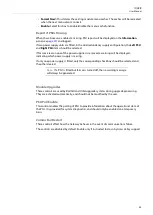
Replacing a Module in a Live Environment
Grass Valley recommends that the mains connections are removed before performing the
operations described above. However, in a live environment this may not be possible, so the
modules are designed to be removed and installed without switching the power off.
:
Note:
Ensure that the mains power connection at the rear of the unit is
removed before these operations are performed.
Note:
Ensure that the mains power connection at the rear of the unit is
removed before these operations are attempted
Note:
It cannot be guaranteed that there will be no disturbance to the
operation of other modules in the enclosure if a module is replaced
without first powering down the enclosure.
Summary of Contents for IQH4B
Page 1: ...www grassvalley com IQH4B IQRCG00 User Manual Issue 2 Revision 3 2022 06 30 ...
Page 16: ...xvi ...
Page 20: ...xviii ...
Page 80: ...78 ...


